Full SSL VPN, clientless access, ICA only. These are some of the deployment options you have available when configuring a NetScaler Gateway Virtual Server. This post explains how you can set up and configure these different deployment types and what they mean.
You may just be interested in giving users access to the corporate XenApp or XenDesktop environment. You may want to give users access to intranet web pages or file shares or corporate email via the web.
Let us have a look at some of the different options and how they view when accessed via the web browser.
ICA Proxy – Access to XenApp/XenDesktop infrastructure
So, you have your XenApp/XenDesktop environment, and you are only interested in giving your users access to their Citrix published applications and desktops via NetScaler Gateway and StoreFront.
To achieve this, you set up an ICA Proxy NetScaler Gateway vServer and point it at your internal StoreFront servers.
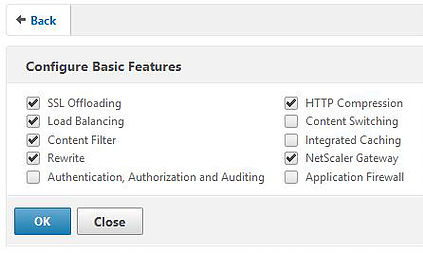
Firstly, ensure the NetScaler Gateway feature is enabled by navigating to Configuration -> System -> Settings -> Configure Basic Features and checking the box next to NetScaler Gateway.
You can also right-click on NetScaler Gateway -> Enable Feature. 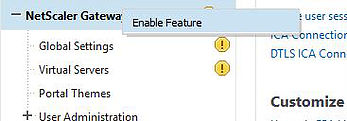
Configure an authentication method. NetScaler needs to authenticate your users in some way. This can be via LDAP, RADIUS, Local etc. I have chosen to configure an LDAP server which will probably be the most popular choice for you too. Configuring LDAP servers and the policies they are bound to can be done by navigating to Configuration -> NetScaler Gateway -> Policies -> Authentication -> LDAP. My LDAP policy expression is ns_true.
Notice I am not using LDAPS (Secure LDAP). If you have a requirement to use LDAPS, go here for a guide on setting that up.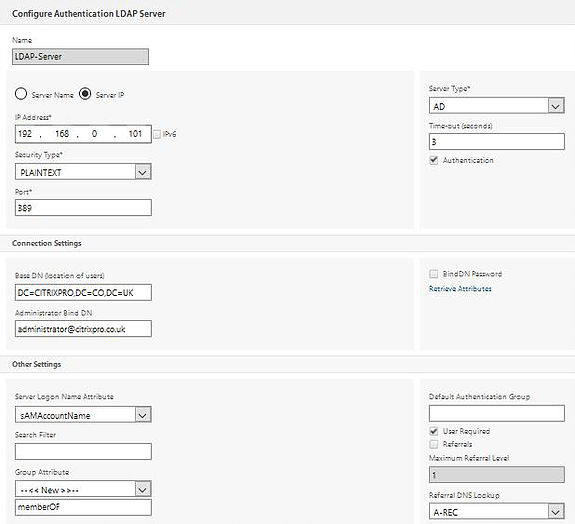
Configure a NetScaler Gateway Session Profile which will contain the parameters needed to direct your users to StoreFront. To do this, navigate to Configuration -> NetScaler Gateway -> Policies -> Session. On the Security tab, set Default Authorization to Allow.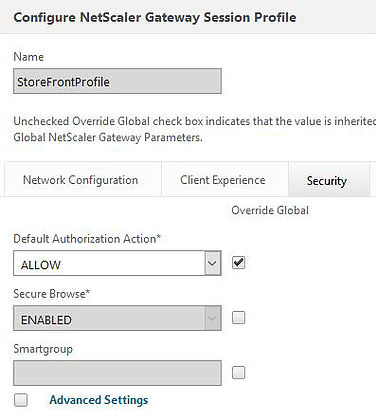
On the Published Applications tab of your Session Profile, turn ICA Proxy to On and enter your Web Interface/StoreFront Receiver for Web address as I have below.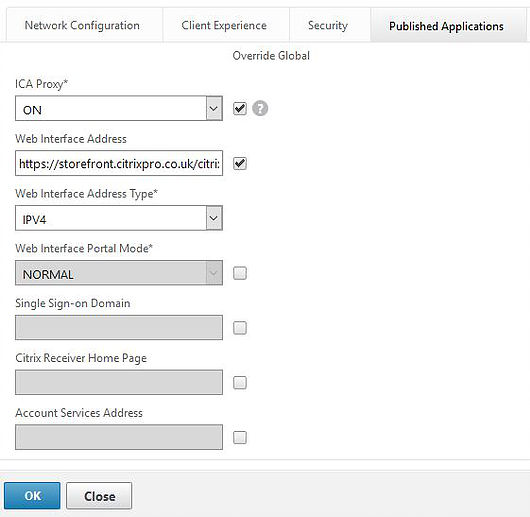
You will then need to bind your Session Profile to a Session Policy.
You will also need a certificate in place to secure communication between NetScaler and the client. The vServer uses SSL. In production you will most always use a trusted third party certificate. In this demo however I’ve used and installed an internal certificate generated by a Microsoft CA. The certificate is named NetScalerCert. I also have the Microsoft CA Root Certificate installed on the NetScaler, named RootCert.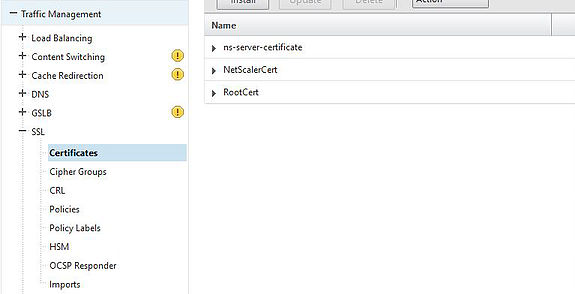
Because I’m using internal certificate I’ve also installed the Root CA certificate on NetScaler and created a link between itself and the NetScalerCert certificate.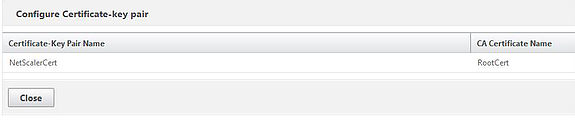
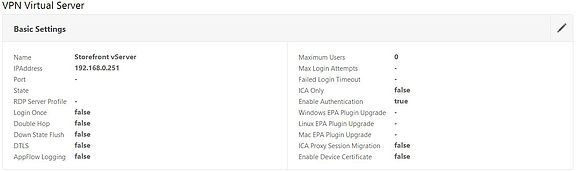
Now, create an NS Gateway vServer. Specifying a name, IP Address, and port. Notice how ICA Only = True which means this vServer will act in Basic Mode and only proxy ICA traffic to XenApp/XenDesktop. Also note the CA and Server certificates have been bound to the vServer (by me). Do the same on your vServer.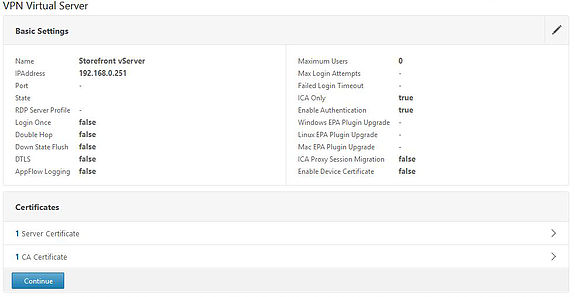
Below is the NetScaler certificate vServer binding.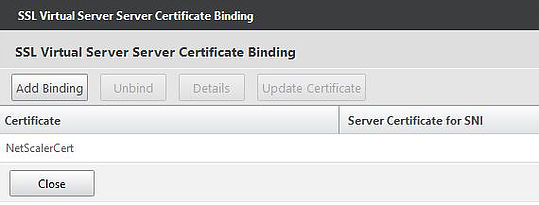
Next, bind the Session Policy you created earlier to the vServer. The Session Policy should come with an expression such as ns_true which means this Session Policy will apply to any user connecting to this NetScaler Gateway vServer.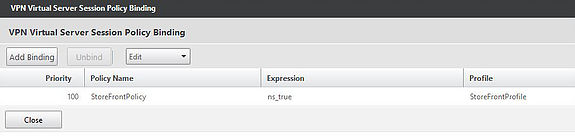
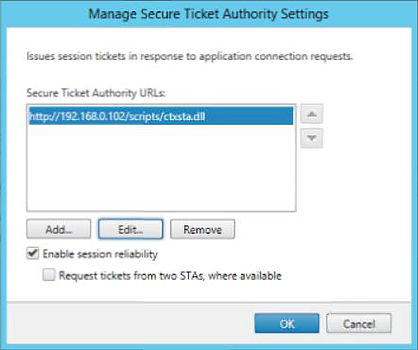
Next, add STA servers to your vServer. These must be the same STA servers your StoreFront configuration holds (which you will configure later). It is recommended to use the IP of your STA rather than FQDN.

Finally, bind the LDAP authentication policy we created earlier which includes the details of our LDAP server. 
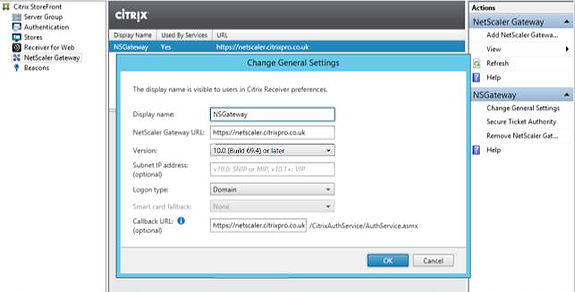
There are also some settings to configure over in StoreFront. Navigate to NetScaler Gateway -> Add NetScaler Gateway within your StoreFront management console to add your NetScaler appliance as shown below. The NetScaler Gateway URL you use must be different from the internal StoreFront address.
Add STA’s to your configuration The STA’s you add must be the same as those configured in NetScaler.
Add the Pass-through from NetScaler Gateway authentication method to your StoreFront configuration.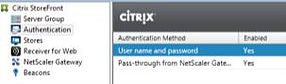
Browse to Stores -> Enable Remote Access and select No VPN tunnel. Choose the appliance you have just added beside NetScaler Gateway appliances.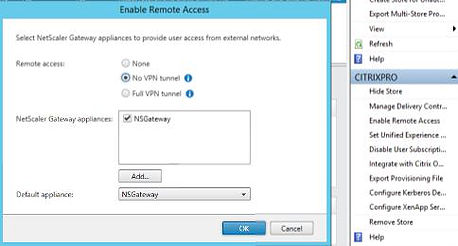
Now browse to the NetScaler Gateway URL and you will reach the login page. My URL is https://netscaler.citrixpro.co.uk. Notice this is quite a different look to the green Receiver for Web site or the more recent StoreFront 3.0 look. You may want to change that to keep the same look and feel for your users.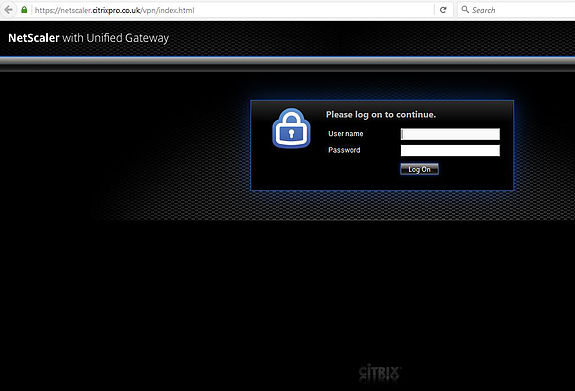
To make the change, go back to your NetScaler Gateway vServer and you will see a Portal Themes section that you can add to the middle canvas.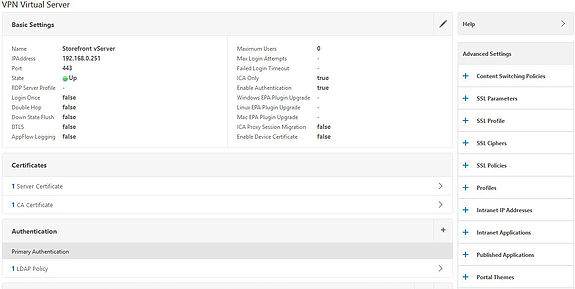
Bind a theme to the vServer. Choosing the Greenbubble theme gives you the green Receiver for Web look whilst X1 gives you the StoreFront 3.0 look.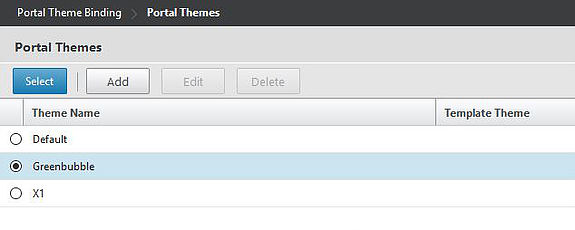
Click on Bind.
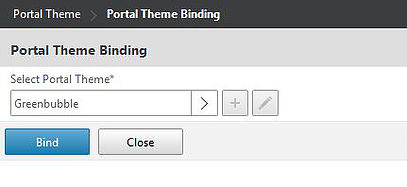
Now click Done.
You can also set the portal theme at a global level. Configuration -> NetScaler Gateway -> Global Settings -> Change Global Settings -> Client Experience.
Here you see an overview of the vServer which is in the up state.
Remember to save the running configuration.![]()
Now returning back to the NetScaler Gateway URL, the more familiar Receiver for Web look appears.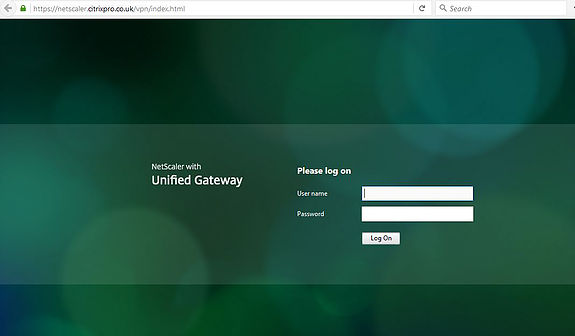
Also we can take a quick look at the certificate I am using, which matches the URL of netscaler.citrixpro.co.uk.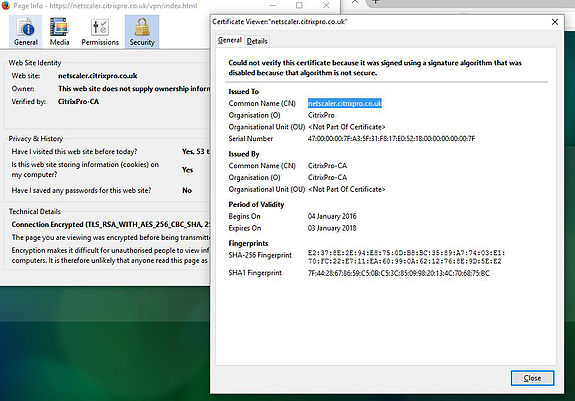
Once authenticate with NetScaler, you’ll be passed through to StoreFront (if all is good!) and be able to launch applications through a secure session.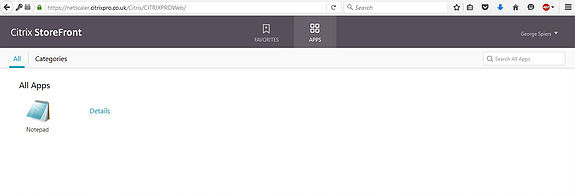
And a final look at the vServer now shows on current user connected.
What if we want to give users full VPN access or clientless access instead? To do that, we can set up a vServer in Smart Access mode. Notice how the below setting of ICA Only = False. This means our vServer is set to Smart Access mode which is needed for client and clientless access. For simplicity, I have used the existing vServer created for ICA Proxy.
So, disable ICA Proxy.
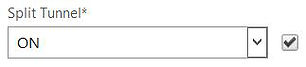
Now go in to your Session Polciy (which is bound to the NetScaler Gateway vServer) and turn Split Tunnel on or off. Split Tunnel determines how the connecting users traffic flows. If set to on, the traffic destined for external networks i.e. Google will go via the clients internet connection. If set to off, all internal and external client traffic will route through the NetScaler. By default, this setting is set to off.
For this guide, I am allowing Clientless Access. This means that users can connect to my NetScaler Gateway without needing the NetScaler Gateway plugin. If users want full VPN access to the corporate network however they will need the plugin as you will soon see.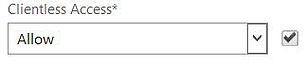
I am also alowing Client Choices which will present connecting users with the options of initiating a full VPN session, clientless access or access to StoreFront.
![]()
Once you have all the desired settings in place be sure to save your running configuration and then browse to the NetScaler Gateway URL, then login.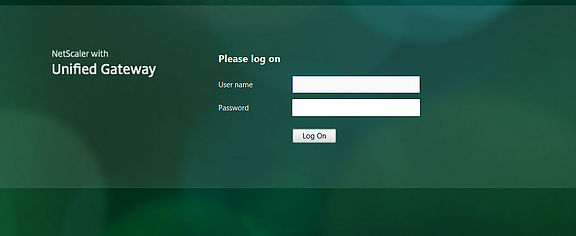
The Client Options setting I enabled previously brings to you the screen below which contains a number of options to choose from. You can get internal network access with the NetScaler Gateway plugin, connect via Clientless Access, or connect to the corporate StoreFont Receiver for Web site to access your applications and desktops.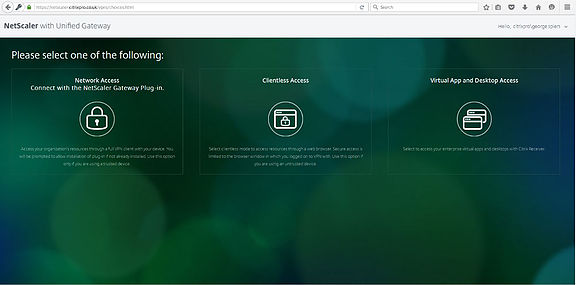
If you click Clientless Access you get the below screen. Here you can access web applications and file shares published from the corporate network. You can also access company webmail. As I have nothing configured yet I will show you how to create an Enterprise Web Sites shortcut and a file share shortcut.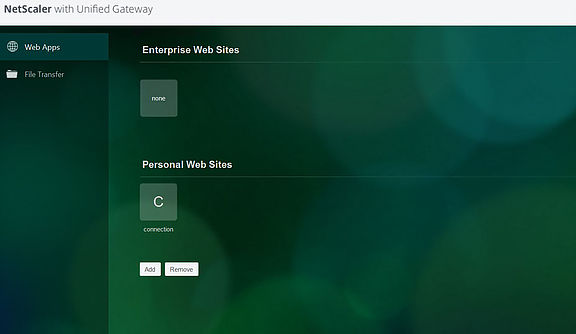
To create an Enterprise Web Sites (bookmark) go back to and edit your NetScaler Gateway vSerer and under the Published Applications section click on No URL.
Click the + icon to add a new URL.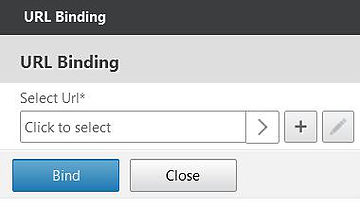
Enter the address of a corporate intranet web page. I’m going to create a bookmark to my ADCS certificate web services site for lack of imagination. You can specify icons etc. but for now I will leave the non-mandatory fields blank.
After clicking OK on the above screen once you have your settings in place, you then click on Select to bind the new bookmark to your NetScaler Gateway vServer.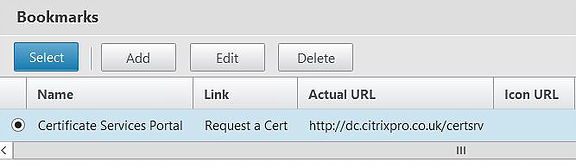
Now it shows we have 1 Url attached to the NetScaler Gateway vServer. Save your configuration.

Back on the Clientless Access site the newly created bookmark appears under Enterprise Web Sites.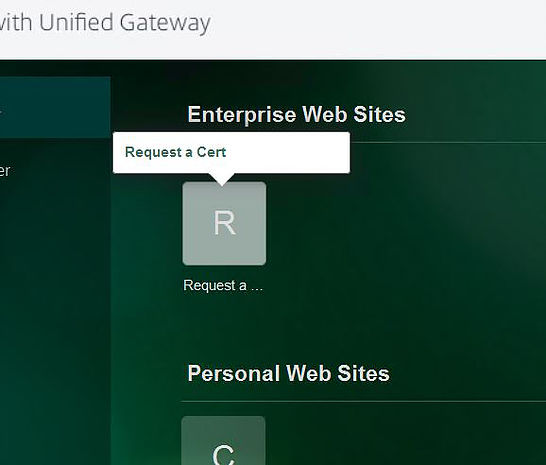
Clicking the bookmark opens a new tab on our web browser, and takes us straight to the internal ADCS web page. If you have lots of intranet web sites and web applications and want to provide secure access to them externally via NetScaler then this can be a great way to do just that.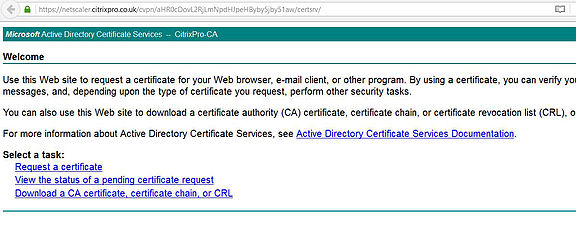
There is also the ability to create your own bookmarks under Personal Web Sites, by clicking on the Add button.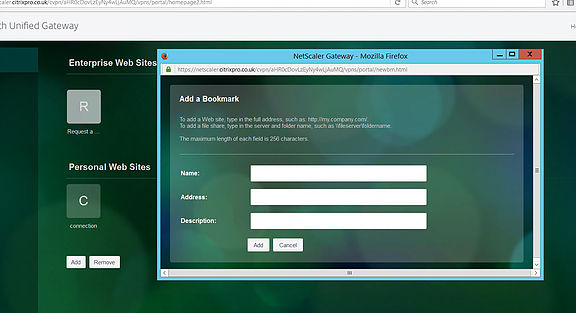
How can we create a shortcut to a corporate file share?
Well all you need to do is browse to Configuration -> NetScaler Gateway -> Resources -> Bookmarks and create a new bookmark. Yes you are also creating a bookmark for a file share. An alternative way to create a bookmark is the one we used earlier. Edit the NetScaler Gateway vServer and create a bookmark that way.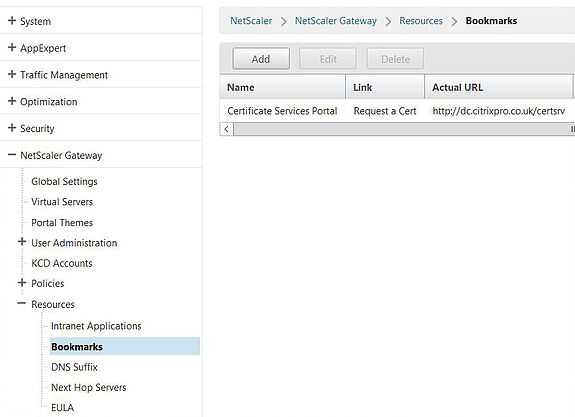
Creating a bookmark as you did before, instead of using a URL enter a share path as shown below and click create. Lastly bind the new bookmark to your NetScaler Gateway vServer and return to the clientless access web page.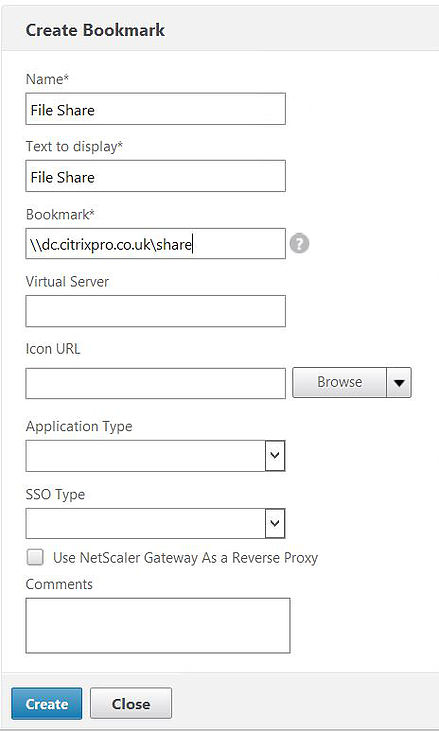
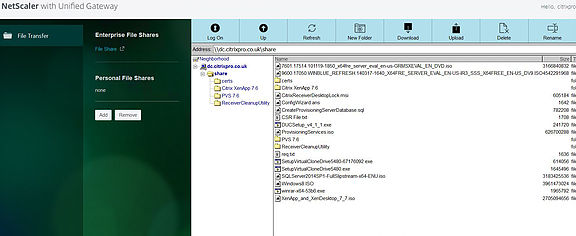
After a log off/on, the file share will appear and you can browse the files on that share, download, rename, upload etc.
Make sure you have the appropriate Windows security and share permissions in place to allow your users to access the shares and files they need.
If you have OWA or any webmail system in your environment which is likely, you can publish this against Clientless Access. Edit your Session Policy and under Client Experience -> URL for Web-Based Email enter the URL for webmail.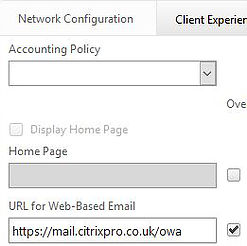
Now back on the Clientless Access site an email section appears which takes you to the webmail portal.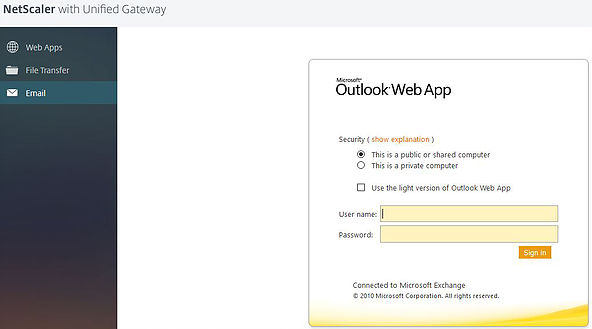
Under Client Experience -> Clientless Access URL Encoding by default URLs are obscured from the users view as below.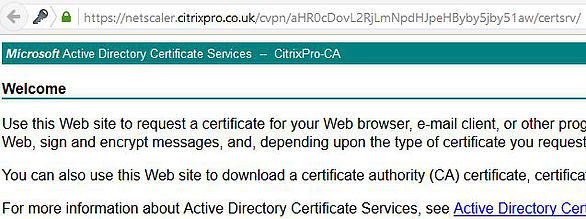
If you want to make this visible to users set the option to Clear in your Session Policy and click OK.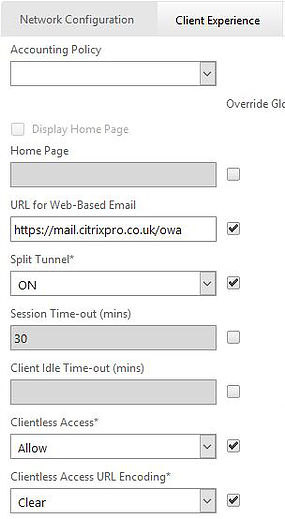
Now users can see the internal URL path. Users will only see this change on next log on when they pick up the newly edited Session Policy.
Pingback: Login Netsclaer Gateway Session – Logini helper
JGIT
September 4, 2025Any chance on getting a revised version of this that uses Advanced policies rather than the classic ones?