When it comes to Skype for Business with XenApp or XenDesktop, your first action will be to optimize the delivery of audio and video calls using the Skype for Business Optimization Pack. In some cases, the Skype for Business Optimization Pack will not suit so it is equally important you have the correct or best possible fallback procedures in-place to support such users.
For the Skype for Business Optimization Pack see https://jgspiers.com/skype-for-business-xenapp-xendesktop/
Configuring Generic Lync is what you should do for those who cannot avail of the Skype for Business Optimization Pack advantages. Users who cannot use the optimizations may be:
- Users who do not have the HDX RealTime Media Engine installed on their PC due to lack of permissions or other reasons out of the users control such as using Chrome OS.
- Users who make use of Receiver for HTML5.
Using Generic Lync. The Real-Time Media Connector running on each VDA is used for video or/and audio processing the such video/audio traffic via Skype for Business is delivered via ICA.
Here are the suggested and best practice configurations you should make for users falling back to an unoptimized delivery of Skype for Business.
Note that 10 concurrent users on a XenApp server can be in a fallback state. Any additional user will simply receive a Not Connected error message from the RealTime Connector.
Set Audio quality to Medium – optimized for speech – This is the recommended audio level when delivering VoIP applications such as Skype for Business. Audio is compressed up to 64Kbps which results in a slight degradation of quality but consumes very low bandwidth. Audio over Real-time transport is also highly recommended and works with the medium audio quality setting.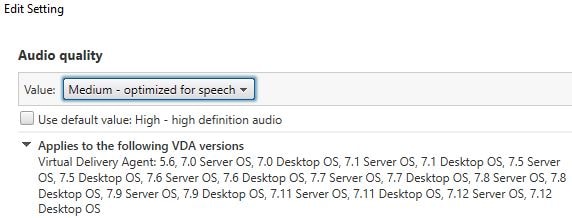
Set Audio over UDP real-time transport to Enabled – Doing so allows audio to travel from VDA to client over UDP rather than TCP. This improves traffic performance especially when there is network congestion or packet loss.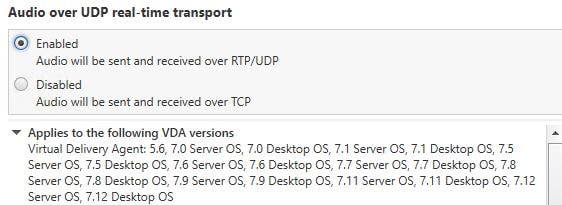
The above setting is enabled by default so you may not need to configure it. UDP audio is only available on Windows and Linux Citrix Receiver clients.
Another requirement is for UDP Audio to be installed on your VDA machines. When installing the VDA, tick to enable the audio Real-Time Transport feature.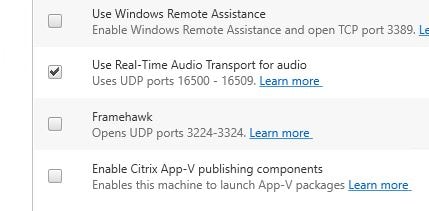
The port range used for Audio over UDP is by default 16500 to 16509. These ports are opened by default when installing the VDA and choosing the Real-Time Audio feature.
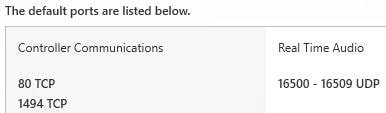
Two ports from this range will be used during an active session. The port range can be changed using Citrix Studio policy setting Audio UDP port range.
Keep in mind that the client machine will also need to be configured for audio over UDP. To do this use the Receiver.admx Group Policy template file. Navigate to Computer Configuraton -> Administrative Templates -> Citrix Components -> Citrix Receiver -> User experience -> Client audio settings. Choose Enabled, set Sound quality to Medium and tick Enable Real-Time Transport.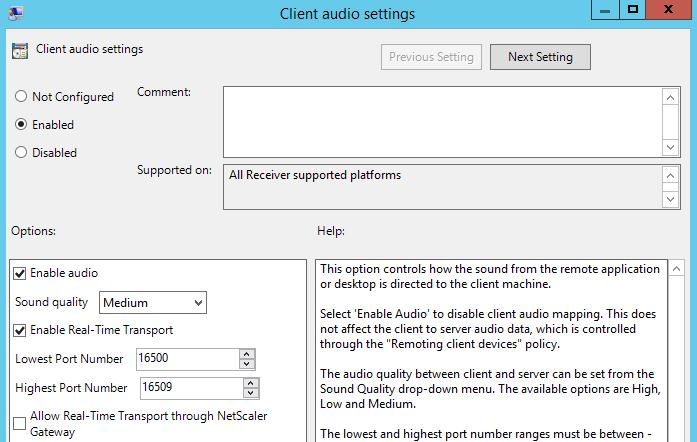
Because by default audio over UDP is not encrypted. For HDX sessions running through NetScaler Gateway you need to configure audio over DTLS. Tick DTLS on the NetScaler Gateway Virtual Server and unbind/rebind the server certificate.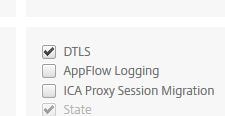
Citrix Receiver client also needs configured to allow Real-Time transport through NetScaler Gateway. Again use the Receiver.admx file either through Group Policy or local gpedit.msc. The setting you want to tick is called Allow Real-Time Transport through NetScaler Gateway.
Note: Since users may use machines not managed by the domain, you can configure UDP Audio by editing the default.ica file on StoreFront and including audio related commands. This applies to all connections routing through that particular store.
Set Windows Media redirection to Allowed – This setting allows the client machine to decompress and render webcam media. Webcam video compression shares the same underlying technology and virtual channel as Windows Media Redirection. This setting is also enabled by default.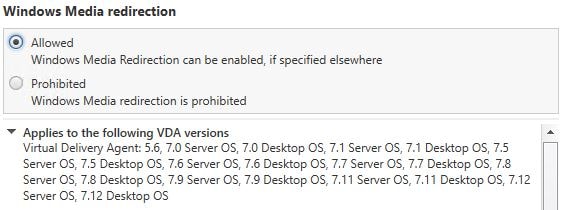
Set Multimedia conferencing to Allowed – This setting is enabled by default and allows support for video conferencing applications. 
You should also configure ThinWire Adaptive Display v2 to compress actively changing regions of the screen using H.264 compression. See https://jgspiers.com/citrix-thinwire-hdx-graphics-modes/