This post describes the actions taken to create an OS Layer in Citrix App Layering 4.x running on Hyper-V with Citrix PVS. You are also shown how to add new versions to the OS Layer for the purpose of patching, upgrading and making changes to the OS Layer image. Here you will see how the Platform Layer and Image Template plays a key part in packaging and deploying complete system images.
To create an OS Layer, you must have the App Layering ELM (Enterprise Layer Manager) appliance installed. Read http://www.jgspiers.com/citrix-app-layering/
This guide deploys an OS Layer using App Layering on Hyper-V. For VMware instructions, see Carl Stalhood’s App Layering OS Layer and Platform Layer post.
Known Issues
- When adding a version to your Windows 10 layer to perform an upgrade, change the Max Layer Size from 30GB to 60GB.
- Windows 10 sometimes creates a Recovery Volume as a new partition on the same disk as the OS Layer version. This volume needs to be removed before the finalize the OS Layer version. This is because the Recovery Volume can cause boot failures.
When adding a version to your OS Layer you must package the layer on the same Hypervisor from which you imported the OS during layer creation. This isn’t the same as packaging Application Layers. Application Layers can be packaged on any supported hypervisor of your choice so long as you are using a Platform Layer for packaging with the correct hypervisor tools installed to support the application installation.
Other points to note when creating an OS Layer:
- .NET Framework 4.5 must be installed on any layered image when Elastic Layers are used on top of that layer.
- You should install .NET 3.5, 4.6 and any Visual C++ Redistributable Packages inside of the OS Layer. This will prevent the possibility of .NET or Visual C++ conflicts coming from multiple layers as many applications depend on these components and will each install them in their own Application Layers if the components are not found in the OS Layer. Keeping these components in the OS Layer will also help with patching.
- Do not use periods in the image file name when using PVS.
- You must disable IPv6 in the OS Layer when using PVS. Do not disable in the Platform Layer. Also, disabling IPv6 by unchecking the option within network adapters isn’t good enough. You must actually disable IPv6 using the Registry in the OS Layer to ensure new network interfaces used with Target Devices automatically have IPv6 disabled on them. I show you how to do this further down the post. If you created a Platform Layer before disabling IPv6 in the OS Layer, you must create a new Platform Layer after IPv6 is disabled in the OS Layer.
- Do not disable 8.3 name creation or NTFS last access time stamps. These are used by App Layering.
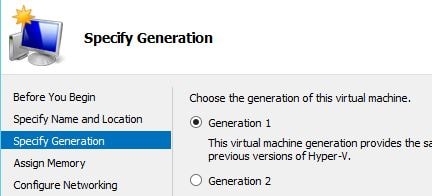
- UEFI is not supported for the OS Layer. This is because the OS Layer must be partitioned with MBR rather than with GPT (not supported). In our case, we are using PVS with Hyper-V. That means you cannot build the OS Layer using a Generation 2 Virtual Machine. You must use a Generation 1 machine. To boot in to PVS, you must then use the Legacy NIC to boot in to a Gold Image regardless if the bootstrap is delivered by BDM or TFTP. Your Target Devices should also contain a Synthetic NIC to take over streaming once the Target Device has booted. See https://jgspiers.com/citrix-pvs-synthetic-nic-streaming-with-hyper-v/ for more information.
- When using Hyper-V to create the OS Layer, use a machine with one Legacy NIC when building the OS Layer. I have found that not doing this results in a BSOD when it comes to booting to the published vDisk.
- Make sure your PVS Target Device hardware settings match those set in the OS and Platform Layer hardware settings. If the number of CPUs in your Target Device VMs are larger than what was used during OS Layer creation for example, you may get a reboot required message when the published image is booted.
- If using App-V 5.1 with Unidesk 4.0.8, you may encounter BSODs on the VDA. There seems to be a conflict between the unifltr.sys and AppvStrm.sys mini-filter drivers. Upgrade to 4.1 or above which contains the required hotfixes.
- You cannot install the OS Layer on any drive other than C:\.
♣ Creating the OS Layer Gold Image
♣ Importing the OS Layer in to ELM
♣ Creating a Platform Layer
♣Creating an Image Template
♣ Updating the OS Layer
To begin using Hyper-V create a Virtual Machine as Generation 1.
Ensure the machine is configured with a Legacy Network Adapter. You should not configure any other network adapters on the machine as your Gold Image should only have one network adapter. Install a supported Operating System. You should also fully patch the OS with Windows Updates.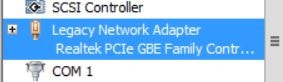
As we are using PVS it is important that you disable IPv6 by opening RegEdit and navigating to HKLM\System\CurrentControlSet\Services\TCPIP6\Parameters. Create a REG_DWORD object with a name of DisabledComponents and a value of 0xFF.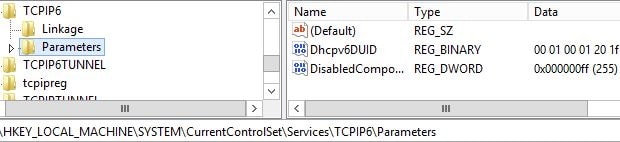
Another requirement is to disable Automatic Updates which can be done via gpedit.msc on the local machine using Local Group Policy Editor.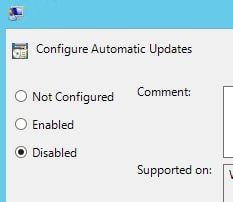
Right-click citrix_app_layering_os_machine_tools_4.6.0 and choose to Run as administrator.
Click Install. The containing files are extracted to C:\Windows\Setup\Scripts\. 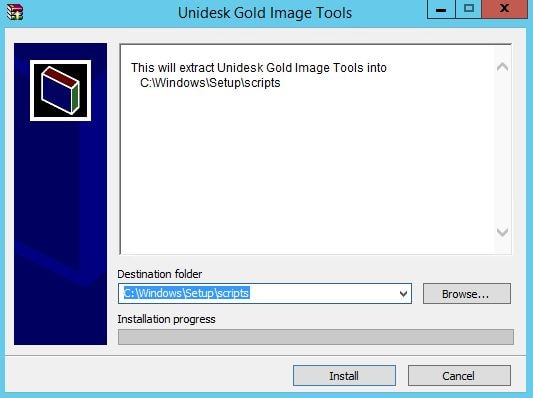
Navigate to the extracted location and run setup_x64. 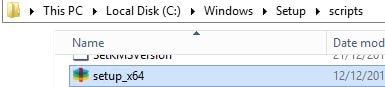
Click Next.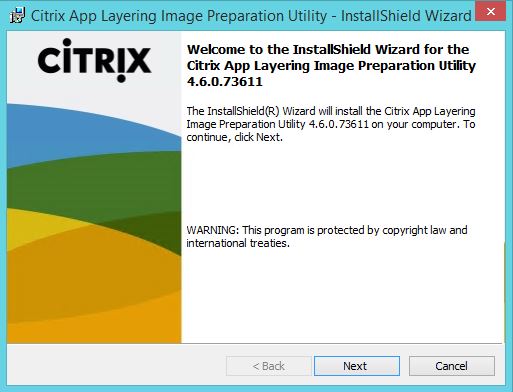
Since we are using PVS there is no need to use an answer file. Click Next.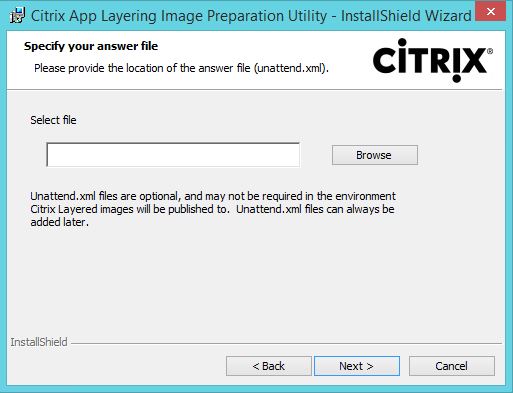
Click Finish. 
During installation of the Image Preparation Utility, a Startup Script should be created which is configured to run kmssetup.cmd. You can view the Startup Script by running gpedit.msc locally.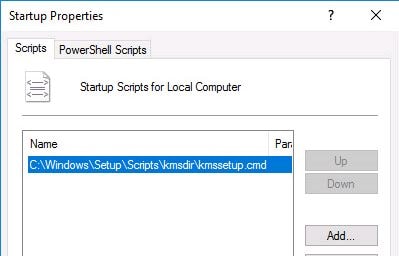
Note: To be safe, right-click C:\Windows\Setup\Scripts\kmsdir\kmssetup.cmd and click Properties. Make sure the file is not blocked. If it is it will not run.
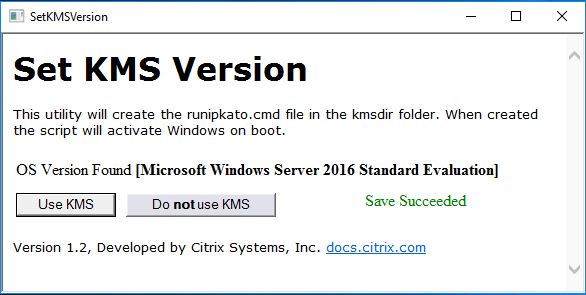
If using versions prior to App Layering v4.11: From an elevated Command Prompt, run C:\Windows\Setup\Scripts\SetKMSVersion.hta”.
Click Save Script. This creates a runipkato.cmd script within C:\Windows\Setup\scripts\kmsdir. The ELM runs this script when publishing an image.
- After installing OS Machine Tools from App Layering 4.11, Set KMS Version runs automatically.
Note: If you are using MCS to distribute your App Layering image, disable the OS Rearm MCS step by running PowerShell command Set-ProvServiceConfigurationData -Name ImageManagementPrep_Excluded_Steps -Value OsRearm from a Delivery Controller. Note that OsRearm is case-sensitive.
Note: To remove the excluded step, run Remove-ProvServiceConfigurationData -Name ImageManagementPrep_Excluded_Steps.
At this stage you should be ready to convert the Operating System you have just prepared in to an OS Layer. Copy the VHD file to the ELM Share that is used by the ELM appliance.
Importing the OS Layer in to ELM:
Log on to the App Layering Management Console and navigate to Layers -> OS Layers -> Create OS Layer.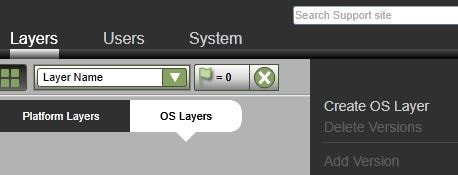
Specify an appropriate name, description, version and maximum layer size. The layer disk will be thin provisioned.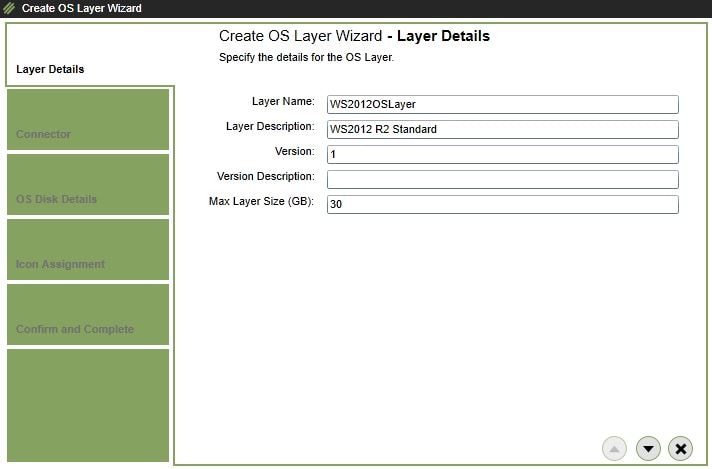
The connector that points to your ELM share should already be configured. If not, you’ll need to create one. Select the ELM Share connector and continue. For information on creating an ELM Share see https://jgspiers.com/citrix-app-layering/#Create-Share 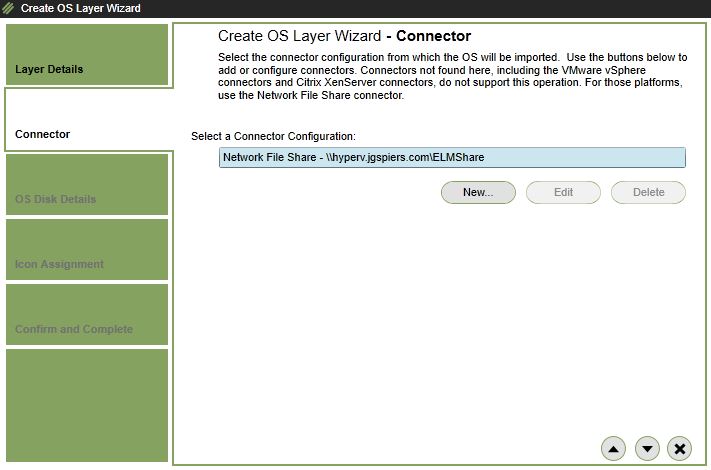
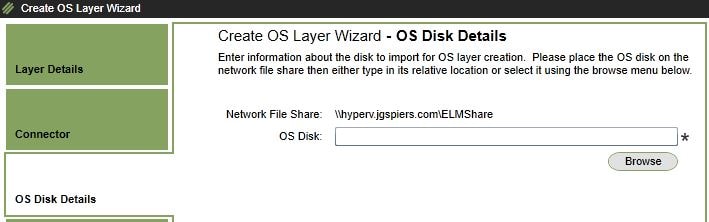
Click Browse.
Expand the ELM share and select the VHDX file to be used for your gold image. Click Choose. 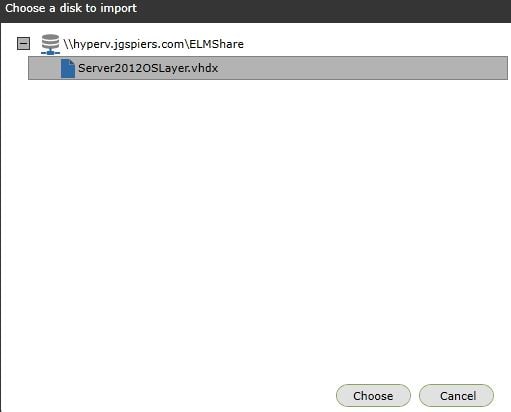
Now click the down arrow. 
Specify an icon for the OS Layer. You can also upload your own icons. 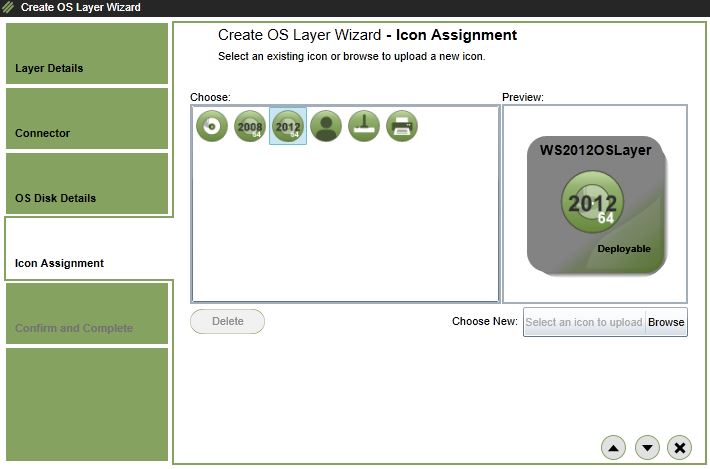
Review the settings and click Create Layer. 
A Creating OS Layer task begins which you can view the details of. This task imports the VHDX you specified in to the ELM Appliances Layering Service storage repository.
Once complete the OS Layer status is set as Deployable. The Creating OS Layer task also reports as done. 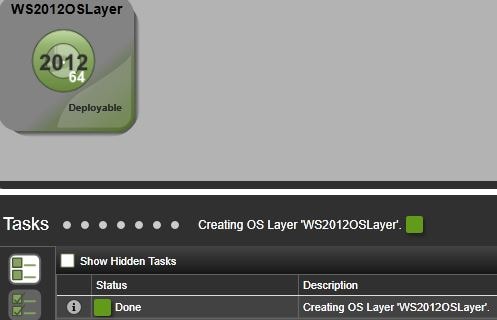
Creating a Platform Layer:
The next step involved is to create a Platform Layer. The Platform Layer normally consists of the hypervisor tools, VDA tools and PVS Target Device software. The Platform Layer is also where you would join the image to the domain and perform any Operating System optimisations. Within the Management Console, navigate to Layers -> Platform Layers -> Create Platform Layer.
Specify an appropriate name, description, version and maximum layer size.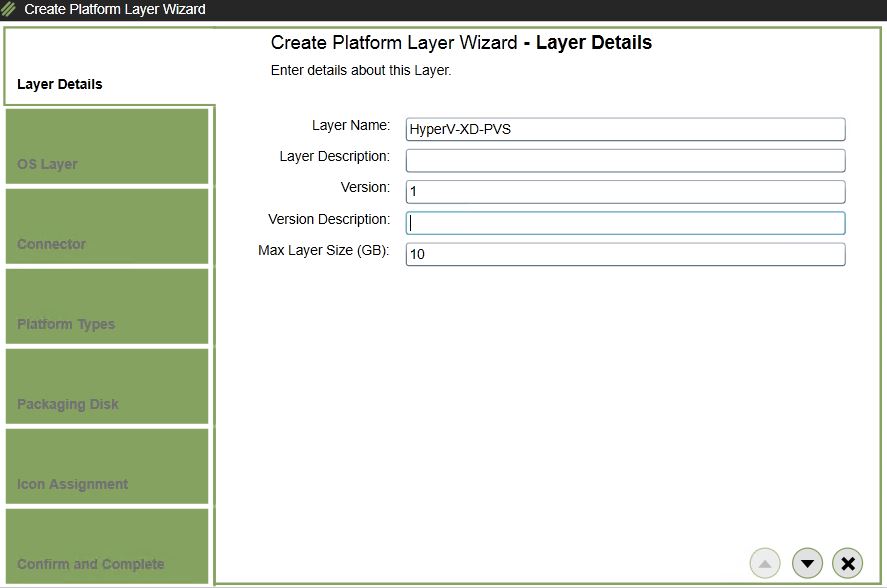
Choose the OS Layer you just imported. The Platform Layer is created based off the OS Layer.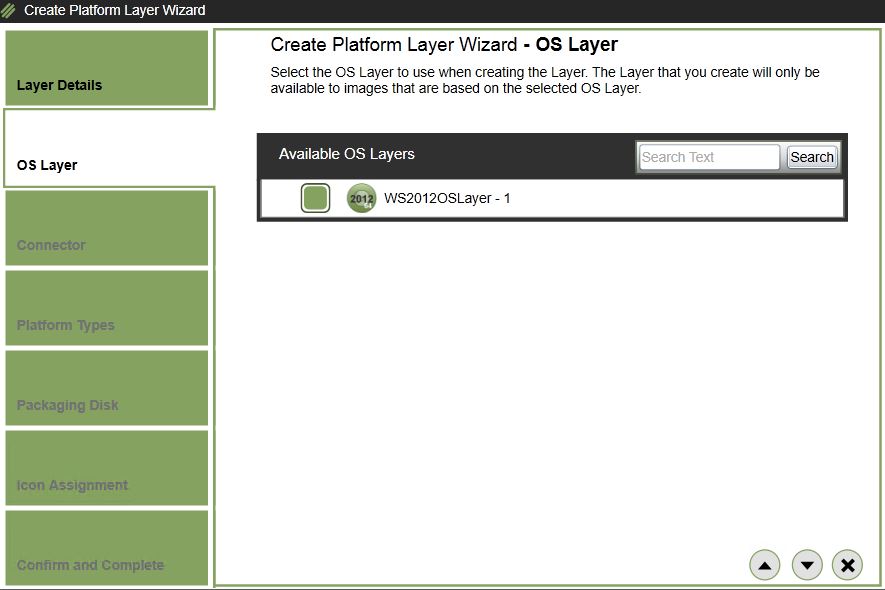
Choose a Hyper-V Connector. You will have to create one if you have not done so already. Prior to App Layering 4.6, you would have had to specify the ELM Share which then resulted in you having two separate disks which require manual attaching to a Packaging VM, which you also had to manually create. Now with a native Hyper-V connector, the Packaging Machine is automatically provisioned.
The Packaging VM is what you use to boot in to the Platform Layer and install the necessary tools. In previous versions this VM was called an Installation Machine.
For steps on creating a Hyper-V connector see https://jgspiers.com/citrix-app-layering/#HyperV-Connector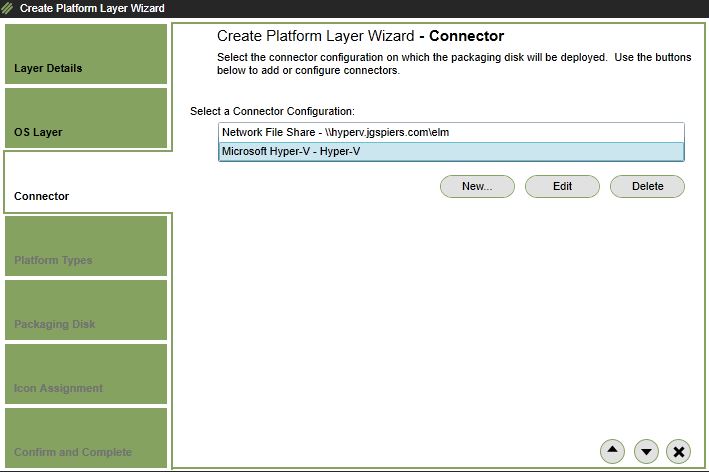
There are two types of Platform Layers you can create. One for packaging layers and one for publishing layers. Since we are publishing a layer, we can select the second radio box. Specify Microsoft Hyper-V for Hypervisor, Citrix PVS for Provisioning Service and Citrix XenDesktop or XenApp for Connection Broker.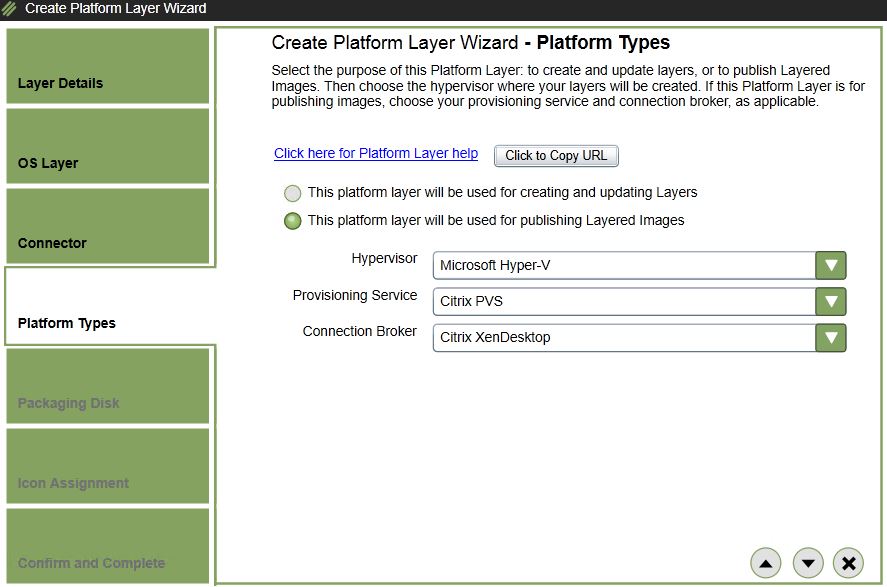
Click the down arrow. If you are publishing to the ELM Share, you are given the option to specify the disk format (VHD/VMDK). 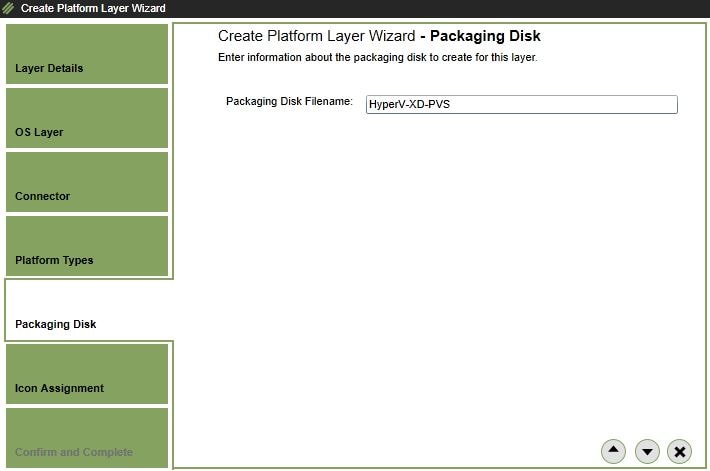
Pick an icon or upload one yourself. 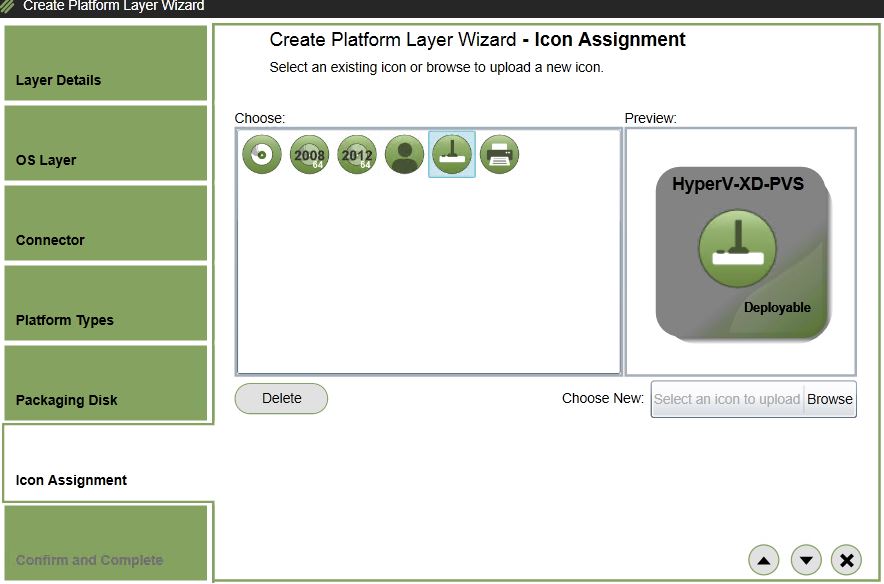
Click on Create Layer. 
After a few minutes you should be informed that the Packaging Machine has been created. At this stage connect to your SCVMM console or Hyper-V Manager.
Connect to newly created virtual machine.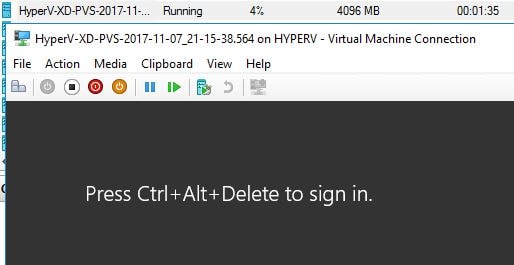
Install Hyper-V Integration Services.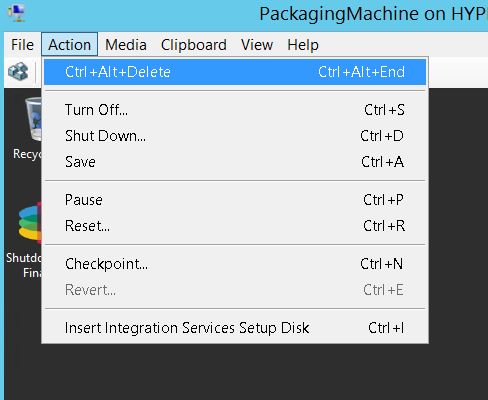
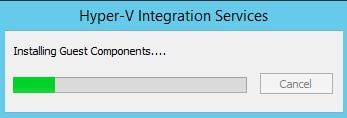
Click Yes to restart. It is safe to restart as many times as you like. Once restarted join the machine to your domain.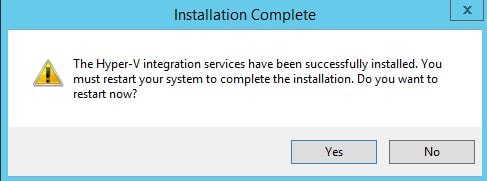
To install the Target Device software, launch the PVS media and click Target Device Installation.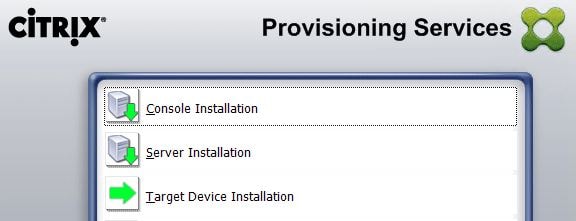
Once the install is complete click Finish. 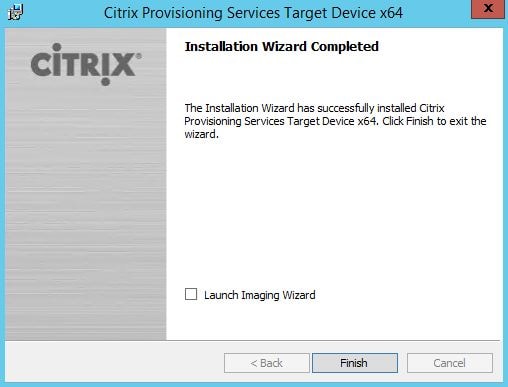
Reboot the machine again.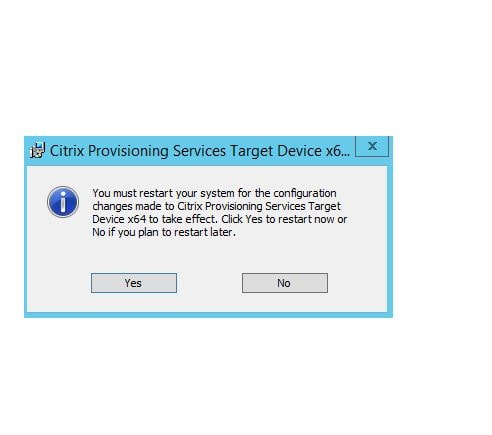 To install the VDA software launch your XenApp & XenDesktop media.
  Select Create a Master Image.
 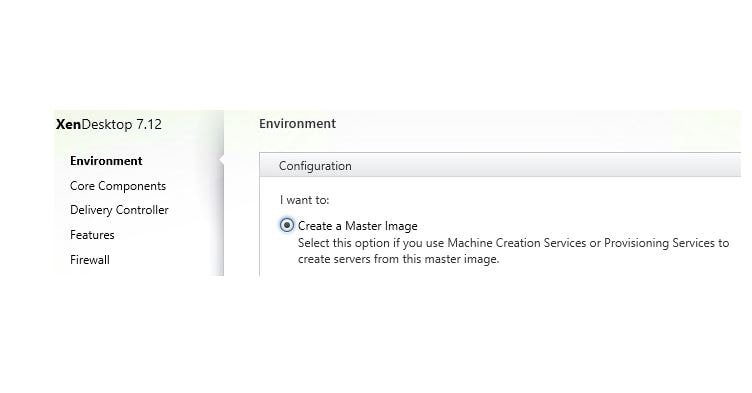 Uncheck Citrix Receiver. Receiver should be installed as an Application Layer.
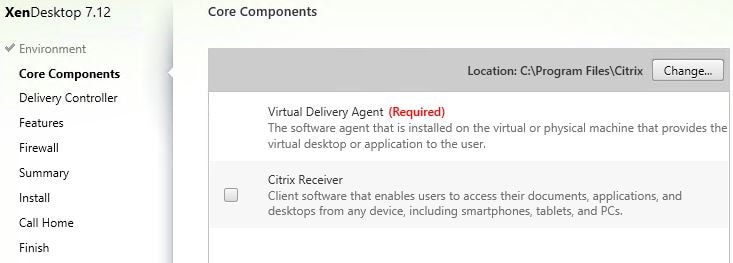
Unselect Optimize Performance. Uncheck/check any other components you need. 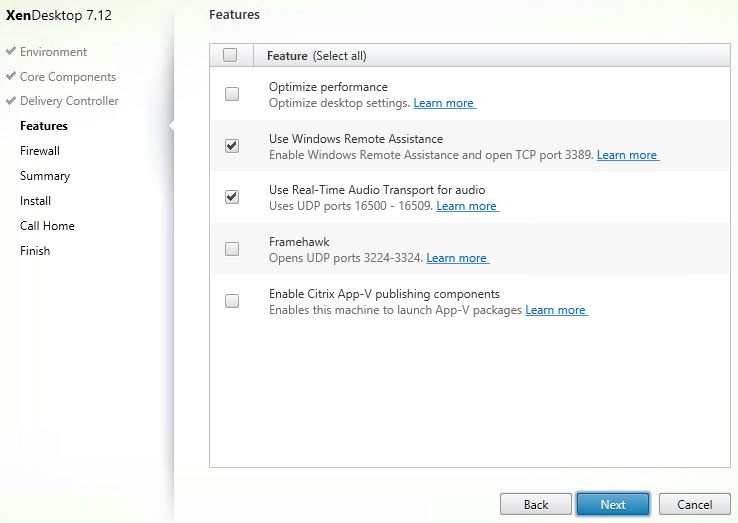
Click Close to restart 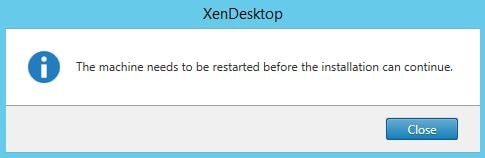
Eventually the VDA installation will complete. Click Finish. The machine will restart for the last time. 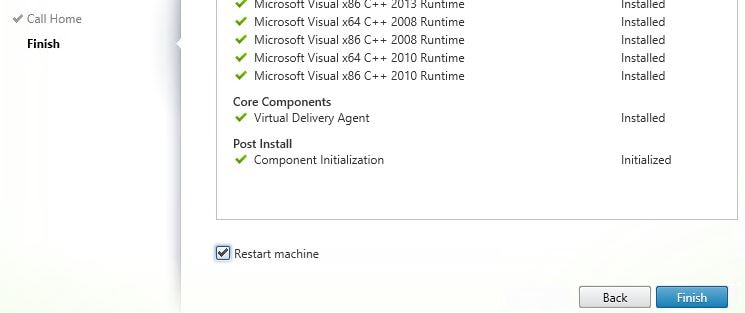
In your Platform Layer launch Command Prompt as an administrator and run command set devmgr_show_nonpresent_devices=1 followed by devmgmt.msc.
Click View -> Show hidden devices.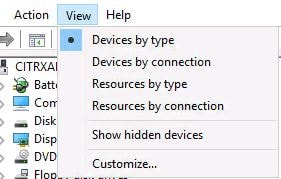
Expand Software devices, right-click Microsoft IPv4 IPv6 Transition Adapter Bus and click Uninstall. 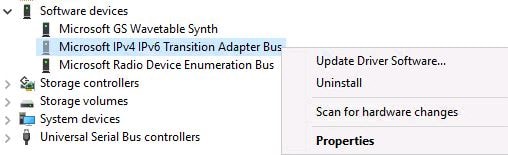
You should now make all necessary optimizations to the gold image by disabling unneeded scheduled tasks and services etc. See https://jgspiers.com/citrix-tips-tricks-tweaks-suggestions/ for pointers and if using Windows Server 2016 see https://jgspiers.com/windows-server-2016-optimisation-script/. Citrix and VMware have optimization tools that allow you to hand pick common optimizations for VDI and SBC machines.
Now that all the required tools are installed and optimisations are completed within the Platform Layer we can finalize the disk. To do so, you must run Shutdown For Finalize which is located on the Packaging Machine’s desktop. 
The Shutdown For Finalize tool runs a quick integrity check to ensure no pending operations are queued. In this case as you can see, an NGen operation is still in progress so the layer finalization does not proceed.
Note: I have an App Layering preparation script which runs NGEN, cleans up many temporary folders, Event Viewer and so on. See https://jgspiers.com/citrix-app-layering-preparation-script/
To check the progress of NGen, you can monitor the ngen.exe service. Once it dissapears you will be able to finalize the image.
Alternatively you can run ngen update /force to force a regeneration of native images.![]()
Once the compiles are complete, you can finalize the image. The Packaging Machine will be shut down.
Return to the App Layering Management Console, select the Platform Layer and click Finalize. 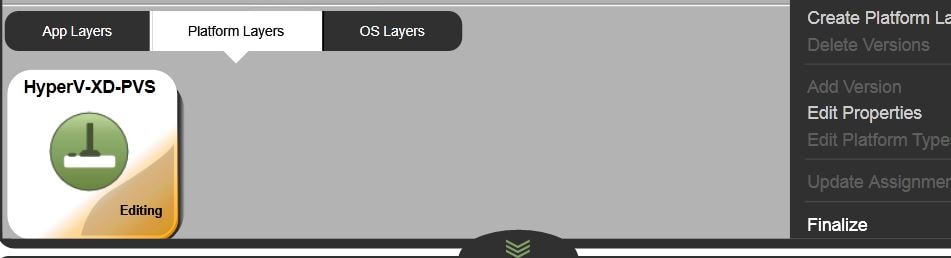
Click Finalize. 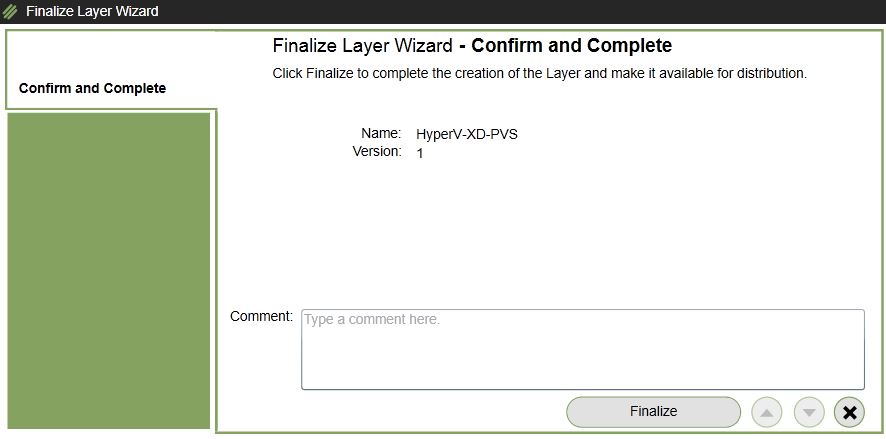
The disks will be imported into local storage on the ELM Appliance. 

The disk contents are being converted into a layer.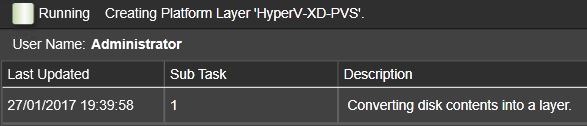
The Platform Layer has been successfully created. 
The Platform Layer now shows as deployable. 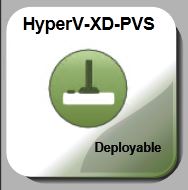
Creating an Image Template:
Finally to publish the OS Layer out to PVS we need to create an Image Template. Image Template’s bundle the OS Layer, Platform Layer and any number of Application Layer’s together. It is when you are publishing an Image Template that all these different layers are merged together to create a desktop for end user consumption. In the Management Console, navigate to Images -> Create Template.
Note: At any time you can edit an Image Template and assign/remove Application Layers and so on.
Enter an appropriate name and description. Select an icon or upload your own. 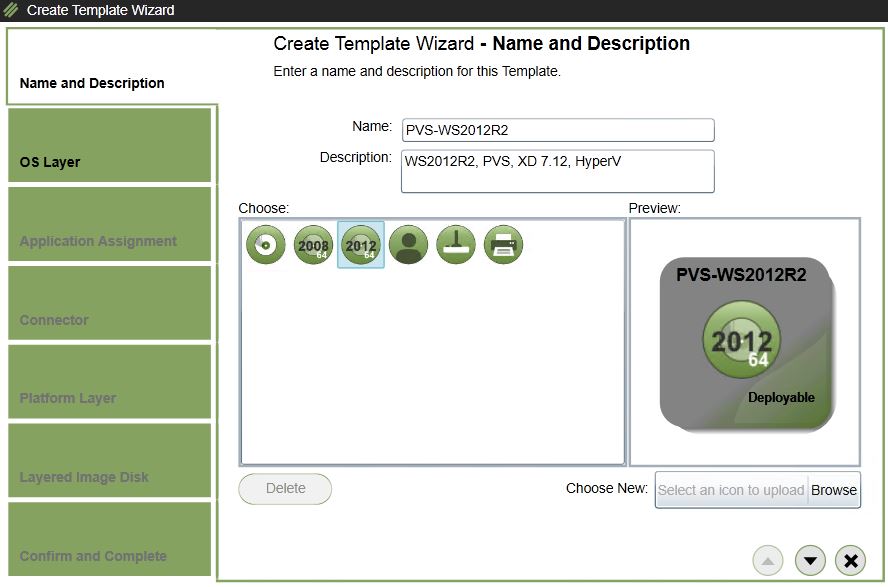
Select the only available OS Layer recently created. 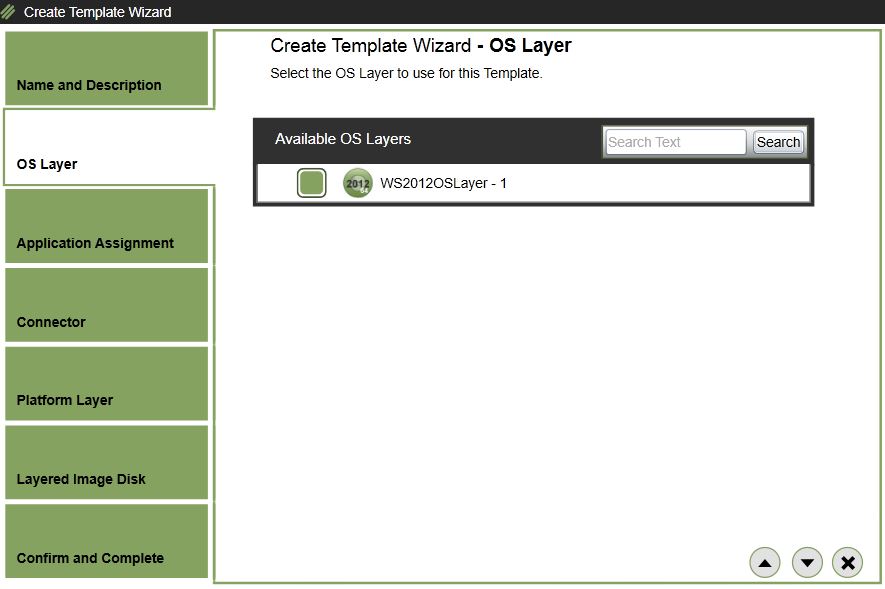
No Application Layer’s are available at the moment so we can continue on. When we have an Application Layer available we can come back and edit this Image Template to include the layer.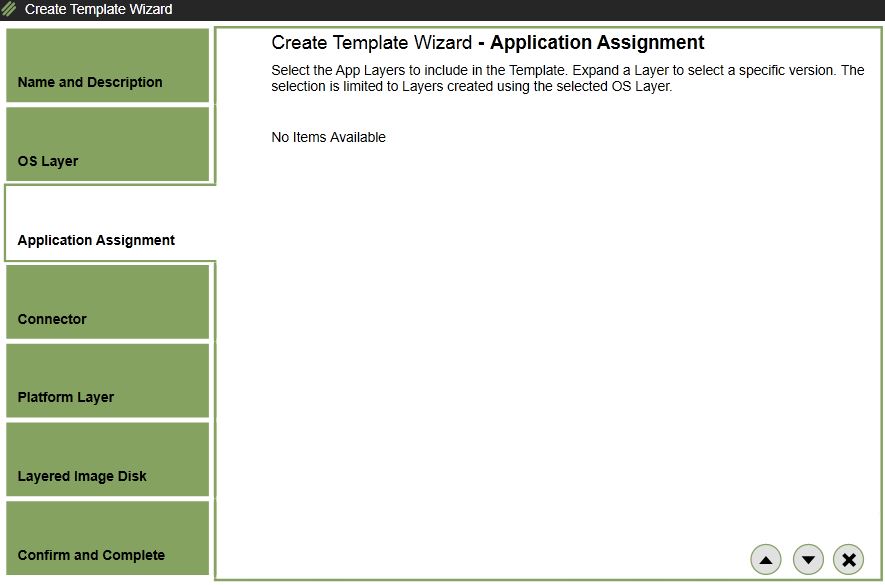
Rather than have ELM publish the image to the ELM Share, instead we want the ELM Appliance to publish the image out to PVS. Click on New.
Note: You could publish the image to the ELM Share and manually import in to PVS, however that is a more manual approach. 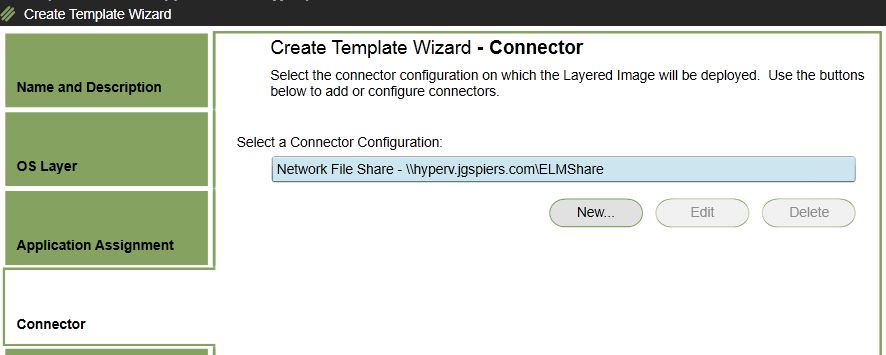
Underneath Type, there are several connectors available to create such as MCS, PVS, Nutanix, XenServer. Click on Citrix PVS. 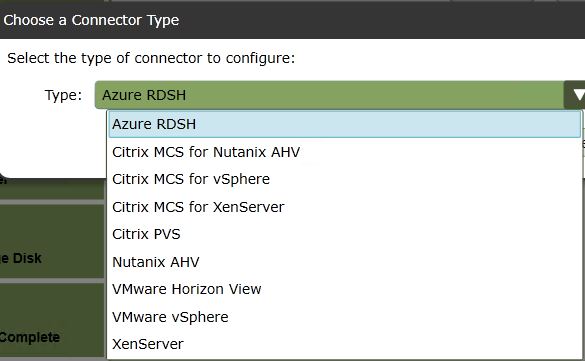
Now click New. 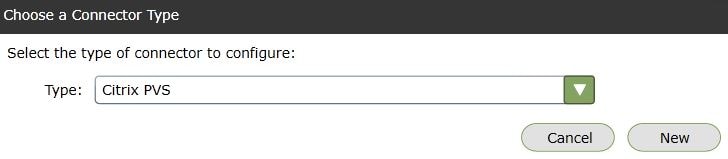
A new popup appears. Make sure your popup blocker is not interfering. The popup webpage directs you to a PVS Connector creation screen. Underneath Console use the dropdown to select your PVS server. Any PVS server that you have successfully installed the App Layering Agent on and registered with ELM will appear here.
Note: A quick tip – Install App Layering Agent’s on “master” PVS servers, ones that you normally nominate to perform all changes on. This server must also have the PVS Console installed.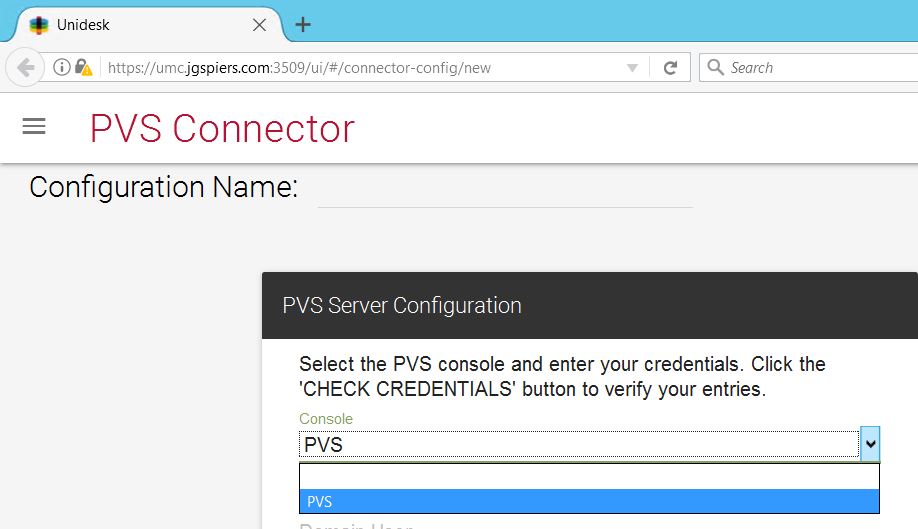
Enter service account credentials that has Farm Administrator permissions on PVS. Click Check Credentials and wait for the The credentials have been verified message. 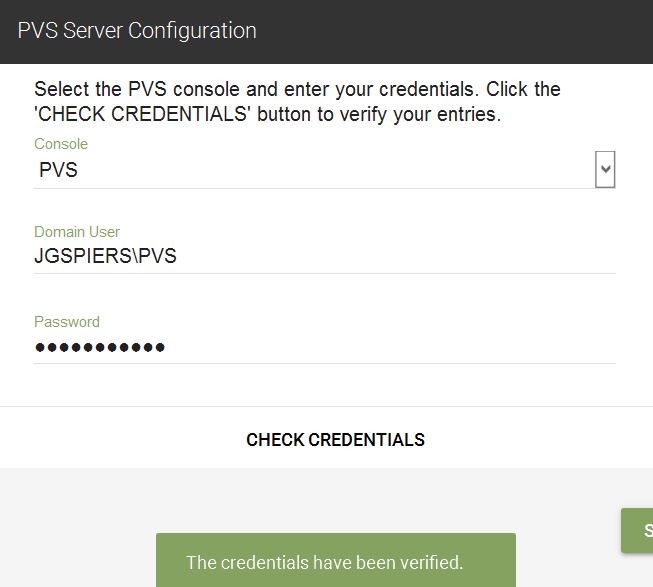
Now that credentials have been provided the PVS farm is queried for the Site Name, Store Name(s) and so on. Select the appropriate details as below. In terms of Write Cache and License Mode etc. App Layering will import the published image in to PVS and automatically configure these settings on the vDisk for you. Click Test.
Note: You could publish all images to a staging store for example, then move them to their appropriate stores afterwards. You can also create multiple connectors, so one for VDI machines and one for Session Host machines with different Write Cache sizes. 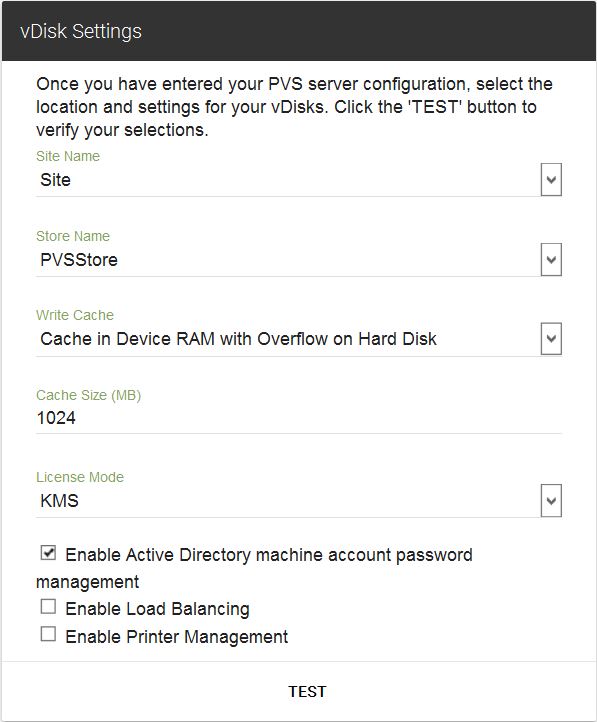
Enter a Configuration Name (at the top of page) and then click Save. 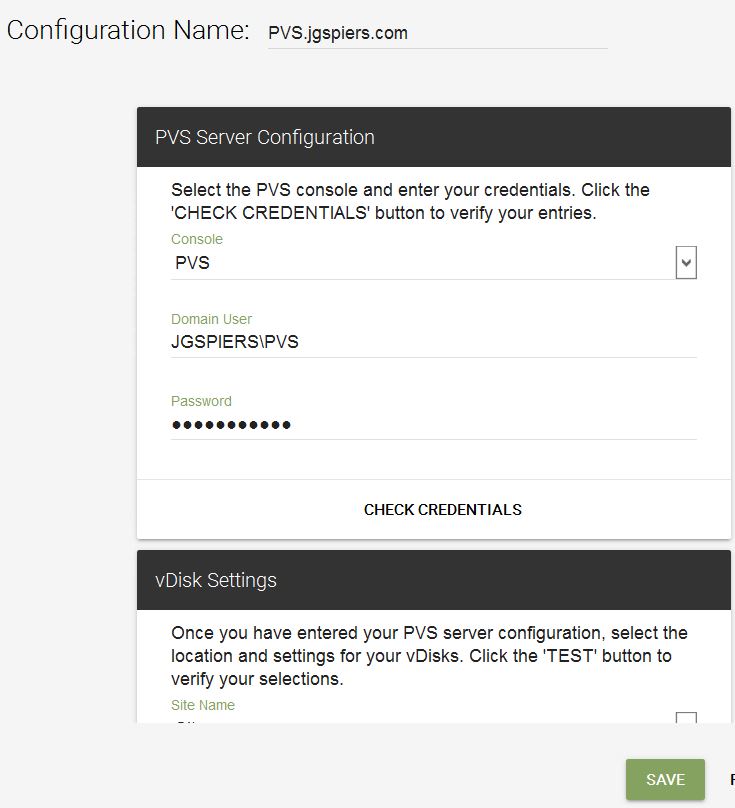
You should receive a These settings were successfully saved message. 
Returning back to the App Layering Management Console you’ll see your newly created PVS Connector. Highlight it, then click the down arrow.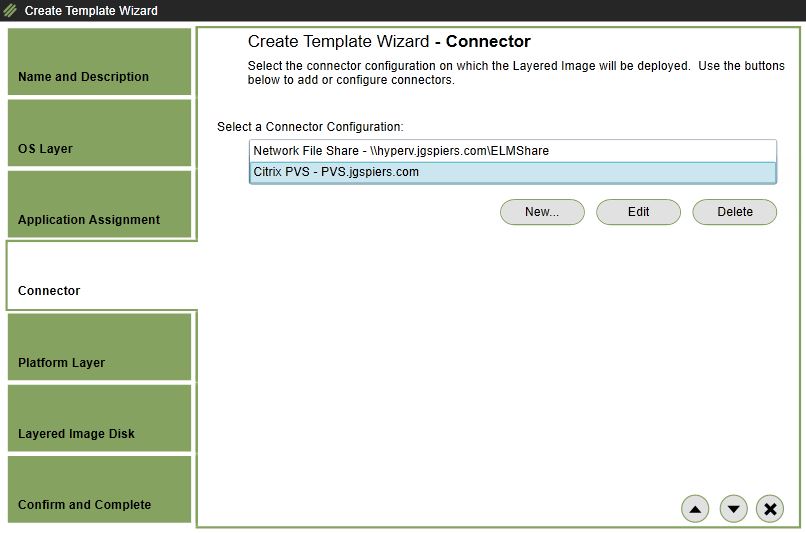
Choose the only available Platform Layer. This Platform Layer is tied to your OS Layer.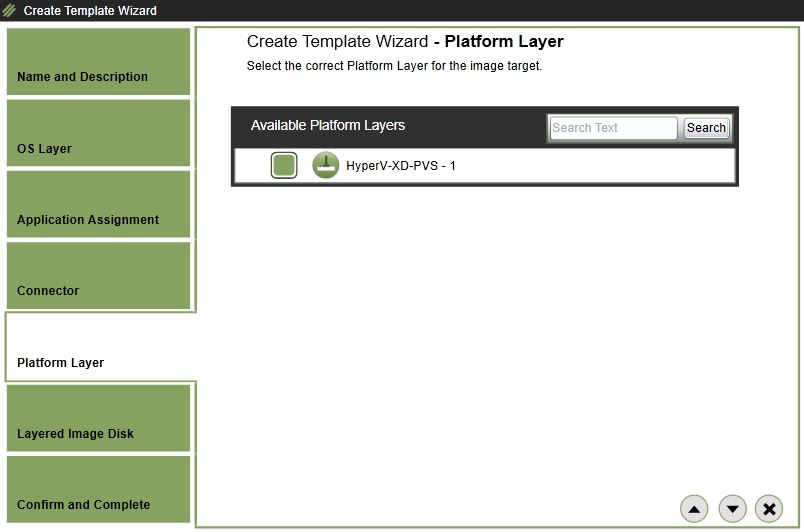
Specify an appropriate name and layered disk size. The disk is thin provisioned. If you are using Elastic Layering, choose Application Layers Only. This installs a App Layering Service inside the image and prepares the image for Elastic Layering capabilities. 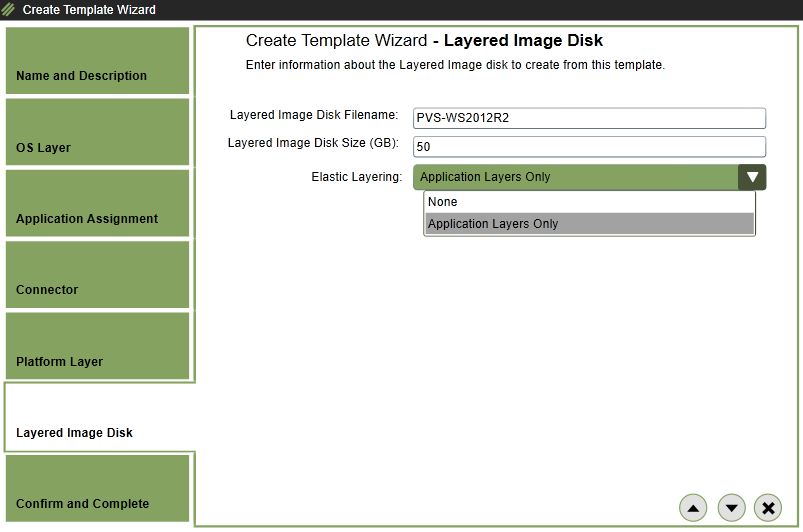
Click Create Template. 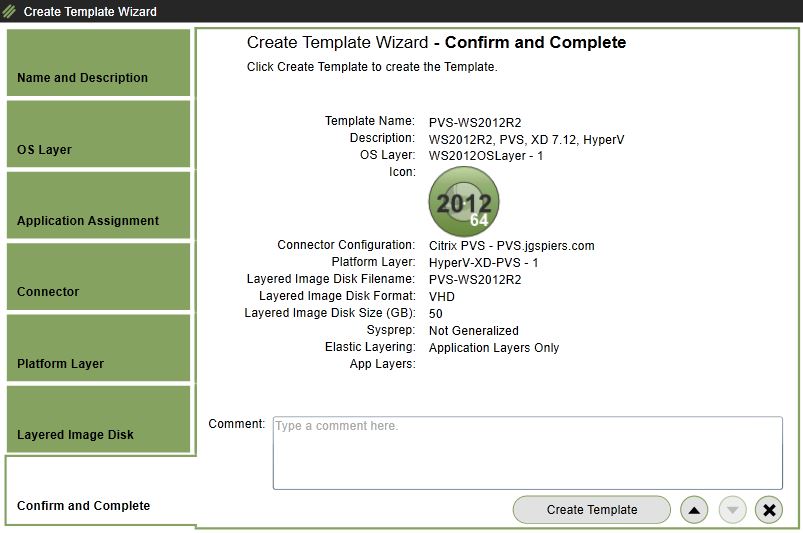
The new Image Template shows underneath as publishable. You now have to publish the image out to PVS. Click Publish Layered Image.
Note: You can highlight and publish multiple Image Templates at once. App Layering will publish up to 4 concurrently.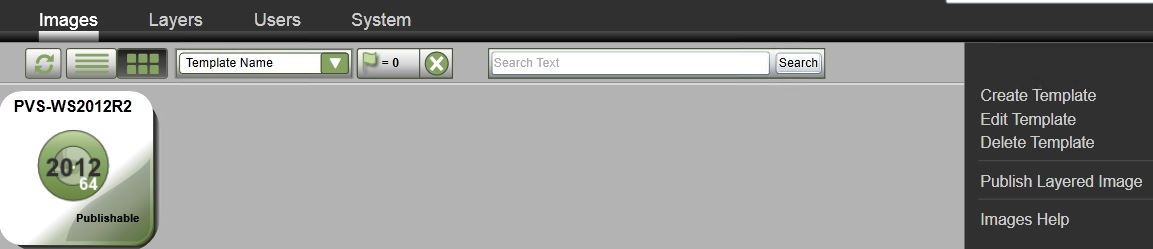
Click Publish Layered Image. 
A new task begins for publishing the image.
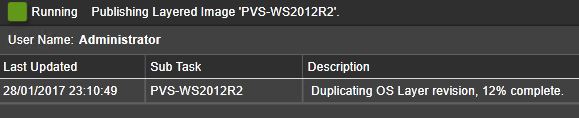
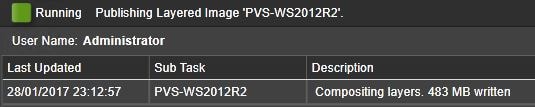
At this stage the image is transferring to the PVS store.
As you can see on the PVS Store a .tmp file is placed in the directory which will later become the published vDisk. 
Image is registering with PVS.
The published job is complete and we should now have the image in PVS. 
Within the PVS Store we can now see the vDisk and relevant .lok and .pvp files. 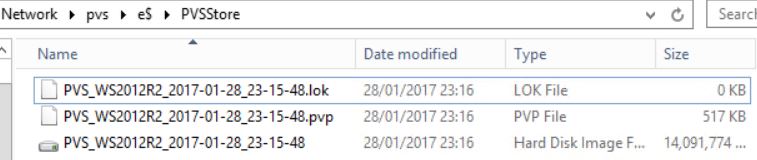
The vDisk also appears in the PVS console, configured with Cache in Device RAM with Overflow to Hard Disk. Create some Target Device VM’s and boot in to the image to confirm everything is in place.![]()
The PVS Target Device software and VDA is present. The Hyper-V tools are also installed but just do not show in Add/Remove Programs. 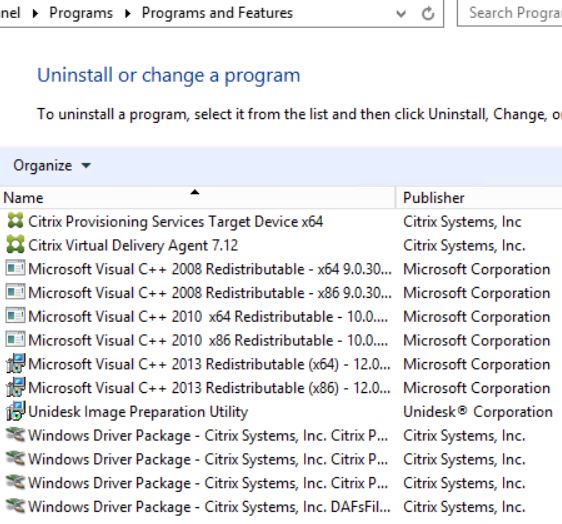
The image also successfully registers with the Delivery Controller. ![]()
Updating the OS Layer:
When the time comes, you’ll eventually need to add versions to the OS Layer image to make changes. The majority of times you’ll only need to perform Windows Update patching on the OS Layer image as generally most applications will be in separate Application Layer’s which come with their own versions. When you create an OS Layer version, the existing latest OS Layer is copied and marked as read/write. You then use a Packaging Machine to boot in to the read/write layer and make the required changes to the image.
To create an OS Layer version navigate to Layers -> OS Layers -> select the OS Layer and -> Add Version.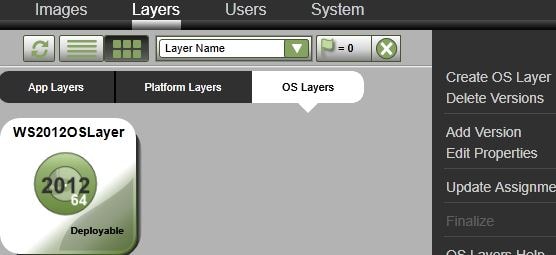
Enter a new version number, description and max layer size. The Max Layer Size value should be large enough to host the OS Layer and any updates you are performing. 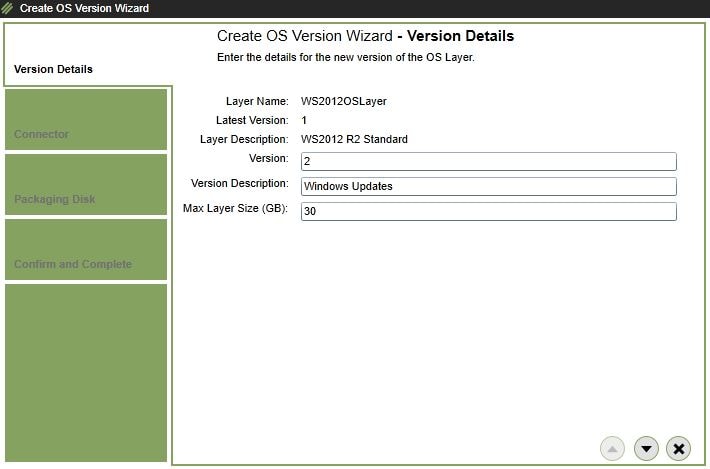
Choose a Hyper-V Connector. You may have to create one. Prior to App Layering 4.6, you would have had to specify the ELM Share which then resulted in you having two separate disks which require manual attaching to a Packaging VM, which you also had to manually create. Now with a native Hyper-V connector, the Packaging Machine is automatically provisioned.
The Packaging VM is what you use to boot in to the OS Layer version so you can perform your changes. In previous versions this VM was called an Installation Machine.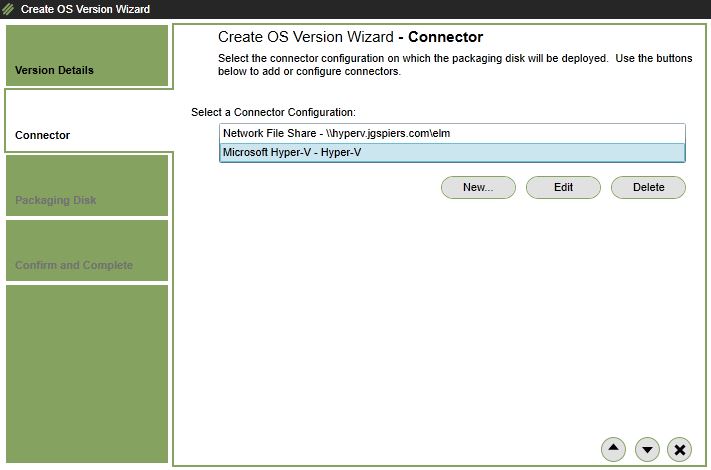
Specify a packaging disk filename. You’ll likely keep the defaults. If you were publishing the new OS Layer version to the ELM Share, you would also be asked for a disk format (VHD/VMDK). Click the down arrow.
Click Create Version. 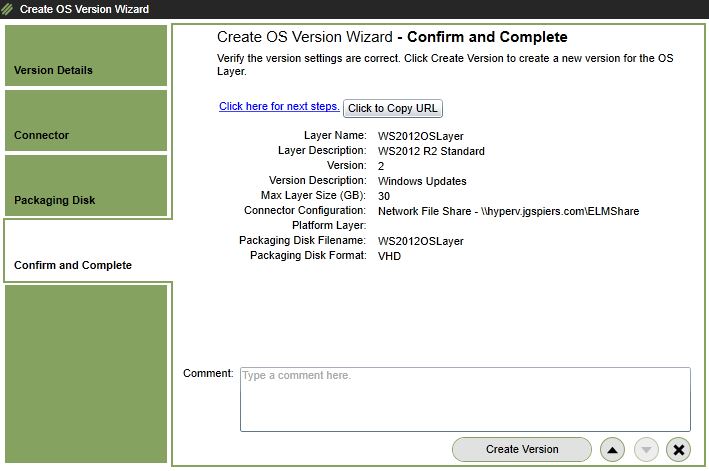
The Packaging Machine has been created. At this stage open your SCVMM or Hyper-V Manager console.
Connect to the Packaging Machine VM.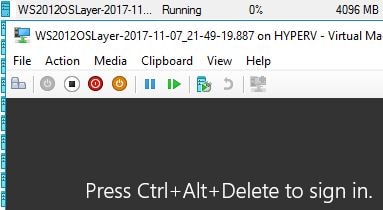
During the Platform Layer optimizations Windows Update was disabled, general VDI/SBC requirement. You must temporarily start the Windows Update service.
Note: In newer versions of App Layering, when creating OS Layer versions the Windows Update service is automatically disabled.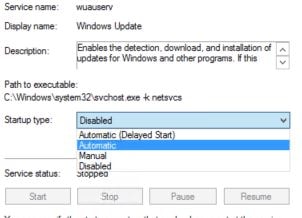
Also set Automatic Updates to Enabled. Make sure to turn these off again after patching.
Search for and install patches. 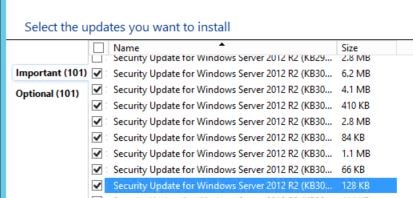
Reboot the Packaging VM to finish installing updates.
When the machine is back up log on and run the Shutdown For Finalize tool.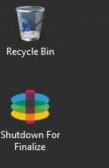
Return to the Management Console, select the OS Layer and click Finalize. 
Click Finalize to finalize version 2 of the OS Layer. 
At this stage the new OS Layer version will be imported in to the ELM local storage. 

The new layer version is ready to be used.
To publish the new layer version out to PVS you need to edit your existing Image Template to include the new OS Layer version. Navigate to Images -> click on the relevant Image Template and select Edit Template.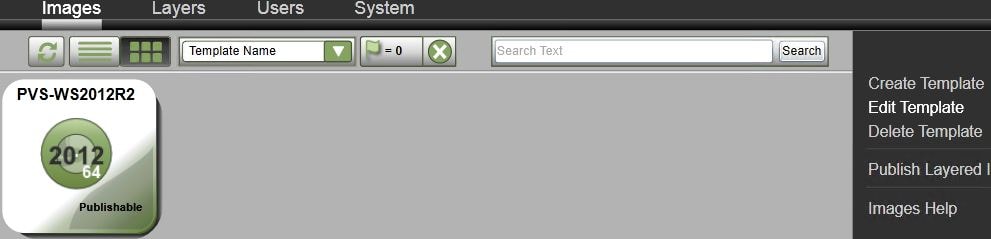
Navigate to the OS Layer tab and then expand the OS Layer, selecting Version 2. 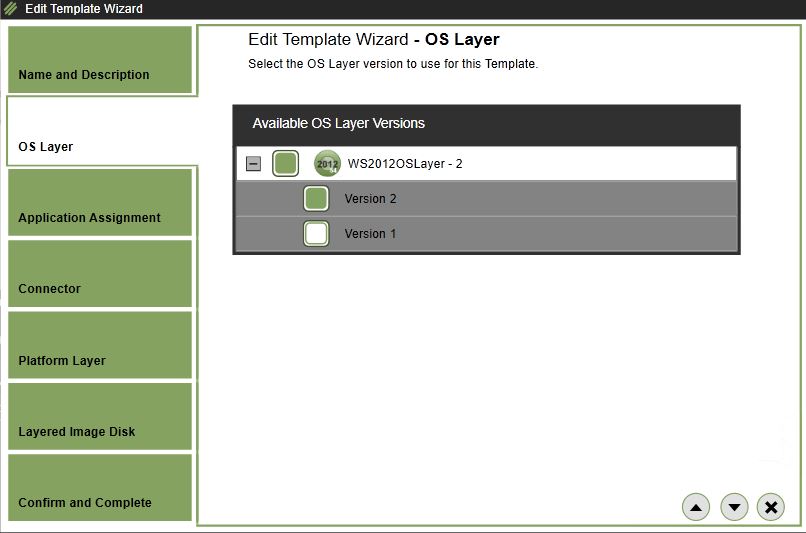
Click Save Template Changes. 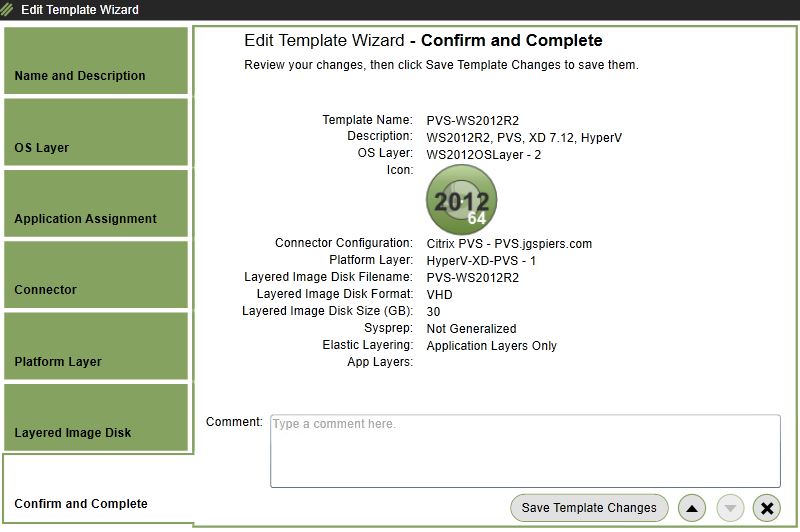
Now go through the Publish Layered Image wizard to publish the disk to PVS, attatch to Target Device VM’s and power them on.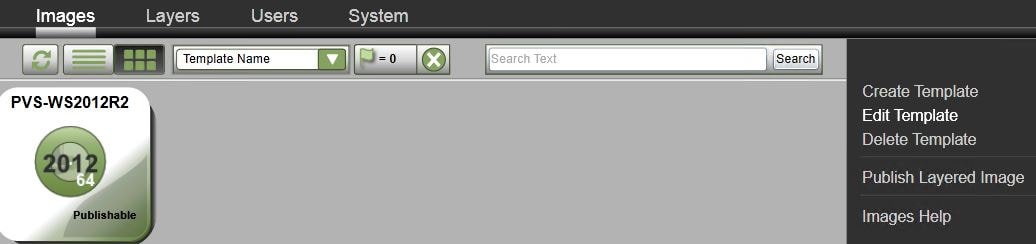
Confirm the new OS Layer version is in effect by looking for the updates you just installed. 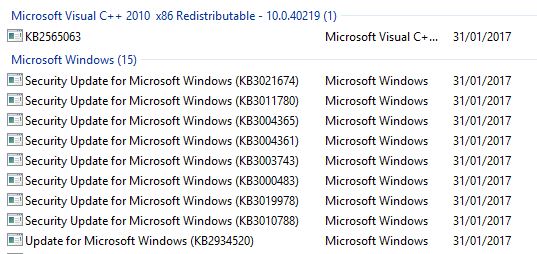
That’s it. You have just successfully updated an OS Layer!
To create Application Layers and Elastic Layers, see http://www.jgspiers.com/app-layering-elastic-layering/
Pingback: Detailed Change Log – Carl Stalhood
Pingback: Unidesk OS Layer and Platform Layer – Carl Stalhood
Pingback: EUC Weekly Digest – February 4, 2017 – Carl Stalhood
Pingback: Site Updates – February 2017 – Carl Stalhood
Tyson Glaser
April 14, 2017If you were going to XenApp hosts and want to do write cache with overflow to disk you need to attach a second hard drive and move everything over to that drive (page file, event logs, ect) and it needs to exist for the RAM to be able to overflow on to. Should this be done on the platform layer or the OS layer?
George Spiers
April 14, 2017Hi Tyson. You don’t create a second disk within any layer as such. The persistent disk is separate from layers. Once you have an Image Template and it is published out to PVS or MCS, you create machines and each machine has a disk attached that is used for the Write Cache, Pagefile, Event Logs like you mention.
Tyson Glaser
April 17, 2017But the image you create doesn’t have the new attached initialized/configured on boot so the page file/cache/event logs don’t move. Do you have to boot the Image Template up into private mode first and configure the attached disk before setting it back to standard and booting up the other machines to the vDisk? If that’s the case, wouldn’t you have to do that step every time you update the OS or Platform layer creating a new Image Template?
George Spiers
April 18, 2017When you create machines via PVS, use the XenDesktop Setup Wizard. You pick a size that the local write cache will be. When the PVS machines are created and booted, they’ll be configured with a WCDisk disk likely to be letter D:\ or the next free letter on your OS. The Write Cache and Pagefile will be on the WCDisk. To move Event Logs, you make the required registry edit on the OS Layer to point them to D:\.
Tyson Glaser
April 17, 2017Also, for something like Workspace Environment Manager where I need to have the WEMCache on the attached disk how would I go about doing that at the App layer? If I create the app layer and load the OS layer in the packaging VM, the attached disk does not exist like it would on a PVS machine so there’s no way to configure that?
Maybe I’m not understanding this product as a whole like I should be, but to me, it seems like it would be easier to just build a single PVS vDisk with all the needed applications in Private mode, then change the disk to standard and publish it out to the VMs. If I have to change the vDisk to private mode to reconfigure the attached disk every time I do an image template for a a new App, OS update, or Platform update that seems like more work than just updating a vDisk in private mode? Am I looking at this the wrong way or something?
George Spiers
April 18, 2017When installing the WEM Agent, you don’t need the disk configured on the Packaging VM. You can install the WEM Agent, specify that the cache exists on D:\WEMCache for example and the Agent will install regardless if D:\ is actually present or not. Now when you publish the image out to PVS, the D:\ drive will exist if you use the XenDesktop Setup Wizard as it creates the disk drive for you. You don’t need to put vDisks in to private/maintenance mode or perform repetitive drive configurations so yes you are looking at this the wrong way.
George Spiers
April 18, 2017I suggest spinning up a lab or test environment and follow the Citrix App Layering/Unidesk 4.x posts I have published here. Also follow https://jgspiers.com/citrix-workspace-environment-manager/#Install-WEM-Agent and https://jgspiers.com/provisioning-services-xendesktop-setup-wizard/ so you can get a feel for how things work.
Matt Russell
May 1, 2017George – Do I need to add the other NIC for PVS stream to the VM in a layer or add it to the server once the image is build/deployed to PVS? Seems like the server would want a restart after adding the NIC.
George Spiers
May 1, 2017Just add the second “Synthetic” NIC to your VM Templates that PVS uses to deploy machines. You don’t need to add it to a layer.
John
September 28, 2017If I do that after boot I can see only one NIC (legacy). Did you test it adding new NIC to template?
George Spiers
September 28, 2017The VM template has both the legacy and synthetic NIC added. The legacy NIC is used to PXE boot into a vDisk as normal and then the synthetic NIC takes over once the machine has booted. I see both NICs in Device Manager as you would expect.
John
September 28, 2017so in the process of creating platform layer you never added synthetic NIC just legacy one, right?
George Spiers
September 28, 2017Nope, I used a Legacy NIC only when creating the OS Layer/OS Layer versions. For the Platform Layer, I used a Synthetic NIC which worked just fine.
John
September 28, 2017OK, all sorted and working as you said. Thanks.
Matt Russell
May 8, 2017George – Where would UPM be installed? I’d assume as an app layer that’s assigned to the OS layer in use, but hoping you might have practical knowledge here. Thanks again!
George Spiers
May 8, 2017If you are referring to Citrix Profile Manegement, it is installed on the Platform Layer alongside the VDA. If it’s another UPM solution, you can install it on an App Layer.
Chone P.
May 8, 2017How to do install WEM agent when utilizing MCS and App Layering?
George Spiers
May 8, 2017Install WEM Agent in App Layer. Use the command line to install the Agent using the AgentCacheAlternateLocation and AgentServiceUseNonCompliantHistory switches. The Agent cache should be redirected to a persistent drive. https://jgspiers.com/citrix-workspace-environment-manager/#Install-WEM-Agent
Chone P.
May 9, 2017That part is understood when using PVS and redirecting to the write cache during the XD wizard target device creation, but when using MCS it creates a hidden identity disk when it creates a catalog. Do we need to provision a secondary persistent disk to each MCS target device to acheive the same results as with PVS?
George Spiers
May 9, 2017Yes correct.
Adil
August 7, 2017Thank you very much George for your usual help
I follow this nice article, with a difference, that I work with vsphere, and I got to the creation of pvs connector
I can not configure the pvs connector I installed the Citrix App Layering Agent on the pvs server During installation I get an error: “a failure occured whene executing ‘netsh’” Error Adding Certificate I put ok and the wizard finishes installation just after 1. I removed security on PowerShell 32 and 64 on the pvs server Set-ExecutionPolicy Unrestricted 2. I executed the EML registration command on the pvs server successfully Citrix.AppLayering.Agent.Service.exe register / i / e: IP_address_of_ELM / u: Domain \ Administrator 3. I also run the commands below: From a command prompt, go to: Cd “c: \ program files \ citrix \ provisioning services console” C: \ Windows \ Microsoft.NET \ Framework64 \ v4.0.30319 \ InstallUtil.exe McliPSSnapIn.dll C: \ Windows \ Microsoft.NET \ Framework64 \ v4.0.30319 \ InstallUtil.exe Citrix.PVS.snapin.dll 4. I activated the remote powershell on Powershell 32 and 64 Enable-PSRemoting When I create a new pvs connector, and I check the connection, the system returns the following error message: One or more the pvs configuration is invalid, please check your selections And set the field red: Console And the following message: Citrix App Layering Agent Error: Error: read ECONNRESET
Your help please.
Avi
August 27, 2017Hi,
When I use PVS with cache on ram with overflow, all the cache are getting full in a few seconds when the users are log in to the VDI.
If I login with user with no assignment the cache stay still on 0% used.
it’s seems that the VHD file that contain the app layer is copying to the C drive when the users are login and the memory and the cache drive are getting full and VDI machine start to stuck.
Is that supposed to be like this? the VHD is copying to the VDI at login?
Thanks in advance.
George Spiers
August 27, 2017How much RAM have you assigned to the Write Cache and how much space has been assigned to the Write Cache overflow drive? Also does this happen for all Elastic Layers or only one?
Avi
August 27, 2017Thanks for replaying.
I have 1024gb to RAM and 5gb to disk.
It happend to all elastic layers.
George Spiers
August 28, 2017When Elastic Layers begin to mount then I guess inevitably the Write Cache will grow due to changes being made to the standard vDisk. Not sure how Citrix have advised us to deal with this. It may be that we restrict Elastic Layers to small packages or increase the Write Cache size. I’ve asked Citrix for some clarity and will let you know.
Brandon Danielson
August 31, 2017I’ve noticed this as well and have been pulling my hair out trying to rule out everything else. Is this product better suited to MCS? It sure seems that way.
George Spiers
August 31, 2017As far as I know this has been passed to Citrix engineering as a potential bug. Elastic Layering is not suppose to fill up the Write Cache but something is causing it to happen.
Avi
August 31, 2017Hope it will fix soon, many customers are on hold becouse of this issue.
Many thanks for your update!
Avi
September 5, 2017Hi George,
Do you know if there is case number for that problem? or how can I know the ststus of the case ?
Thanks,
Avi.
George Spiers
September 5, 2017There is no case number, you should probably phone Citrix Support and create a case for yourself if you wish to be kept updated.
George Spiers
September 6, 2017See https://support.citrix.com/article/CTX227454
Avi
September 6, 2017Not good at all! It’s a bad news for all the customers that use pvs.
Thank you for the update!
Bilal Aslam
October 7, 2017Hi George,
I am using BDM disk to boot with Hyper-V and have been stuck after publishing layer to PVS, VM keeps rebooting with windows error below
– SYSTEM_THREAD_EXCEPTION_NOT_HANDLED (CVhdMp.sys)
I have created the clone machine and created template from that to be used with target machines ( Cloned the Packaging machine in the Platform layer with Synthetic card GUID available)
Multiple tries by scratching from start or adding layers but not being able to get it functional ( This is SCVMM 2012 R2 – HYper-V design )
p.s. Minus App Layering my PVS is functional fuly in production.
Regards,
Bilal
George Spiers
October 7, 2017Are you using Generation 1 or 2 VMs in Hyper-V? Also be sure that the Platform Layer contains the PVS Target Device, the OS Layer was created with a VM that had one Legacy NIC and the Platform Layer is set to the correct Hypervisor.
Dieter
November 28, 2017Hi did you ever manage to solve this? I’m having similar issues on VMware (boot with ISO).
Thanks
George Spiers
November 29, 2017What version of App Layering are you using?
Dieter
April 30, 2018Sorry for the late answer but a good tip is do not test with the template VM. 🙂
Bilal Aslam
October 8, 2017George,
That is Generation 1 VMS ( Windows 10 LTSB x 64 ) and Hypervisor is Hyper-V 2012 R2 rightly selected. I have been able to get out of this by doing a not very logical step that after failing for first time I add a platform layer and reinstall PVS Target device software and finalize the image immediately and it then starts to work normally and i can update images by incorporating application layers and publish and use them successfully. The only anomaly i see is that Secure ICA start to fail randomly and mostly afterwards, without Secure ICA being enabled on DG things work smooth.
Suspecting the order of installation now I have shifted optimizations in OS layer and am thinking to have a try with the following order:
–After powering on machine first step to reconfirm on Ghost Nics
–Install PVS Target Device and VDA software before Domain Joining the machine ( Before i was doing it after domain joining among last steps)
–Domain Joining creation and removal of network account (plus ensuring polices exist for SAM database)
— Antivirus Exclusions ( windows Defender)
— Disk cleanup ( NGen though probably not needed here )
— Registry optimization like file services client tuning and graphics ( Citrix Best Practices ) has been moved to OS layer and here just following:
Windows Registry Editor Version 5.00
[HKEY_LOCAL_MACHINE\SOFTWARE\Policies\Citrix]
“EnableFTU”=dword:00000000
[HKEY_LOCAL_MACHINE\Software\Wow6432Node\Citrix\Dazzle]
“AllowAddStore”=”N”
[HKEY_USERS\.DEFAULT\ControlPanel\Desktop]
“ScreenSaveActive”=dword: 00000000
[HKEY_LOCAL_MACHINE\SOFTWARE\Citrix\Graphics]
“SetDisplayRequiredMode”=dword:00000000
–Rearming for KMS ( SetKMSversion being run in the OS and deemed to be only thing for OS layer
My idea is that don’t need to reconfigure for KMS while updating os and platform layers and adding versions.
—Citrix Optimization tool is being used in the OS Layer ( All settings enabled with additional App Layer Supplementing XML template )
— Do we need to run PVS target device Optimization tool for layered image as well or sort of redundant when in the OS layer we have used Citrix Opt tool?
–Cleanup and shutdown for finalize
Thanks
Bilal
George Spiers
October 8, 2017Is your Windows 10 OS Layer set to 60GB?
Although optimisations can work in the OS Layer, I recommend keeping all optimisations in the Platform Layer. You should review what the Target Device Optimizer does and compare that to the Citrix Optimization Tool. If there are things PVS Optimizer does that Citrix Optimizer doesn’t, then perform just those optimisations when running PVS Optimizer. I personally use neither tools as I use my own scripts for optimisations.
I don’t see anything wrong with the steps you are running through when creating a Platform Layer. Another thing Citrix recommend is to disable IPv6 in the OS Layer when using PVS.
Bilal Aslam
October 8, 2017Yes the OS Layer is set to 60GB and I have noted your viewpoint about doing optimizations. I used one of your script you shared publically for Image cleaning before finalization and that was good, If you could share the path of others that are publically available then it would be nice.
Yes I have got Ipv6 and TCP offloading both disabled in the OS Layer.
Bilal Aslam
October 8, 2017Just to be clear adding a Platform Layer Version what I mean.
sam
January 22, 2018George, thanks for great info on your site. I have ELM running on vmware. I have 1 hyper-v host and VMM running. I installed the agent on hyper-v host and VMM and register both with ELM but when I try to create a hyper-v connector I get ‘there are no registered citrix applayering agents’ so can’t create it. I rebooted all server and disabled firewalls too but no luck. Please let me know if I’m missing something. Thanks.
George Spiers
January 23, 2018Hi Sam
SCVMM is not supported with App Layering, however the Hyper-V Connector is. You install the App Layering Agent directly on the Hyper-V host and create a connection to it. Within the Connector creation wizard, you should specify the Hyper-V host under “Agent”.
Will
April 13, 2018Hi George,
Thanks for this, great help.
Hyper-V does the VHD files for the OS, I am using Vmware so I’m not sure. I may have to install PVS on the image just to convert it to vhdx and then remove the software so it can be installed as part of platform layer later.
Unless anyone know of another way I can get a VHD file if using Vmware
George Spiers
April 13, 2018You don’t have to get a VHD file. If you are using VMware and building an OS Layer you use a Connector to import your OS Layer in to the Enterprise Layer Manager (ELM).
Will
April 17, 2018Thanks George, that worked.
During Template creation, PVS authentication I am getting “Failed to connect to the Citrix App Layering Agent on xxxxx”
What I have done so far:
Uninstall reboot and reinstall PVS Agent
Enable-PSRemoting
Ensure that port 8016 is open
register /i /e:IP_address_of_ELM /u:Administratorname
load dlls c:\program files\citrix\provisioning services console
“C:\Windows\Microsoft.NET\Framework64\v4.0.30319\InstallUtil.exe” Citrix.PVS.snapin.dll (for XD 7.15)
“get-pssnappin -registered”
Removed all firewalls
Enable bits
Account is in PVS administrators group in the farm properties.
George Spiers
April 17, 2018Do you mean you are getting this when creating a Connector? Or are you getting this when trying to publish an image to PVS (by publishing an Image Template)
Anonymous
April 18, 2018During Template creating, PVS connector. it finds the PVS Server (with agent installed) enter credentials, takes a long time to come back and then error
“Failed to connect to the Citrix App Layering Agent on xxxxx”
Thanks
George Spiers
April 18, 2018On PVS server run “netstat -a” do you see port 8016 listening?
Run “C:\Windows\Microsoft.NET\Framework64\v4.0.30319\InstallUtil.exe McliPSSnapIn” again from “C:\Program Files\Citrix\Provisioning Services Console”
Anonymous
April 19, 2018HI George,
8016 is listening, McliSSnapin ran successfully, ps remoting enabled, all other steps followed as part of PVS agent install.
[2018-04-18T09:31:04.053Z] ERROR: ResponseTranslator/1467 on localhost.localdomain: An Error occurred: Failed to connect to the Citrix App Layering Agent on pvs.mydomain.net (reqNum=504)
[2018-04-18T09:31:04.054Z] ERROR: ErrorLogger/1467 on localhost.localdomain: Failure: [POST] /api/Pvs/verify => STATUS: 422 (VerificationError:Failed to connect to the Citrix App Layering Agent on pvs.mydomain.net) (reqNum=504)
[2018-04-19T10:01:15.350Z] INFO: HttpLogger/1467 on localhost.localdomain: [HTTP] => Start: [GET] /api/Agents?filter[include]=host [path: /api/Agents] (reqNum=754)
[2018-04-19T10:01:33.553Z] INFO: HttpLogger/1467 on localhost.localdomain: [HTTP] => Start: [POST] /api/Pvs/verify [path: /api/Pvs/verify] (reqNum=755)
[2018-04-19T10:01:33.607Z] INFO: AgentClientFactory/1467 on localhost.localdomain: Looking for Agent id ‘950222’ (reqNum=755)
[2018-04-19T10:02:33.669Z] ERROR: AgentClientService/1467 on localhost.localdomain: POST failed: RequestError: Error: ETIMEDOUT (reqNum=755)
[2018-04-19T10:02:33.679Z] ERROR: PowerShellScriptExecutionEngine/1467 on localhost.localdomain: Error encountered in PowerShellScriptExecutionEngine. Error: ‘GlobalizedError: Unable to connect to Citrix App Layering Agent running at pvs.mydomain.net:8016’ (reqNum=755)
[2018-04-19T10:02:33.684Z] ERROR: pvs-connector/1467 on localhost.localdomain: (reqNum=755)
Failed remote request contents:
{
“unideskAgentId”: “950222”,
“userName”: “mydomain\\elm_admin”,
“password”: “”
}
[2018-04-19T10:02:33.685Z] ERROR: ResponseTranslator/1467 on localhost.localdomain: An Error occurred: Failed to connect to the Citrix App Layering Agent on pvs.mydomain.net (reqNum=755)
[2018-04-19T10:02:33.686Z] ERROR: ErrorLogger/1467 on localhost.localdomain: Failure: [POST] /api/Pvs/verify => STATUS: 422 (VerificationError:Failed to connect to the Citrix App Layering Agent on pvs.mydomain.net) (reqNum=755)
George Spiers
April 20, 2018Run “Get-PSSnapin -Registered” on the PVS server. Do you see McliPSSnapin in the list?
Anonymous
April 20, 2018Hi George,
PS C:\windows\system32> Get-PSSnapin -Registered
Name : Citrix.Broker.Admin.V2
PSVersion : 2.0
Description : This PowerShell snap-in contains cmdlets used to manage the Citrix Broker.
Name : Citrix.Configuration.Admin.V2
PSVersion : 2.0
Description : Stores service configuration information.
Name : Citrix.ConfigurationLogging.Admin.V1
PSVersion : 2.0
Description : This Snapin is for managing configuration logging
Name : Citrix.DelegatedAdmin.Admin.V1
PSVersion : 2.0
Description : This Snapin is for managing Delegated Administration
Name : Citrix.Host.Admin.V2
PSVersion : 2.0
Description : Manages Hosts, and Hypervisor Connections
Name : Citrix.PVS.SnapIn
PSVersion : 4.0
Description : This is a PowerShell snap-in that includes cmdlets.
Name : McliPSSnapIn
PSVersion : 4.0
Description : This is a PowerShell snap-in that includes the Mcli-Add, Mcli-Delete, Mcli-Get, Mcli-Help, Mcli-Info,
Mcli-Run, Mcli-RunWithReturn, Mcli-Set and Mcli-SetList cmdlets.
George Spiers
April 20, 2018Looks like you have everything correct. At this stage I’d run a traffic trace on the PVS server to see what is going on under the hood. Failing that contact Citrix Support.
Also check the connector logs under /var/log/Unidesk
Sven
April 24, 2018Hi George,
I get always a blue screen while booting the created PVS image. It says BNIStack failed, network stack could not be initialized. I followed your documentation step by step. I created new OS Layers/Plattform Layers with no luck. Do you have an idea?
Kind regards
Sven
George Spiers
April 24, 2018Some things to try:
https://jgspiers.com/0x0000007e-bnistack-failed-vmware/
https://support.citrix.com/article/CTX222191
Also make sure the Platform Layer is set to the correct Hypervisor type.
Sven
April 25, 2018Hi George,
Thanks for the two KB links. I saw them before but these are for VMware not Hyper-V. I deleted all the hidden NIC’s and created the OS for the OS Layer only with a Legacy Network Adapter. When I create the plattform layer, then I see that the generated VM does not have the legacy network adapter anymore. My PVS Target VMs have two NICs, one legacy to boot with and a “normal” network adapter.
Kind regards
Sven
Anonymous
April 27, 2018Hi Sven, did you get to the bottom of this? I am also having the same issue.
George, I have gone through “some things to try” and also every known fix from Citrix and the web without joy. Every step to get to the creating of my vdisks and target devices followed this document.
Sven
April 27, 2018Hi Anonymous 🙂
No, not yet. I tried different ways to get this up and running, but without any luck. I think my next step will be to open a citrix case. I hope they can fix the problem.
Kind regards
Sven
George Spiers
April 27, 2018Try creating an OS Layer with the Legacy NIC, but NOT deleting any hidden NIC from the OS Layer/Platform Layer.
Try booting that new test OS Layer/Platform Layer from PVS without any App Layers as you want to make sure you are working with the least amount of layers possible in this case.
Sven
May 3, 2018Hi George,
I found the solution after testing like mad 🙂 When creating the plattform layer, the vm will be created with a syntethic network adapter. So, before finalising you have to shut down the hyper-v vm, remove the synthetic network adapter, add the legacy network adapter, boot the vm and delete all hidden NICs, shut down the vm und finalise the image!
I hope this helps others too.
Kind regards
Sven
George Spiers
May 3, 2018Good work, thanks for sharing your steps.
Anonymous
May 6, 2018Thanks George, very helpful with my POC.
I created the platform layer with OS Layer version 1, now I have OS version 2, how can I update the platform layer with the latest OS version?
Thanks
George Spiers
May 8, 2018You don’t need to update the Platform Layer as such. You create a new Image Template using OS Layer v2 and Platform Layer v1, and then publish the image out.
Michael
June 7, 2018Hello George, can you please tell me what’s in the script “ShutdownForFinalize.cmd”? I searched your site and the www but I can`t find any information. Thank you!
George Spiers
June 7, 2018This just checks to see if either an NGEN operation is in progress, a reboot is pending/outstanding post application install or to install drivers, an MSI install is still in process, or a run once script is outstanding. If it finds any it tells you. If nothing is found, the machine is shut down and can be finalised.
Jim
June 8, 2018Hi George,
Thanks for this wonderful post,
Regarding Customizations, I see you suggest doing them in the platform layer. how about removing Windows 10 Store Apps, should they be done in Platform layer too?
I applied some of your tweaks for faster login times but still getting 4 Mins 1st login and 2 Mins subsequent ones. Any ideas what else can be done?
George Spiers
June 8, 2018Windows 10 Store Apps should be removed in the OS Layer BUT if you use App Layering v4.11 there is no longer a need to remove Store Apps (that is if you want to keep them).
2 minutes is way too long. What is Director telling you regarding logon times? It shoudl state how long GPOs took to apply etc.
Leo van Geel
June 21, 2018Hi George, I am doing a multi tenant rollout POC of app layering in Hyper-V.
I noticed that when you edit a OS version, the VM created does not have a legacy network adapter.
Is this what you expect?
George Spiers
June 21, 2018I would expect that yes, you don’t need a legacy network adapter attached to the Packaging VM.
Frank
July 26, 2018Hi George,
Thanks for your detailed documentation, it came in really handy.
I have User Layer (full) turned on as replacement for PVD in Win 10, it seems to be be setting the user limits to 10Gb or something, how do we increase this size (to say 60gb) for all users as they login?
Thanks,
Frank
George Spiers
July 26, 2018Since they are just VHDs you expand it how you would expand any VHD. For example via PowerShell.
J
August 22, 2018Thanks George, very helpful, still using this to finish off a POC.
Question: The target devices are showing a C drive of 10GB with 3 free, where is this set when my OS layer is 40 GB with 15 free and the Platform layer is 15GB with 12 free.
Regards,
J
George Spiers
August 22, 2018Are you using User Layers? That would be what you are seeing.
J
August 23, 2018Hi George, yes we are using user layers.
So the users only get to see their user layers as C in the target devices?
In the packaging machines, we are slowly running out of disk space, how can we expand the OS layer C drive?
George Spiers
August 23, 2018Yeah that is right.
You don’t need to expand the OS Layer, as you create more versions, you specify a size suitable for your tasks e.g. windows patching.
Brit
October 27, 2018Hi,
I want a 40GB user layer for DefaultUserLayerSizeInGb , I just enter 40 (Hexadecimal value) in the dword key?
George Spiers
October 28, 2018Use decimal value.
Brit
October 31, 2018If I change the user layer share in ELM, how do I make sure the target devices point to the new share as users login?
George Spiers
October 31, 2018You update the ELM appliance with the shares and map them to AD Groups.
https://jgspiers.com/citrix-app-layering/#Create-Share
Ray
November 9, 2018One thing I get confused on is where do you do all the Optimizations?
Pvs optimizations, windows 10 script you have me, citrix optimizations and BIS-F sealing?
I noticed you Unselect Optimize Performance in the vda install? Will it meas it up in app layering?
George Spiers
November 9, 2018I personally do my optimisations in the Platform Layer, but when running Windows 10 you have to remove Store Apps from the OS Layer (if you want to remove Store Apps). All other optimisations can be performed in the Platform Layer.
On the other hand, I’ve heard of people performing all optimisations in the OS Layer and even in an App Layer.
Ray
November 12, 2018Thanks George need to build a lab to fully understand app layering I have to many PVS Golden images and it talking to long to update them all. Thanks for the help.
Pingback: App Layering – OS Layer and Platform Layer – Carl Stalhood
Anonymous
December 24, 2018In an environment where PVS and MCS are being used
In order to avoid having to create and patching multiple OS-Layers, would it not be advisable to have “IPv6” disabled in the platform layer, in the layer created specifically for PVS instead?
George Spiers
December 27, 2018Yes I see your point but Citrix say to disable in the OS layer and for some reason not in the Platform layer. You could try disabling in the Platform layer and if it works for you then go with that. Alternatively if you don’t use IPv6 on your network then it wouldn’t matter.
Pingback: Práticas recomendadas para camadas do aplicativo Citrix – Blog de Ti
Rayman
June 26, 2019Hello George,
Thank you for this helpful article/procedure.
I was able to test app layering and all the different combinations, with and without Elastic Layer, with and without User Layer.
On a windows 10 machine without elastic layer, I’m able to reach the desktop within 25 seconds, with elastic layer on the desktop displays in 35 seconds. But when I activate user layer the desktop appears whitin the minute or so and you can really start to work 30 seconds later, when all the applications were fully loaded.
Do you experiment the same in your environment?
Ray (not the same as above :))
George Spiers
June 27, 2019Is that User layer time first logon, or is every logon the same time? (within minute).
I would try an image published with just the OS layer and Platform layer and see if it’s any better.
Rayman
June 28, 2019Every logon is between 1m05s and 1m10s. In the application layer I have only Office 2016. I’m thinking about applying some optimizations in the OS layer first, I found a nice article here https://jgspiers.com/citrix-director-reduce-logon-times/ 😉
I’ll try then with the 2 layers you mentioned.
Thank you.
Ray
SJ
August 6, 2019Hi George,
Thanks for this wonderful article.
I have created OS layer for Win server 2016 (Hyper-V based). When trying to create platform layer named ‘WINSRV2016PFL’ from this OS layer I am getting error ‘Could not find file “WINSRV2016PFL-2019-08-06_17-40-02.172″‘
Do you know what might be wrong?
George Spiers
August 16, 2019Can you create an App layer using the same OS layer? I would suggest re-importing the OS layer. Also check for any newer releases of App Layering and update.
Aunos
March 11, 2020I would like to discuss how to use the app layer. I just started learning and created it. I use OS Layer to connect with ESX ( I use MCS method)
I suspected after I have edited to update OS Layer version ,already. How can I update over to same template VM at ESX or only create new template vm?
I have use old template VM to create Machine Catalog and work on XA, already. How to update Machine Catalog from old template vm or need to use new template vm to update?
George Spiers
May 19, 2020See here: https://support.citrix.com/article/CTX201226
Does this article solve your requirement?
Anonymous
March 4, 2022how can i uninstall citrix app layering image preparation utility from server? Please guide