Citrix Command Center monitors and manages Citrix products such as NetScaler (MPX, VPX, SDX), CloudBridge and AppFirewall. Using Command Center for example allows you to monitor, manage and troubleshoot your entire Citrix NetScaler inventory all from a single web interface console.
Note: Command Center is now End of Life. NetScaler MAS is the replacement https://jgspiers.com/citrix-netscaler-management-analytics-system/
Note: You can now migrate Command Center (version 5.2 build 48.2+) configurations to NetScaler MAS (version 12.0 build 51.24+). Some configurations are not migrated such as syslog purge schedule times, audit templates and performance thresholds. For a complete list and migration instructions see http://docs.citrix.com/en-us/command-center/5-2/migrating-command-center-configurations-to-netscaler-mas.html
The Command Center server collects SNMP and syslog events generated on your devices so you can keep on top of any device or network issue. You can monitor the performance of the entire estate using historical performance charts and graphs. You can monitor and manage the states of virtual servers, services and service groups across the entire NetScaler infrastructure. You can manage multiple devices from the one single console simplifying management. You can even run automated custom or built-in tasks, or upgrade firmware on the devices in your network. Set up alerts to be notified when the configured thresholds are breached. Receive notification on certificate expiration dates to prevent services going offline due to expired certificates. You can even update those certificates right from the Command Center console. You can set up Command Center in a highly available active/standby fashion.
Available with Platinum, Enterprise and Standard editions of NetScaler. You do not need a license to use the Command Center software.
Current version is 5.2 build 44.11. Downloaded from citrix.com – Can be downloaded and installed on Linux servers or Windows. Requires a database. Supports the following databases:
- MySQL 5.5/5.6
- Oracle 10g
- MSSQL 2005/2008/2008R2/2012/2012R2
If using MSSQL as your database you need to use SQL authentication. Windows authentication mode is not supported in Command Center.
A hardware (MPX) appliance is also available. It comes with a MySQL built-in database but the hardware appliance is not free.
The current 5.2 Windows version of Command Center runs on Windows 2003 SP2, 2003 R2 x64, 2008, 2008R2, 2012, 2012R2. Command Center non-windows runs on Linux Red Hat Enterprise AS 4, ES 4/5.1/6.2/6.4 and Centos 5.5/6.2 (32bit/64bit) and 6.5 (32bit).
Useful ports: (CCServer = Command Center Server)
- UDP 161 – SNMP communication between CCServer and NetScaler/CloudBridge.
- TCP 80/443 – HTTP and HTTPS communication between CCServer and CloudBridge.
- TCP 443 – HTTPS communication between NetScaler SDX and CCServer.
- TCP 8443 – HTTPS communication from Command Center client and server.
- TCP 9090 – HTTP communication from Command Center client and server.
- TCP 6011, 2014, 1099 – Communication between HA servers.
Command Center Agents – These agents act like gateway type devices. If you have a large number of NetScaler devices in your environment you can deploy agents which manage and monitor these devices on behalf of the Command Center server. This reduces the load on the Citrix Command servers.
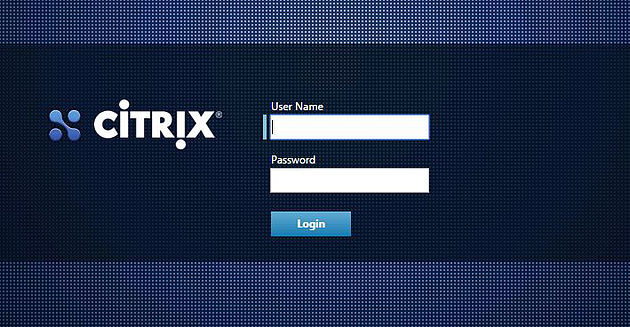
On first log on to Command Center web interface, the username is root and password is public.
After downloading the Citrix Command Center 5.2 software from Citrix, click on CC_Setup_5.2_44_11.
Click Next.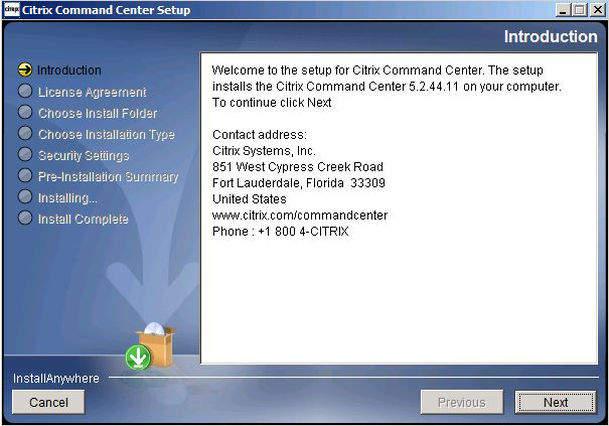
Accept the terms of the License Agreement. Click Next.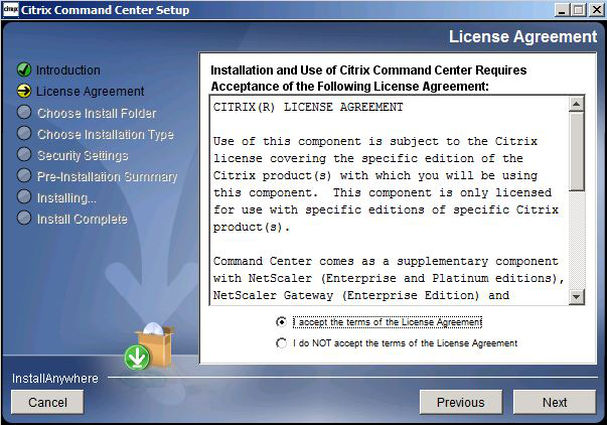
Specify an install location. Click Next.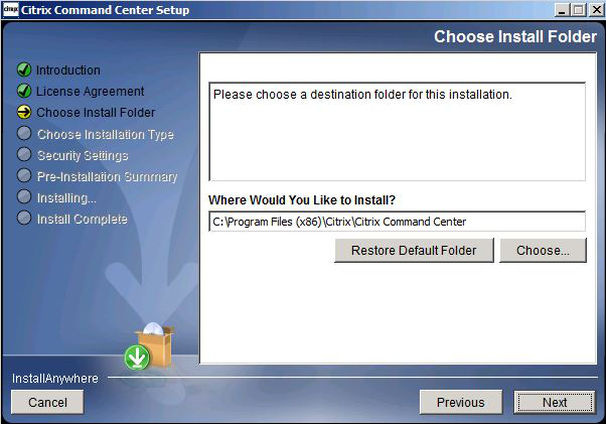
Select Typical (recommended). Click Next.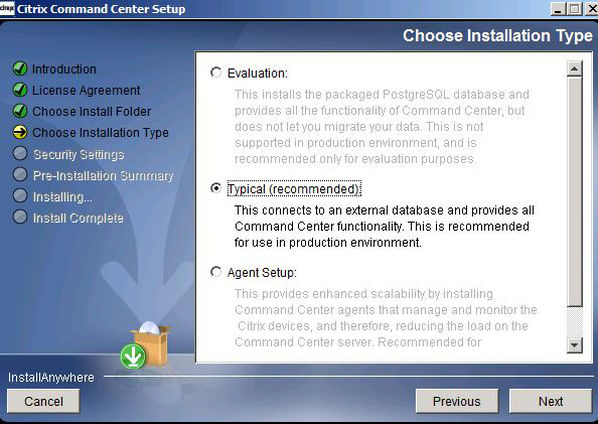
From the drop down you can choose MySQL, Oracle or MSSQL. I have used MSSQL.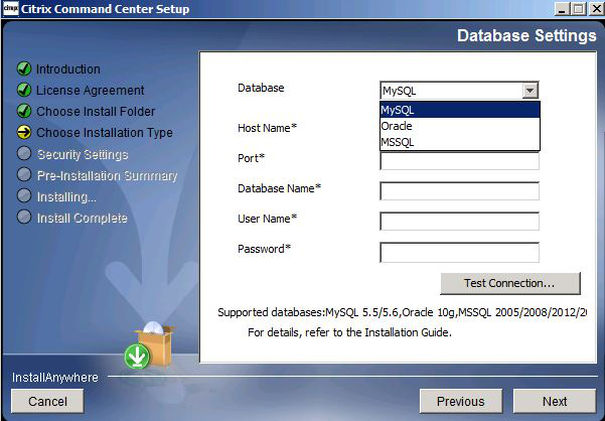
Fill in your database connection details. Notice I have used localhost because SQL is installed on the same server I am installing Command Center on to. Do not do this in a production environment. Seperate your SQL instance on to a dedicated SQL server.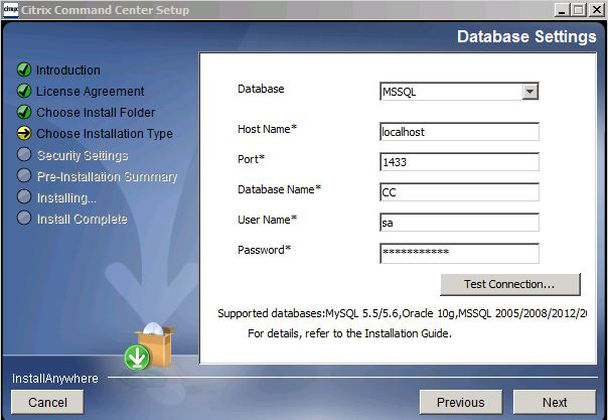
Click Test Connection to confirm the connection to database is successful.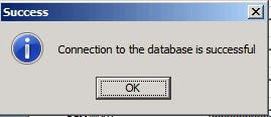
Choose whether you want to connect to the Citrix Command Center web management console over HTTP or HTTPS (recommended). This can be changed later if you decide. Click Next.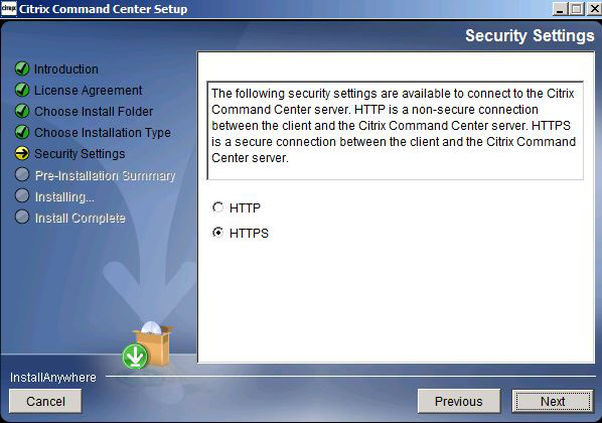
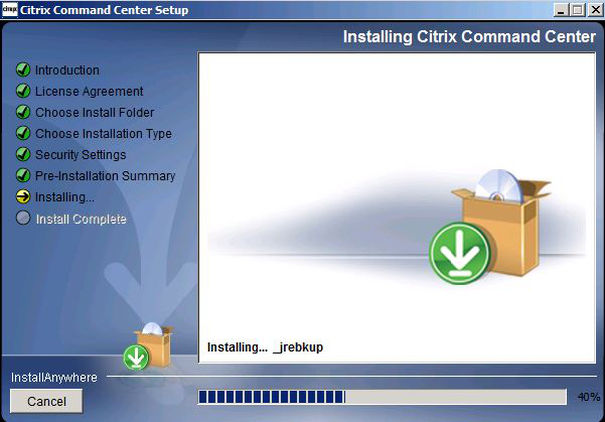
Click Install.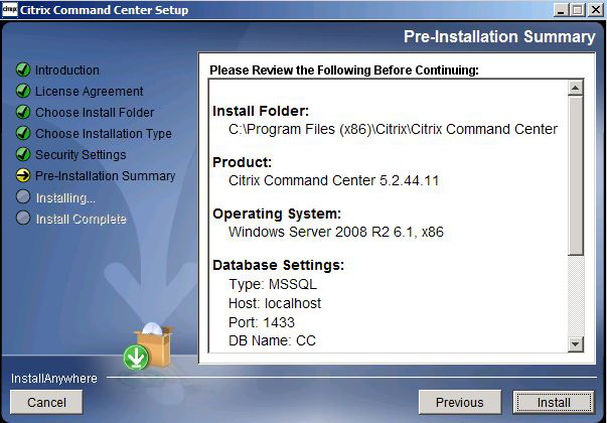
Click Done.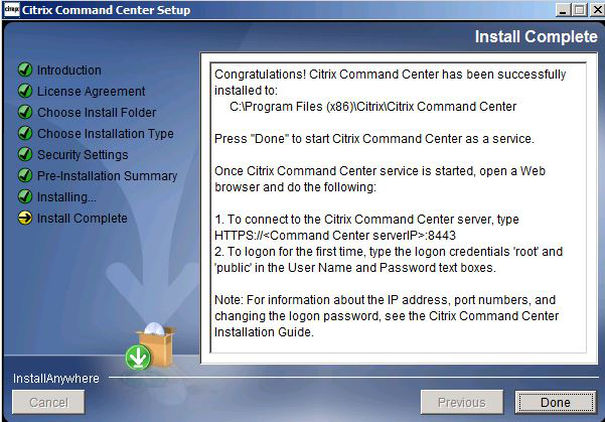
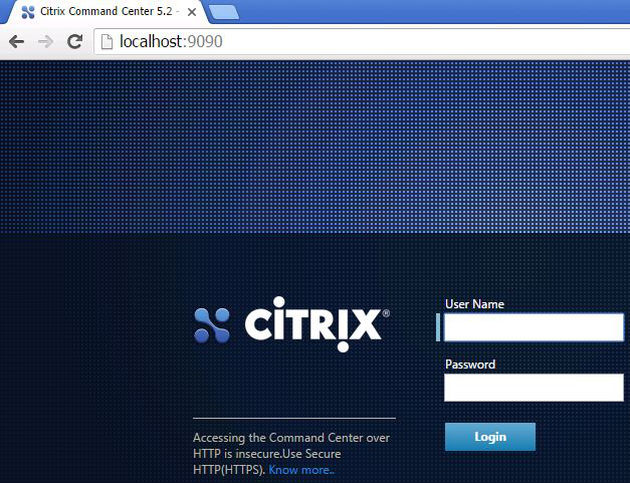
Now we can connect up to the web management console.
HTTP – http://commandcenterserver:9090
HTTPS – https://commandcenterserver:8443
Username – root
Password – public
Click Login.
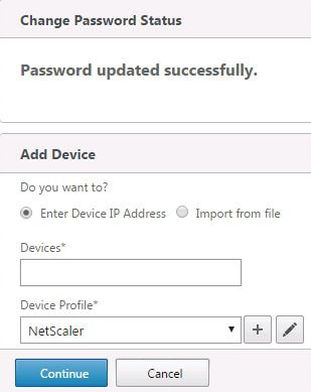
Next you will be asked to change the root password. Create a strong password and specify a value under Password expires in. This value is in days. Click Save.
Now you can add devices to Command Center. Enter an IP address, hostname or even an IP range if you want to discover multiple devices. Select a profile. For example, if adding a NetScaler device, use the NetScaler profile. The following profiles that can be selected are:
- NetScaler/SDX
- CloudBridge/Advanced Platform
By default, if adding a NetScaler, the NetScaler profile will attempt to authenticate with the NetScaler device using nsroot/nsrootwhen discovering your NetScaler devices. If you have changed the nsroot default password you will get the following errors:
Error on Citrix Command Center.![]()
Error on NetScaler CLI. 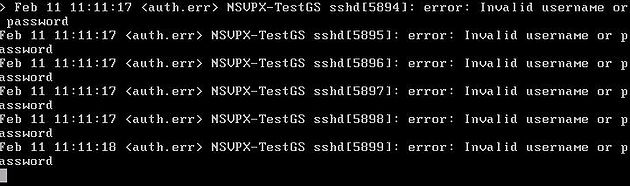
To get around this, create a new NetScaler profile. I advise not editing the default NetScaler profile. You will see one reason why later when we deploy VPX to XenServer. You can create a new profile by navigating to Citrix Network -> Device Profiles.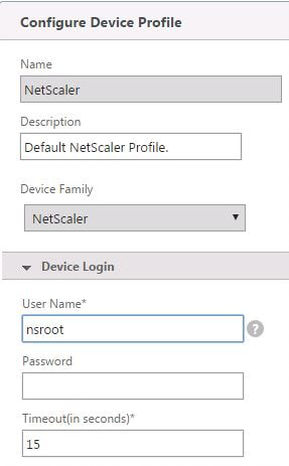
Now back on the Add Device screen. Enter your NetScaler details and select the correct Device Profile. Click Continue.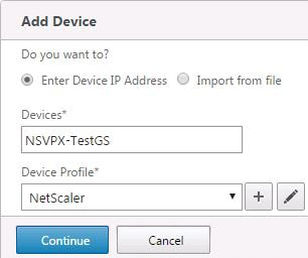
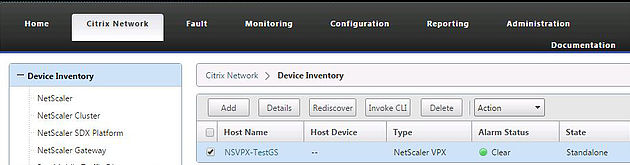
The Discovery Process will complete and the discovered NetScaler appears under Device Inventory. If your NetScaler is set up in a highly available pair both NetScaler appliances will be discovered.
Navigate to the Administration tab of the management console and then Security -> Users. Here you can add new users to access the management console.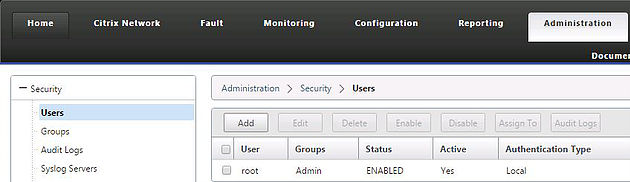
Navigate to Security -> Authenticate Settings.
Specify LDAP & Active Directory as your authentication server and enter details as below. Click OK.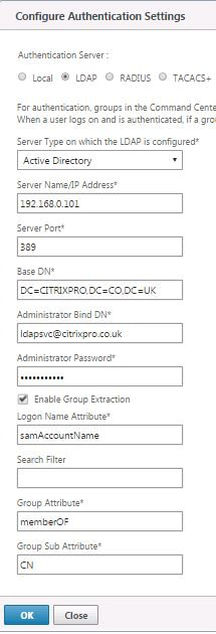
Navigate to Security -> Fallback User Settings.
Here you can configure local fallback users that will be allowed to log on if Active Directory authentication becomes unavailable. Click OK.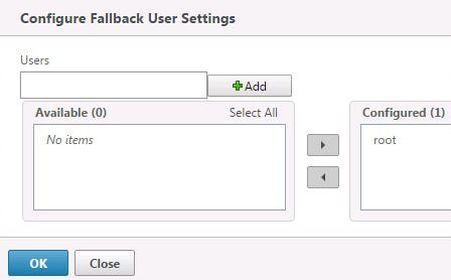
Navigate to Security -> Password Policy.
Specify a Minimum Password Length and Enable Password Complexity. Click OK.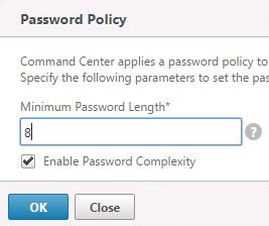
Navigate to Security -> Users -> Add.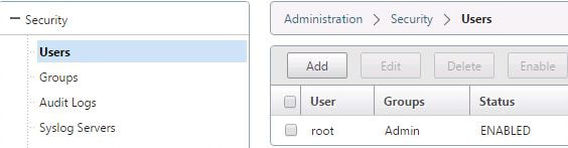
Enter user account details. Notice you can specify this account as a non-LDAP authenticated user and assign the user as a Fallback Authentication User. Specify group membership and password/account expiry values. Click Create.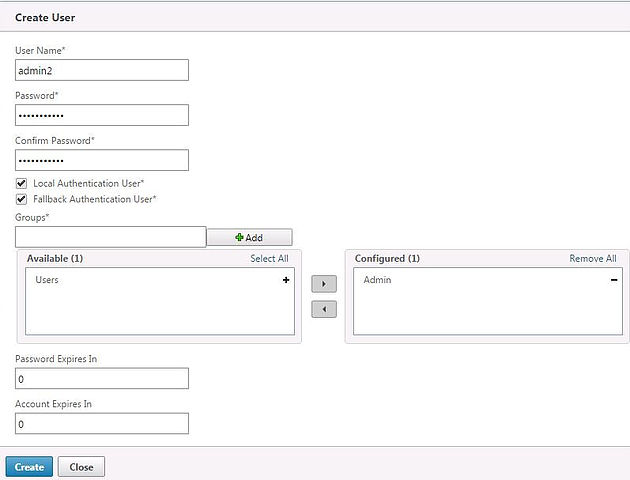
And here it tells me the password I supplied didn’t match the complexity requirements I previously set. I did this on purpose to prove the complexity policy had taken effect. Promise!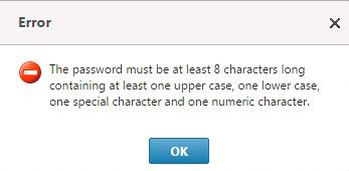
Navigate to Security -> Groups -> Add.
Here you can add groups from Active Directory and assign them Command Center permissions. Click the search symbol next to Group Name.
Enter an Active Directory group name such as Domain Admins and click Go.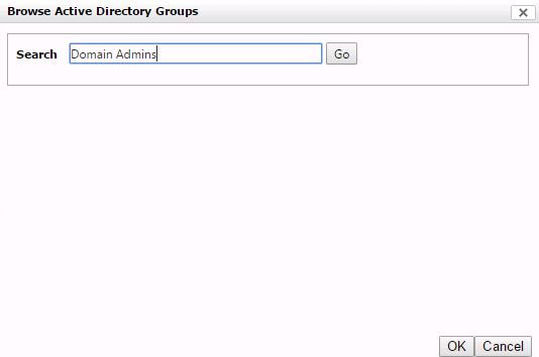
Command Center will search for the available matching groups and return them to your display. Move Domain Admins from Available to Selected and click OK.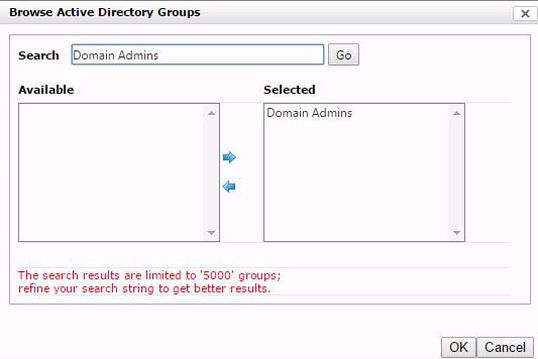
Assign desired permissions and click OK.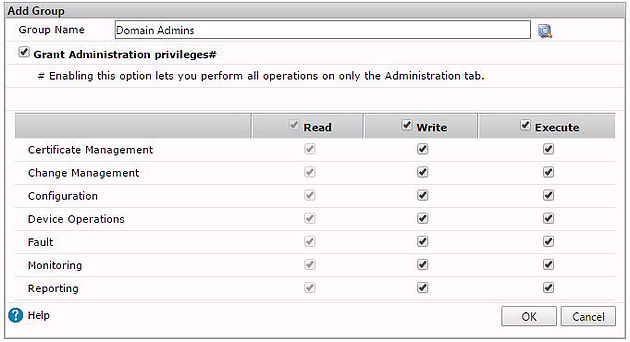
Navigate to Diagnostics -> Settings -> Access Settings.
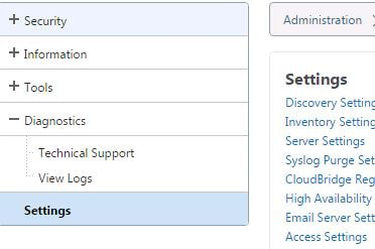
Here you can change the Command Center management console to use HTTP or HTTPS access and change the port/session timeout.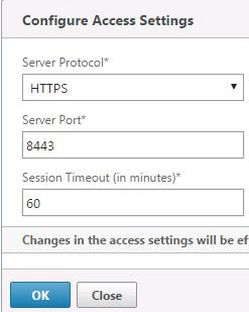
Click OK to change the access method. Restart the Citrix Command Center service and access the web console using the new protocol/port.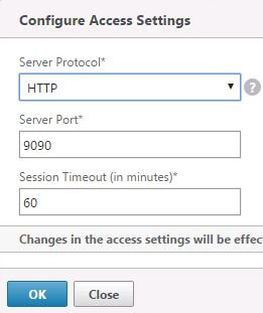
Navigate to Administration -> Tools -> Install Certificate.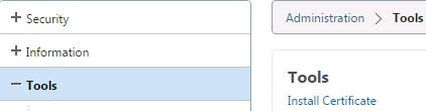
Click Choose File and select a PKCS file. If you operate in an Active Directory environment, request a certificate from your ADCS (Certificate Services) servers and export the certificate and private key to .pfx.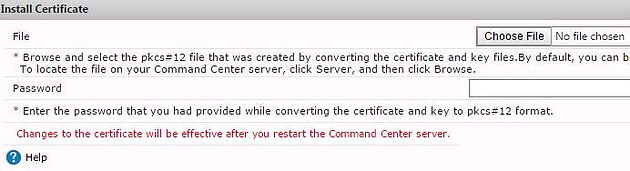

Enter the import password and click OK.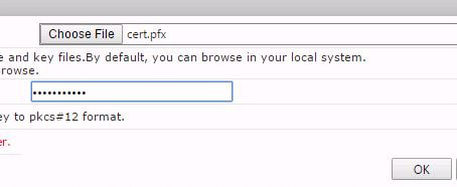
Click OK on the success message.
Restart the Citrix Command Center service.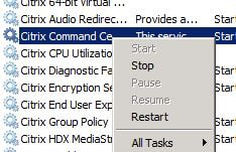
As Command Center discovered my NetScaler appliance, during the discovery process SNMP was configured based on the settings within the NetScaler profile.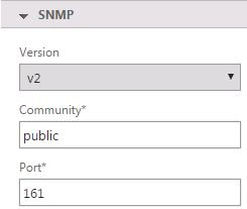
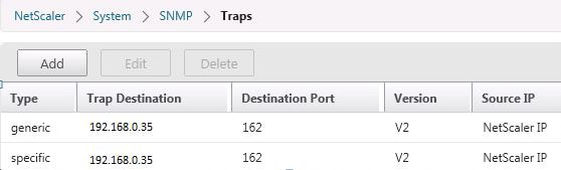
We can see this reflected on the NetScaler by navigating under System -> SNMP.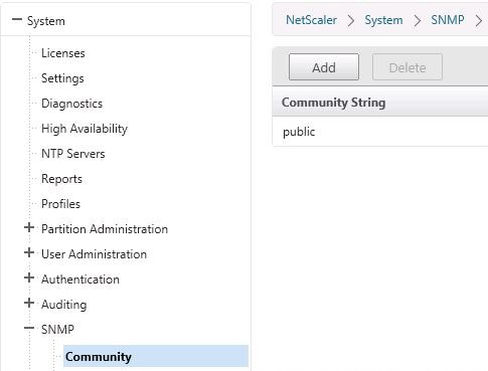
As you can see Command Center has added itself as the destination for any generated traps/events on NetScaler. All traps/events generated on this appliance will be forwarded to Command Center.
During discovery Command Center also collects information about the NetScaler appliance which can be found through the Command Center console by navigating to the Device Properties page. Click on your discovered NetScaler device (checkbox) and select Details.
A new web page opens up, and you can see details of the appliance right down to things such as the running configuration and licensing.
There are many different tasks you can complete on a NetScaler from Command Center. Selecting your NetScaler device then clicking the Actions button shows you some of the actions you can accomplish. Choose the Run Report action.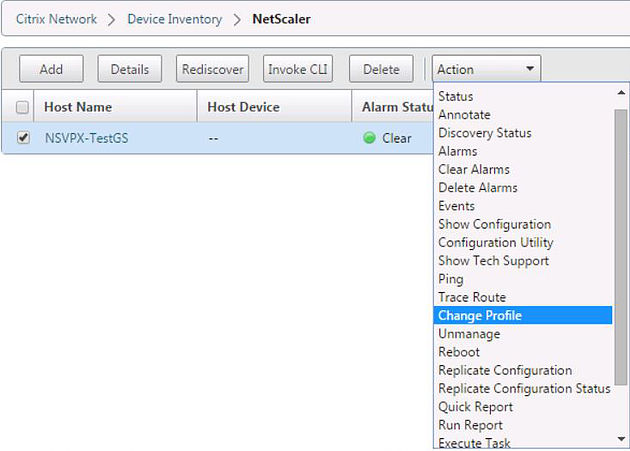
Select the ResourceUtilization report. Specify a time period and click OK.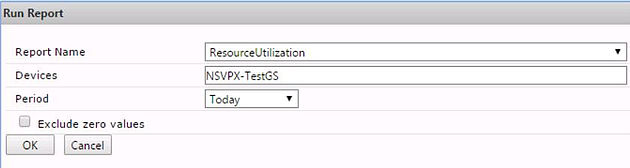
The report shows the NetScaler appliance CPU and memory usage for today. You can get results further back in time.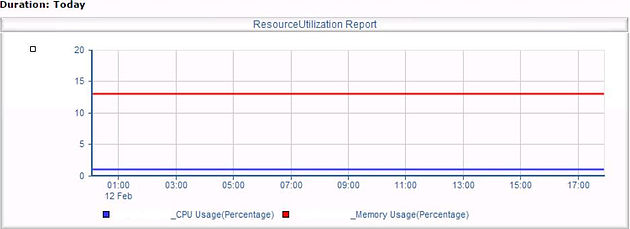
Another powerful feature Command Center gives you is the ability to provision NetScaler VPX devices on to a XenServer platform straight from Command Center itself.
First, add your XenServer to Command Center. Navigate to Device Inventory -> Add.
Select the XenServer profile and enter your XenServer IP address. Edit the XenServer profile and specify the current root password or discovery will fail.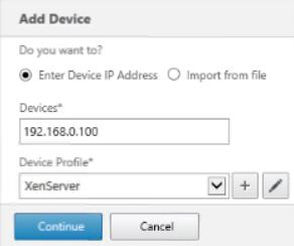
At this stage XenServer is now discovered in Command Center.
Next create a NetScaler VPX template on XenServer. This can be done by deploying NetScaler VPX to XenServer then converting the VM to a template. Make sure NetScaler is in the name of the template or Command Center will not recognise it.![]()
Navigate to Device Inventory -> XenServer, select your XenServer, Actions -> Provision VPX.
Enter the NetScaler configuration details which Command Center will configure for you. Click OK. NetScaler VPX will now be deployed. During deployment Command Center will use the default NetScaler profile to authenticate with the VPX appliance. This is important to know because if you have edited the password of the default NetScaler profile authentication will fail against the new VPX and the VPX will not be correctly provisioned. Make sure the default NetScaler profile uses credentials of nsroot/nsroot.
After a short time the VPX will be deployed, configured and discovered within Command Center.![]()
![]()
Note that if you used the wrong profile against a NetScaler device or just want to change one, select the NetScaler device and click Action -> Change Profile.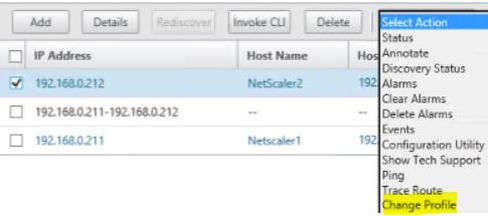

As Command Center collects events on devices such as NetScaler, these events are used to generate alarms if something is wrong.
As you can see below, a Critical alarm has appeared for one of the NetScaler appliances that is in an HA pair. This is because I restarted the appliance.![]()
Select the appliance, click Actions -> Events.
The events report the NetScaler appliance was in a DOWN state.![]()
Clicking on the event and clicking Details shows some more information on the event.
This is very useful because if users report they could not access for example the NetScaler Gateway out of hours it is incredibly simple to track if the NetScaler was offline at any stage.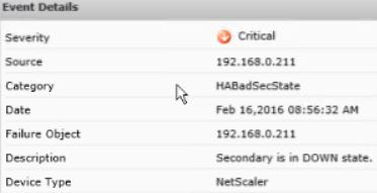
You can also view a list of the alarms generated by these events.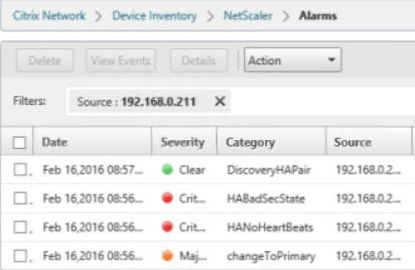
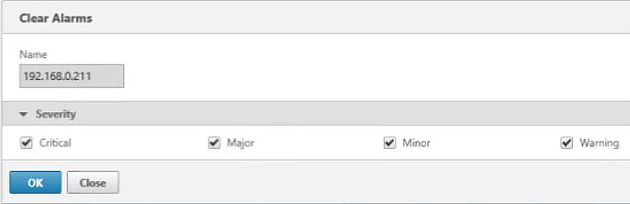
Once you are happy any fault is resolved you can clear the alarms to bring the NetScaler back to a healthy state in Command Center. Note that you can also export alarms and events for record.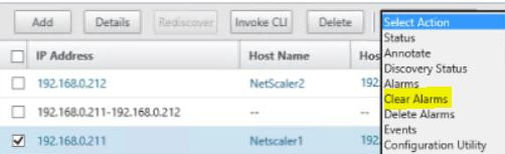
If both NetScaler appliances are green/healthy, the NetScaler HA Cluster will also show as healthy.
You can execute tasks on NetScaler directly from Command Center using the custom or built-in tasks. Navigate to Device Inventory -> NetScaler, select the NetScaler standalone node or HA node, click Action -> Execute Task.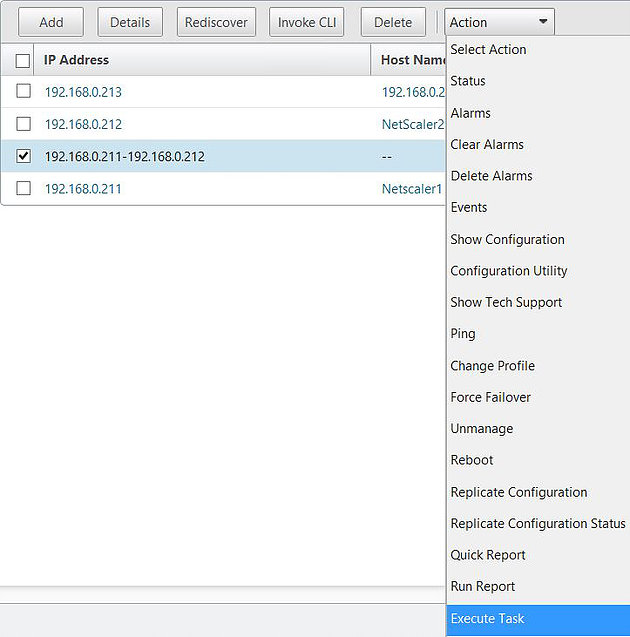
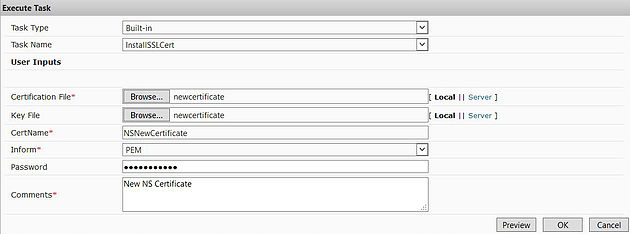
Select Task Type, Task Name and then specify any required user inputs. This example shows me using the built-in InstallSSLCert task to install a new certificate on my NetScaler Highly Available pair. Click OK.
The task has completed with success.
Over on the primary NetScaler node the new certificate shows as expected.
To view a list of the built-in tasks or create your own, navigate to Configuration -> Built-in Tasks or Custom Tasks.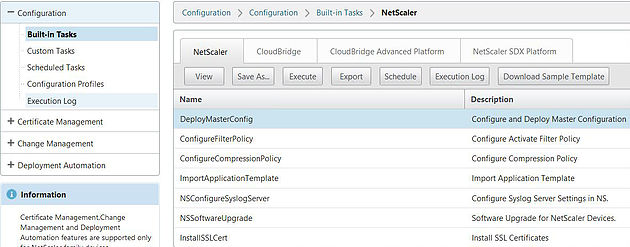
You can click on a task and create a schedule.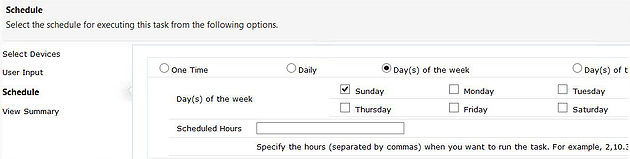
If you want to create custom views for generated events navigate to Fault -> SNMP -> Events -> Views -> Add.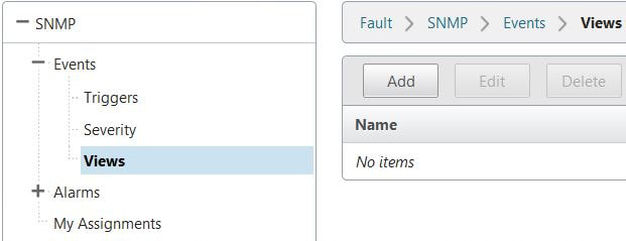
Specify a name, Device Type, Severity and select the device you want to see events for.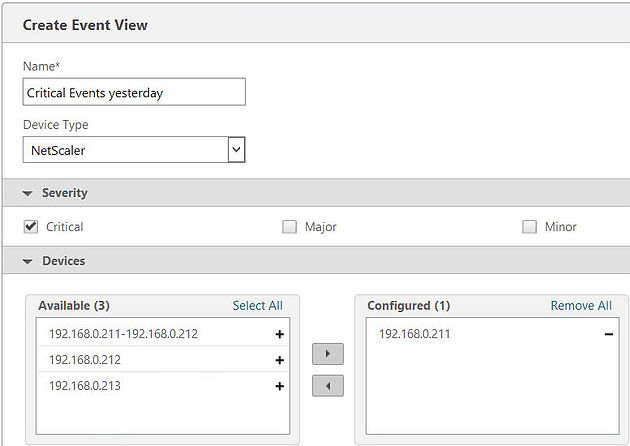
Specify an Event Age. Click Create.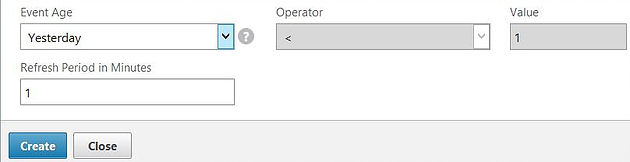
Now double-click the newly created view.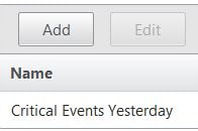
The custom view events display.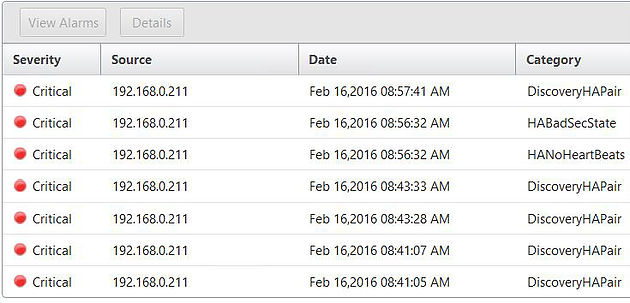
You can do the exact same for alarms by navigating to Fault -> SNMP -> Alarms -> Views -> Add.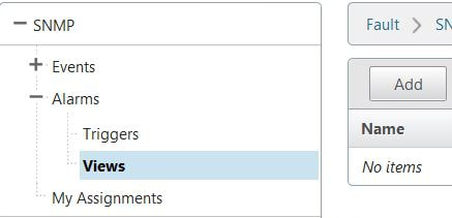
Anonymous
May 14, 2016Very detailed with the number of screenshots provided, helped out a ton! One interesting thing learned is that Command Center can also manage CloudBridge, which is becoming a hot topic now a days. I work for a law firm and was able to implement Command Center by just using this site and the one mentioned below. Cool stuff.
– Jake
http://techfusioncbt.com/citrix-netscaler-vpx-mpx-sdx-networking-network/citrix-netscaler-command-center/
Jim Griffin
June 10, 2016One thing I am trying to figure out is this: if we have two Command Center servers for redundancy but we have to use an SQL server, does that create a single point of failure? Should we then not bother to have two servers?
thanks
George Spiers
June 10, 2016Well yes it does create a single point of failure. If SQL goes down, Command Center won’t function. It is nice to have the option to make Command Center highly available though. For me, I generally only deploy one Citrix Command Center VM which sits on a cluster. This provides some level of high availability. The same goes for the SQL server.
I guess the real answer depends on how critical Command Center will be for you i.e. how much downtime can you afford to have. You can also make SQL HA. Hope this helps.