Starting StoreFront 3.9, it is possible to use SAML authentication direct to StoreFront with ADFS and integrate that with the Citrix Federated Authentication Service. Users authenticate at the Identity Provider, the assertion is sent to StoreFront, a certificate is issued for authenticating to the VDA.
You can also configure the same scenario but with NetScaler for external access. See https://jgspiers.com/adfs-authentication-storefront-netscaler-saml-citrix-federated-authentication-service/
You can use Citrix Federated Authentication Service with Microsoft Authentication Mechanism Assurance. A way to control access to files, shares, printers, applications and more based on if users authenticate with a certificate or not – see https://jgspiers.com/microsoft-authentication-mechanism-assurance-citrix-federated-authentication-service/
Previous to StoreFront 3.9, you had to go through NetScaler to use SAML authentication against StoreFront. Now you can go direct with 3.9 without the need for NetScaler for internal connections. ADFS is currently the only supported SAML Identity Provider for use directly to StoreFront. Users authenticate with SAML at the Identity Provider, and then StoreFront issues a certificate to the user which is used for authenticating to the VDA.
SAML authentication direct to StoreFront can be used with Receiver for Windows 4.6+ (not possible when through NetScaler) and through Receiver for Web.
♣ Required Ports for Federated Authentication Service
♣ Install and Configure Active Directory Federation Services
♣ Install and Configure the Citrix Federated Authentication Service
♣ Configure StoreFront
♣ Add StoreFront Relying Party Trust
♣ Log on to StoreFront using SAML
♣ Events Logs, viewing and revoking issued Certificates from FAS
Required Ports for Federated Authentication Service
| Source | Destination | Port | Purpose |
| StoreFront | FAS Server | TCP 80 | Send user’s identity assertion |
| FAS Server | AD Certificate Services | TCP 135 | Certificate request |
| AD Certificate Services | FAS Server | TCP 135 | Issue certificate from certificate request |
| VDA | FAS Server
Domain Controller |
TCP 80
TCP 389/636 |
Get user certificate from FAS server
Authentication of connecting user |
Install and Configure Active Directory Federation Services
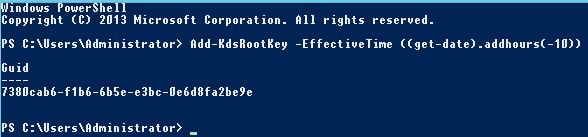
Before installing the ADFS role on Windows Server, draw up PowerShell and enter command Add-KdsRootKey -EffectiveTime ((get-date).addhours(-10)). This command immediately creates a Key Distribution Service Root Key, stored in Active Directory and allows us to create a group Managed Service Account password for the ADFS service account we create later. Run this command from a Domain Admin or Enterprise Admin account.
Now intall the ADFS role using Server Manager, then launch the Active Directory Federation Services Configuration Wizard -> Next.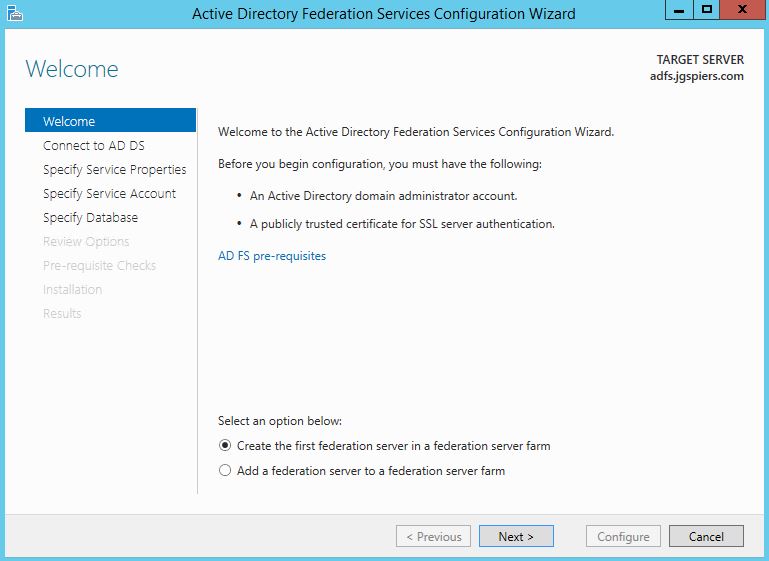
Specify a Domain Admin account to perform the ADFS configuration. Click Next. 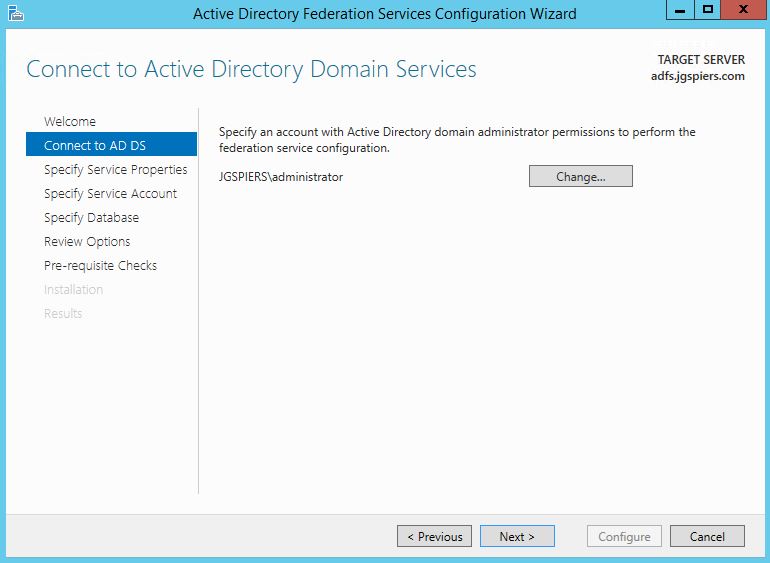
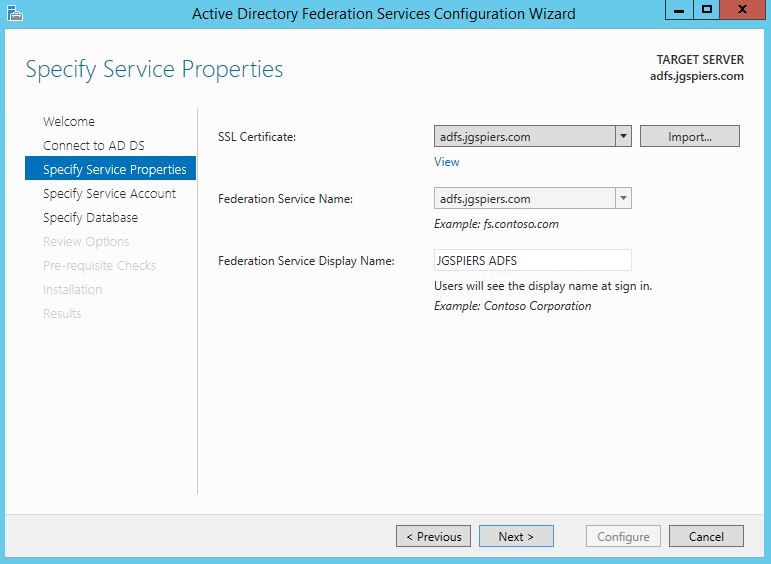
Import a public issued cerificate that matches the ADFS URL users will be redirected to for authentication. In my case, this is adfs.jgspiers.com. Set the Federation Service Name as your ADFS URL. The Federation Service Display Name will show to all users at log on. Click Next.
Note: The ADFS URL must be different from the ADFS server hostname. In my case, the ADFS server has a hostname of idp.jgspiers.com and an ADFS URL reachable via adfs.jgspiers.com.
Under Create a Group Managed Service Account enter a unique name. Managed Service Accounts are supported in Windows Server 2012 onwards and come with strict, complex passwords which are changed automatically every 30 days. Click Next. 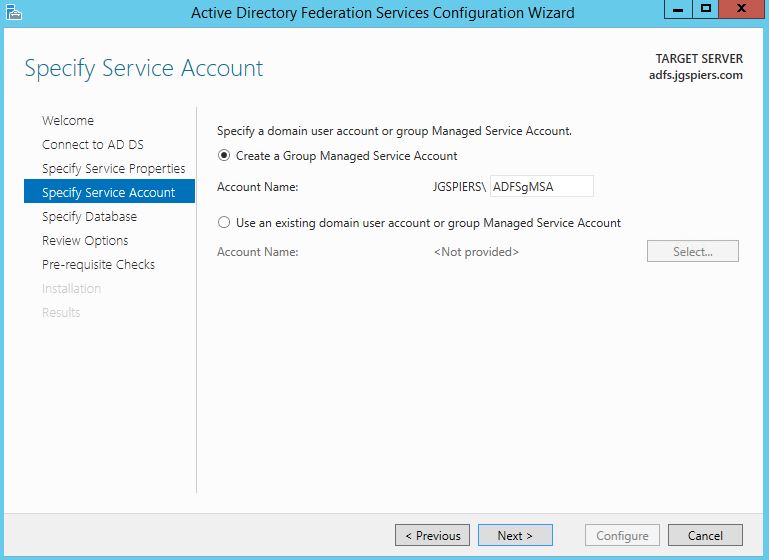
Check Specify the location of a SQL Server database and enter your SQL server details. Click Next. 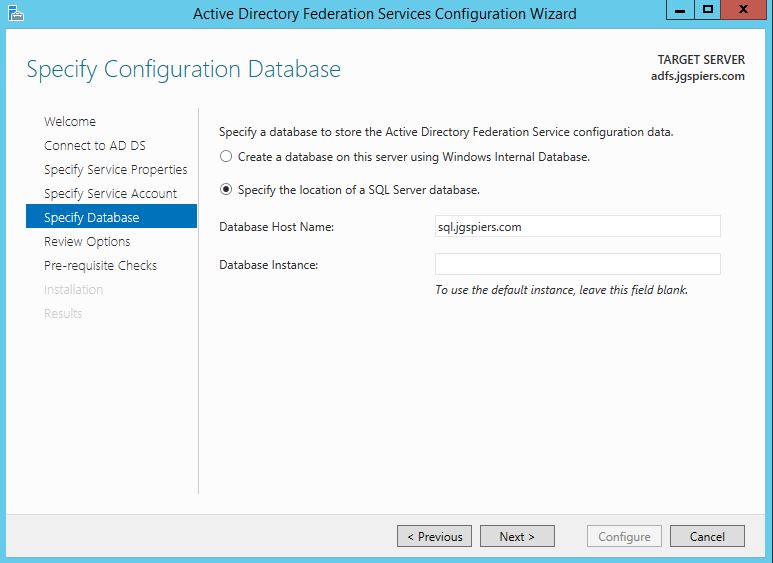
Click Next after reviewing your options. 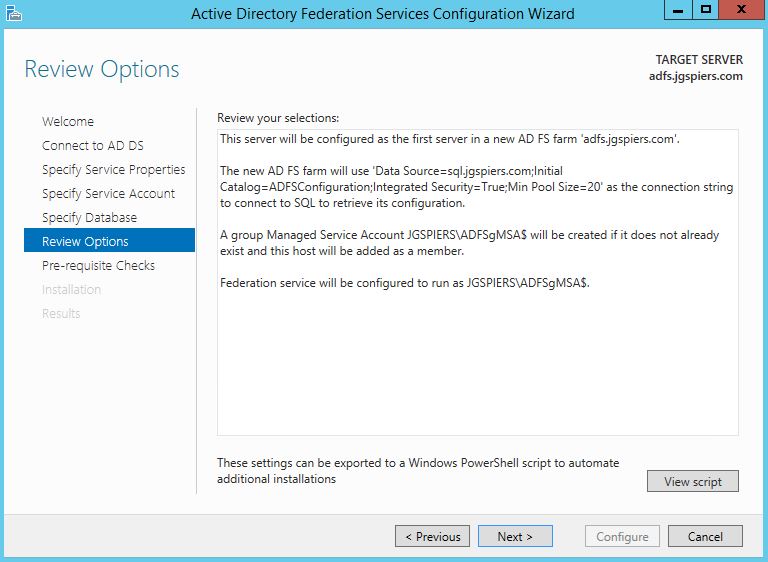
Click Configure.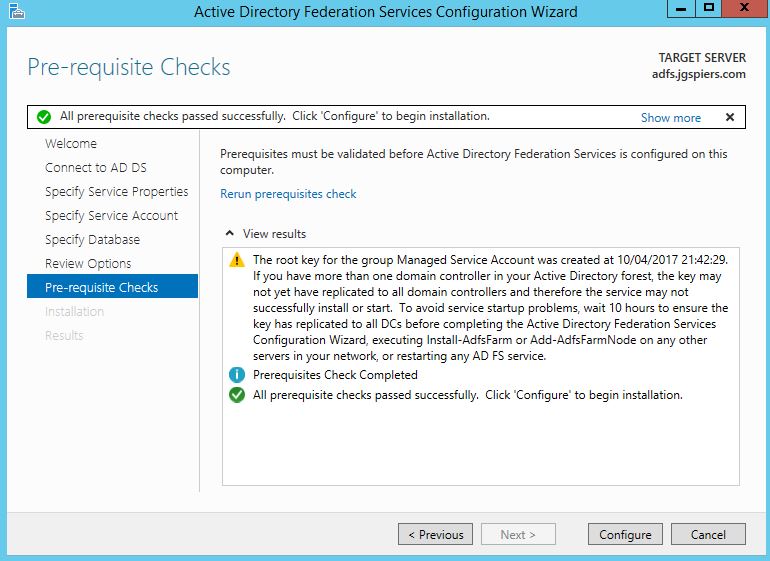
Providing no errors occur, the ADFS server will be successfully configured. Click Close. 
Create an internal A Record for your ADFS URL.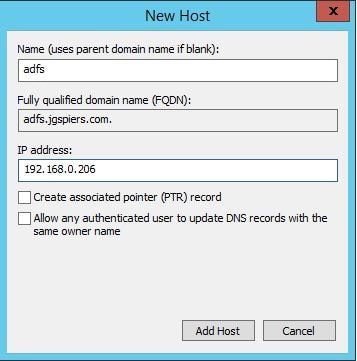
Next on the ADFS server, launch PowerShell and run command Set-ADFSProperties -AutoCertificateRollover $false. I am doing this because I do not want to use the ADFS generated Token-decrypting and Token-Signing certificates. Instead we will use our own generated through ADCS (Active Directory Certificate Services). In my case I have two certificates with subjects of:
- adfssigning.jgspiers.com
- adfsdecryption.jgspiers.com

Enrol the certificates, install them on the ADFS server and then launch the ADFS Management console. Browse to AD FS -> Service -> Certificates.
Use the Add Token-Signing Certificate and Add Token-Decrypting Certificate actions to add your own self-signed certificates as shown below. 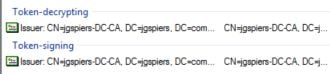
Token-decrypting certificate: 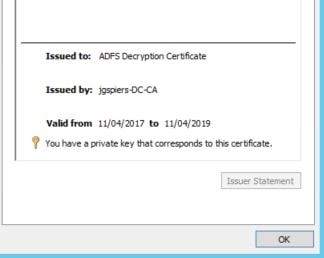
Token-signing certificate: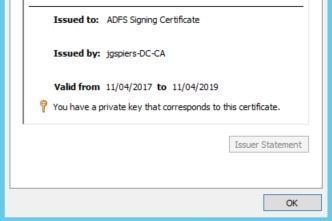
Within the ADFS Management Console, click each new certificate and select the Set as Primary action. Delete the existing, autogenerated Token-decrypting and Token-signing certificates that came with the installation.
On the ADFS server, launch MMC and add the Computer Certificates Snap-in. Navigate to the Personal store, right-click on the Signing certficiate and click All Tasks -> Manage Private Keys. 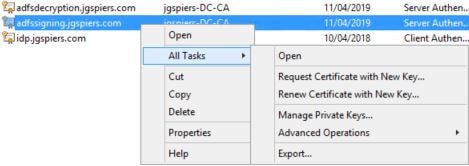
Click Add. 
Click Object Types and check Service Accounts -> OK. Enter the name of the Managed Service Account you used during ADFS configuration. 
Specify Read permissions for the service account and click OK. Perform the same action on the Decrypting certificate. Afterwards, restart the Active Directory Federation Services service. 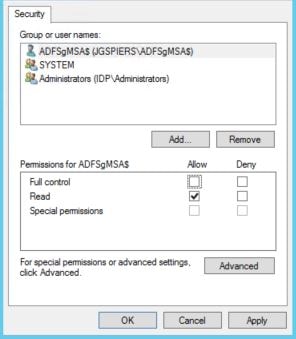
Install and Configure the Citrix Federated Authentication Service
To begin, as a Citrix recommended practice, deploy a dedicated server to host the Federated Authentication Service. The server must be running Windows 2008 R2 or later. This service automatically on behalf of users enrols for certificates against Active Directory Certificate Services, so it is important that this server is secured.
To insall FAS, launch the XenApp/XenDesktop 7.9+ media and click on Federated Authentication Service.
Accept the License Agreement and click Next. 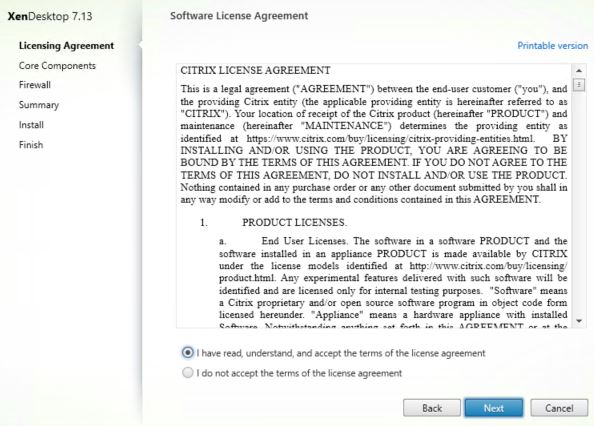
Click Next. 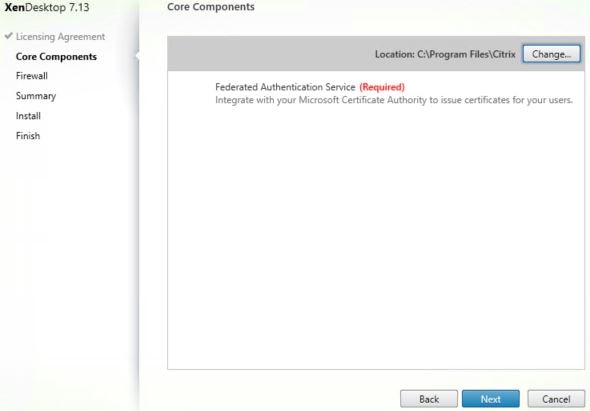
Click Next. Port 80 TCP will be used. 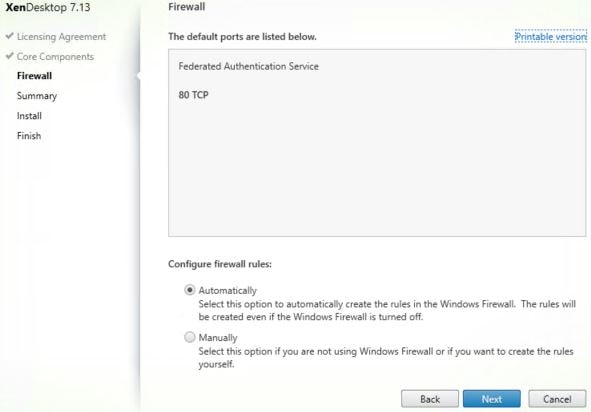
Click Install. 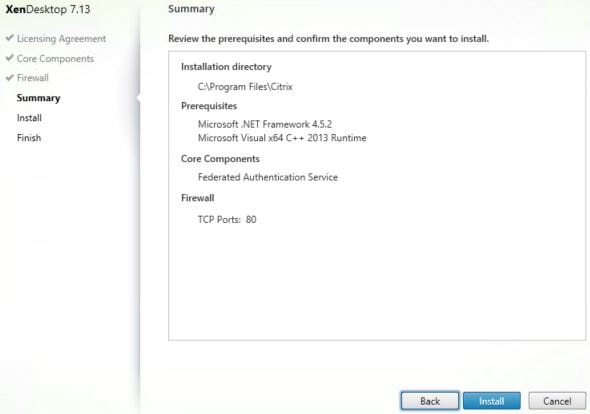
Once FAS has installed, log on to your StoreFront server and launch PowerShell. You are going to enable FAS on the Store of your choice. Run the following commands and propagate to remaining servers if applicable:
- Get-Module “Citrix.StoreFront.*” -ListAvailable | Import-Module
- $StoreVirtualPath = “/Citrix/Citrix” (Note: Change /Citrix/Citrix to your own store path)
- $Store = Get-STFStoreService -VirtualPath $StoreVirtualPath
- $Auth = Get-STFAuthenticationService -StoreService $Store
- Set-STFClaimsFactoryNames -AuthenticationService $Auth -ClaimsFactoryName “FASClaimsFactory”
- Set-STFStoreLaunchOptions -StoreService $Store -VdaLogonDataProvider “FASLogonDataProvider”

On a Delivery Controller, run commands asnp citrix.* and Set-BrokerSite -TrustRequestsSentToTheXmlServicePort $true ![]()
Next we need to use Group Policy to specify which servers are used for FAS. On the FAS server, navigate and copy all files and folders from C:\Program Files\Citrix\Federated Authentication Service\PolicyDefinitions. 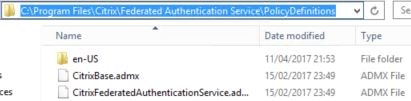
Copy them to the PolicyDefinitions folder within SYSVOL aka your Group Policy Central Store. 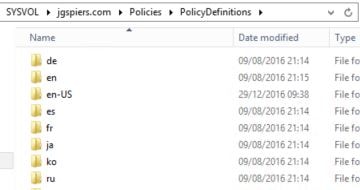
Now create a Group Policy Object which points to your FAS, StoreFront and VDA servers. You could link the policy to a high level OU or at the domain level if you don’t want to be more granular. Expand Computer Configuraton -> Policies -> Administrative Templates -> Citrix Components -> Authentication and double-click Federated Authentication Service. 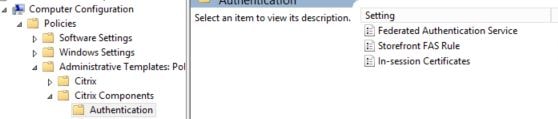
Check the Enabled radio box. Click Show beside DNS Addresses and enter your FAS server hostname. Click OK.
Note: You cannot use CNAME records when specifying the FAS address.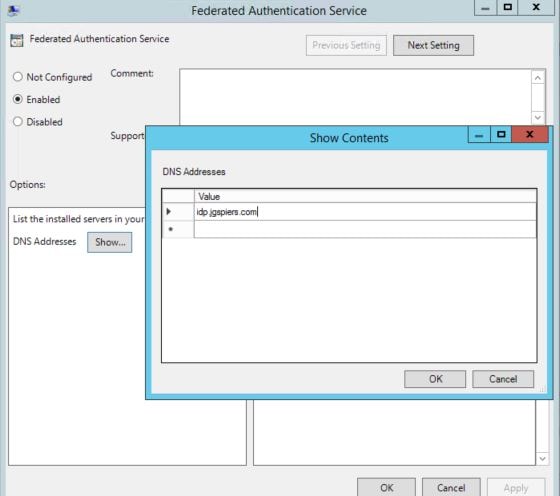
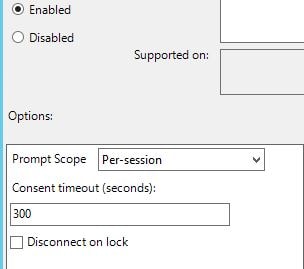
You can also enable the ability for in-session certificates by configuring the In-session Certificates setting. By default, VDAs will not allow access to FAS issued certificates after a user logs on, however this setting does allow the use of certificates and places a certificate in the users personal certificate store after logon. This is useful when you have applications or web applications that require client certificate authentication or when you need to sign documents using a digital certificate. 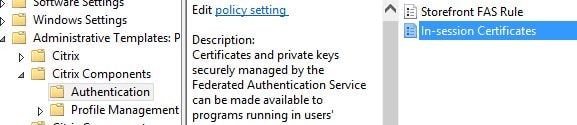
You can specify that prompts for consent to use the certificate in-session can appear on-screen per-application, once for a session or not at all. You can also configure how long a consent lasts for before asking again.
Note: Make sure to also check Available after logon within the FAS administration console under User Rules or else users will be denied access to their certificates when they log on to a VDA.
Log on to your FAS server and launch the Citrix Federated Authentication Service console. You may have to run a gpupdate before the FAS address appears as below. Click Ok. 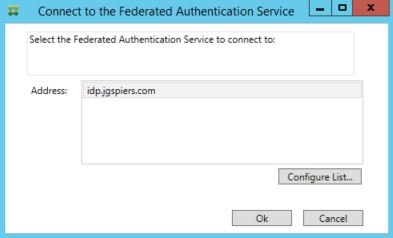
On the Initial Setup page, click Start next to Deploy certificate templates. 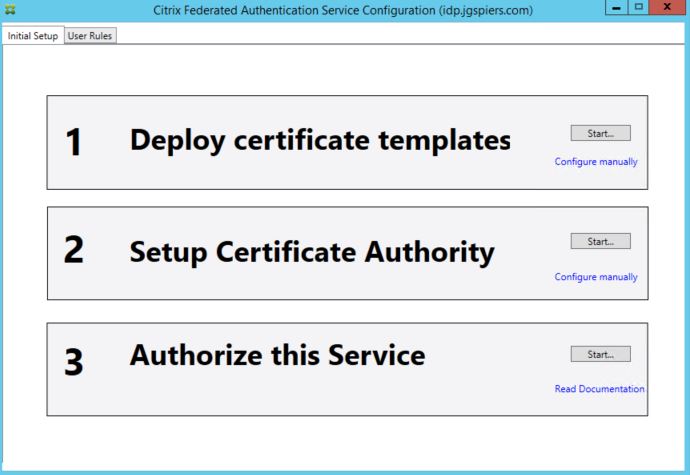
As mentioned in the note, FAS will attempt to install three certificate templates on to your ADCS server. This may require that the account you are running the FAS tool with is a Domain or Enterprise Admin. These steps can also be performed manually if needed using PowerShell. You have the additional option of publishing these templates to multiple Certificate Authorities using PowerShell, if you wanted some high availability/load balancing.
The three templates are:
- Citrix_RegistrationAuthority_ManualAuthorization – This template is used to authorise FAS servers.
- Citrix_RegistrationAuthority – This template is used to generate the certificate request for users.
- Citrix_SmartcardLogon – This template is used to issue certificates to users.
Click OK.

The first section will turn green once the templates have been installed. The second step may also turn green without any additional input. If it dooesn’t, click Start under step 2 and select your Certificate Authority. Do not proceed to step 3 just yet. 
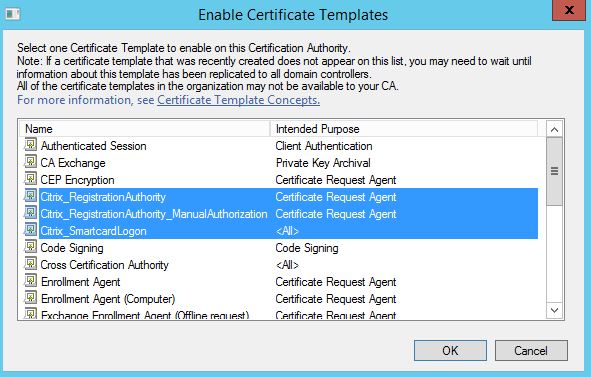
On your Certificate Services server, the three certificate templates show as below. 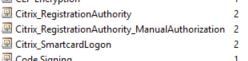
Open the Certificate Authority console and navigate to Certificate Templates, right-click and select New -> Certificate Template to Issue. 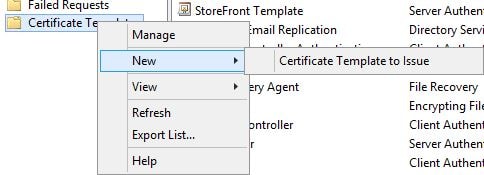
Highlight the three Citrix FAS related templates and click OK.
Note: You can choose to optionally deploy either the Citrix_RegistrationAuthority or Citrix_RegistrationAuthority_ManualAuthorization templates. The first template is for auto-enrolment and the second requires certificate requests using that template to be manually issued. If you are using the Citrix_RegistrationAuthority template, you should restrict the permissions so that only the FAS server can auto-enrol this certificate.
Now return to the FAS server. Click on Start beside step 3, Authorize this service. What this is going to do is submit a certificate request to ADCS based on the Citrix_RegistrationAuthority_ManualAuthorization or Citrix_RegistrationAuthority certificate templates. The first template requests manual approval, whilst the second is configured for auto-enrolment. 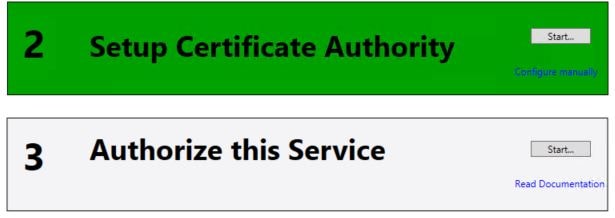
Click OK. The request will be sent to the selected Certificate Authority server, but you can specify another. 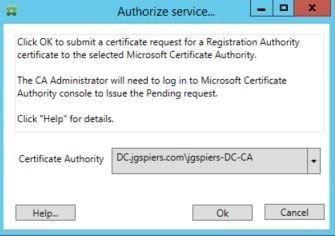
If you are manually approving using the Manual Authorization template, the FAS console will wait for approval. At this stage you need to manually issue the certificate request. 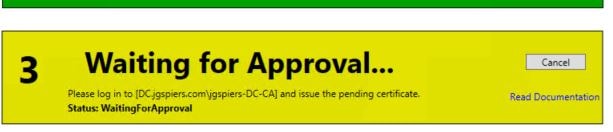
Open up the Certificate Authority console, navigate to Pending Requests. Right-click on the existing pending request and click Issue under All Tasks. 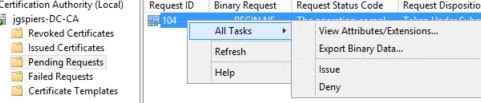
Once the certificate has been successfully issued, step 3 will turn green. The Initial Setup is complete. FAS now has the ability to issue certificates to users. 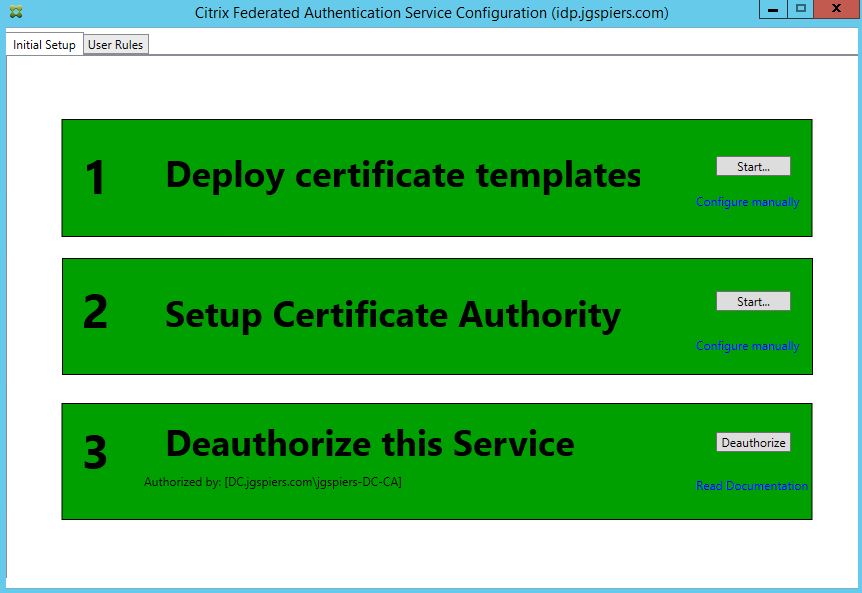
Click on the User Rules tab. A default rule has aleady been created. You can customise this rule, or create your own additional rules. Rules dictate which StoreFront servers can request certificates from FAS, which users certificates can be requested for and which VDAs can consume those certificates. Rules can be applied to different StoreFront servers using Group Policy. For now I will stick with the single default rule and make some modifications. Make sure Certificate Authority matches your CA (you can add multiple CA servers using PowerShell) and the Certificate Template is set to Citrix_SmartcardLogon. Click Edit beside List of Storefront servers that can use this rule. 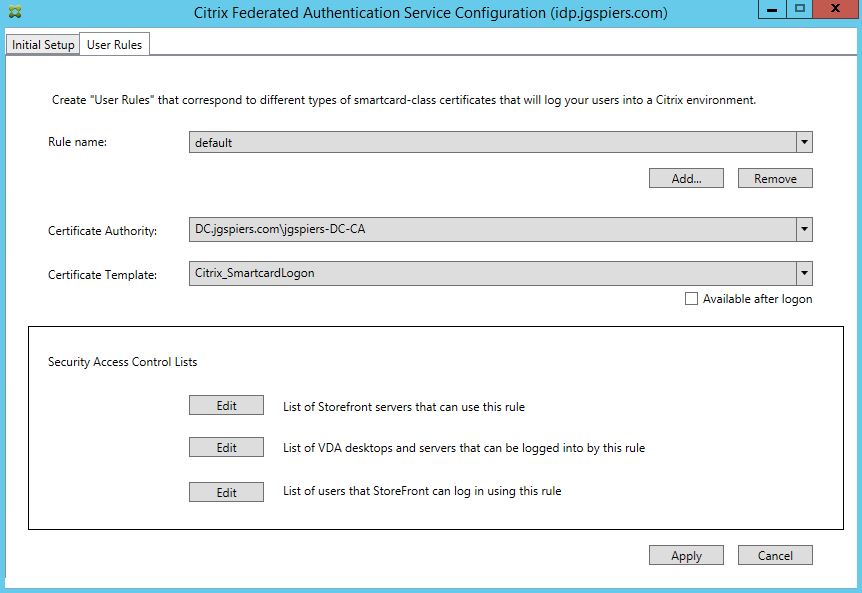
Ensure only your StoreFront servers have the Assert Identity permission. No other server should be included in the list. Click OK. Click Edit beside List of VDA desktops and servers that can be logged into by this rule. 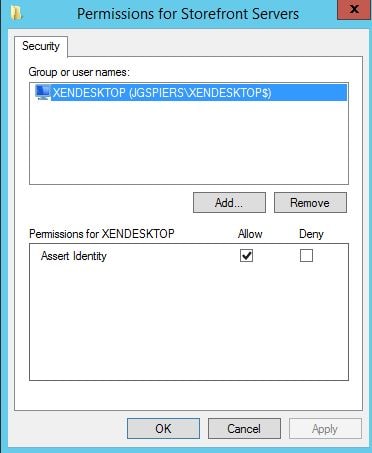
By default Domain Computers have Relying Party Allow rights. You can change this to specify that only certain VDA machines can be logged on to using FAS. Click OK. Click Edit beside List of users that StoreFront can log in using this rule. 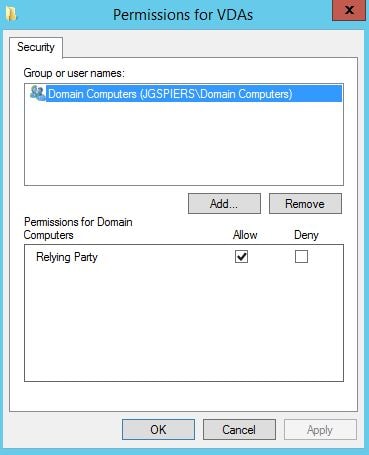
By default, Domain Users can log on using FAS. Again, you can change this. Click OK. 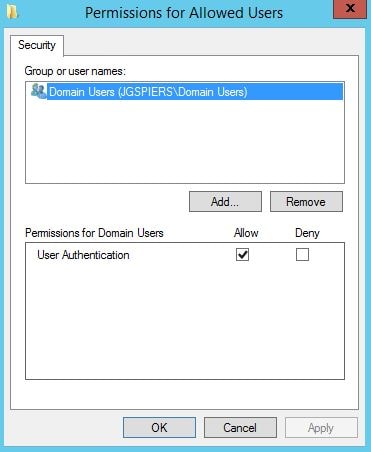
Once you are satisfied with all rules, click Apply and then OK. 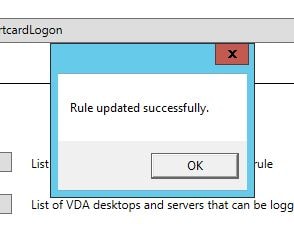
It is strongly recommended that you restrict the FAS server to only being allowed to issue certificates using the single Citrix_SmartCardLogon template and to certain users. Excluding administrators is a good example of users who should not be issued a certificate under FAS. You can configure restrictions within the Certificate Authority console. 
Configure StoreFront
Launch StoreFront. By this stage you will already have configured FAS against the store of your choice. Select that same store and click Manage Authentication Methods.

If you upgraded StoreFront from a pervious version to 3.9, you will not see SAML in the list of authentication methods like below. If you installed StoreFront 3.9 fresh you will. If you don’t see it, click Advanced -> Install or uninstall authentication methods.
Check SAML Authentication -> OK. 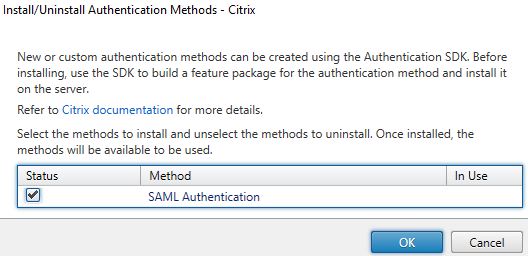
Click OK. Propagate this chane to any remaining StoreFront servers. 
Launch PowerShell on the same StoreFront server and run the following commands.
- Get-Module “Citrix.StoreFront.*” -ListAvailable | Import-Module
- $StoreVirtualPath = “/Citrix/Citrix” (Note: Change /Citrix/Citrix to your own store path)
- $Store = Get-STFStoreService -VirtualPath $StoreVirtualPath
- $Auth = Get-STFAuthenticationService -StoreService $Store
- Update-STFSamlIdPFromMetadata -AuthenticationService $auth -Url https://adfs.jgspiers.com/FederationMetadata/2007-06/FederationMetadata.xml (Note: Change adfs.jgspiers.com to your own ADFS URL)
At this stage the federation metadata is read from ADFS.

During the metadata importing process, StoreFront attempts to import the ADFS Signing-token certificate. If it is unable to read the subject name of the certificate for any reason, you’ll get an error as below and the StoreFront console will not load any settings.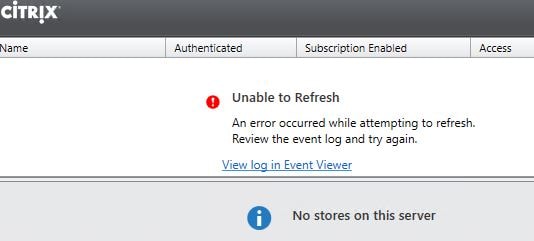
Event Log reports that the value for property subject is not valid. 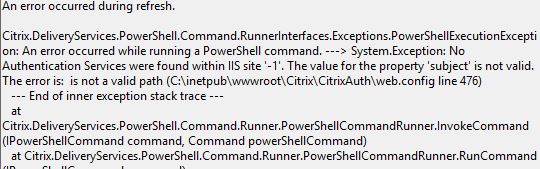
Open the web.config file located on StoreFront under C:\inetpub\wwwroot\Citrix\CitrixAuth\ and beside the subject line enter the certificates subject name. In my case, adfssigning.jgspiers.com. 
At this stage StoreFront will load properly. Navigate to Manage Authentication Methods and under SAML Authentication select Identity Provider.
You’ll notice the information that was abstracted from ADFS including the ADFS signing certificate and URL. Propogate changes to any remaining StoreFront servers and log on to your ADFS server.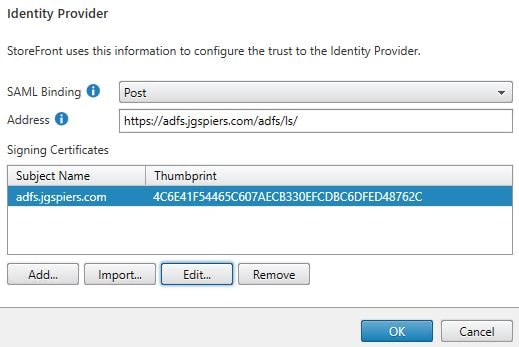
Add StoreFront Relying Party Trust
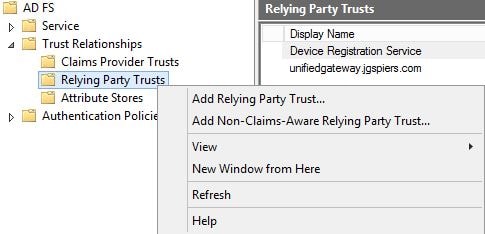
Launch the ADFS Management Console. Navigate to AD FS -> Trust Relationships -> Relying Party Trusts -> Add Relying Party Trust.
Click Start. 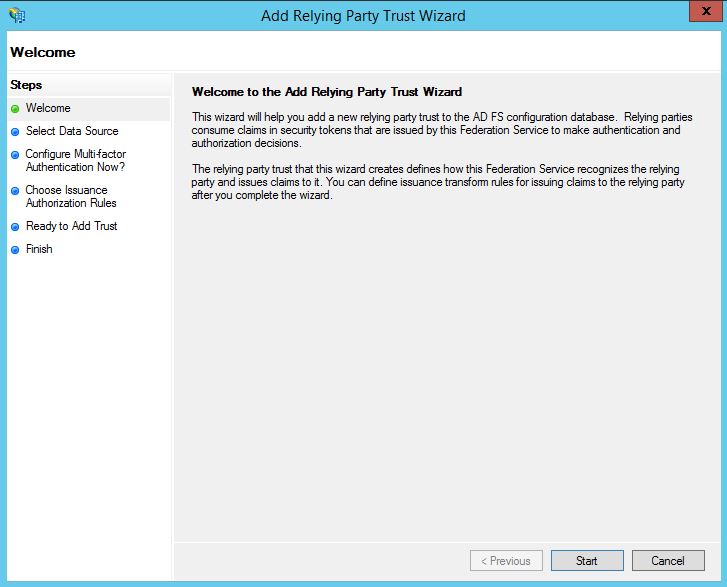
Check Import data about the relying party published online or on a local network and enter the Federation metadata address as below. Change xendesktop.jgspiers.com/Citrix/CitrixAuth to your own StoreFront URL and Citrix store name. For example, this could be yourstorefront.com/Citrix/YourStoreAuth. Click Next. If successful, ADFS should be able to read federation metadata from StoreFront.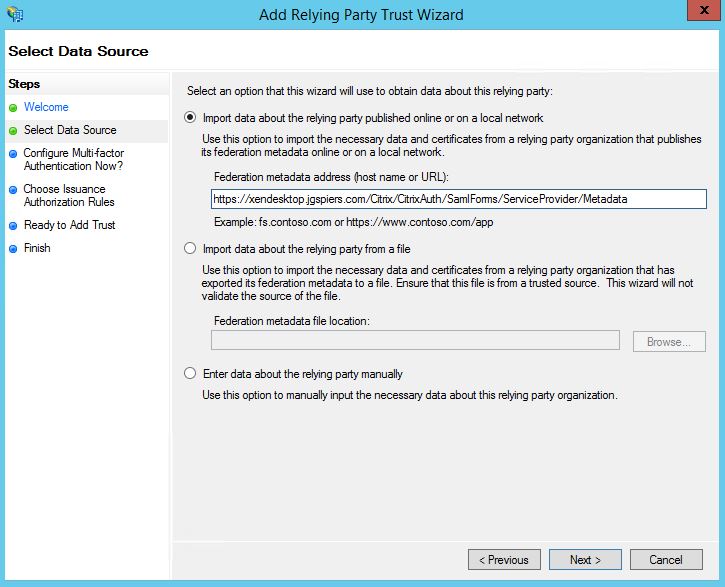
Enter a display name and click Next. 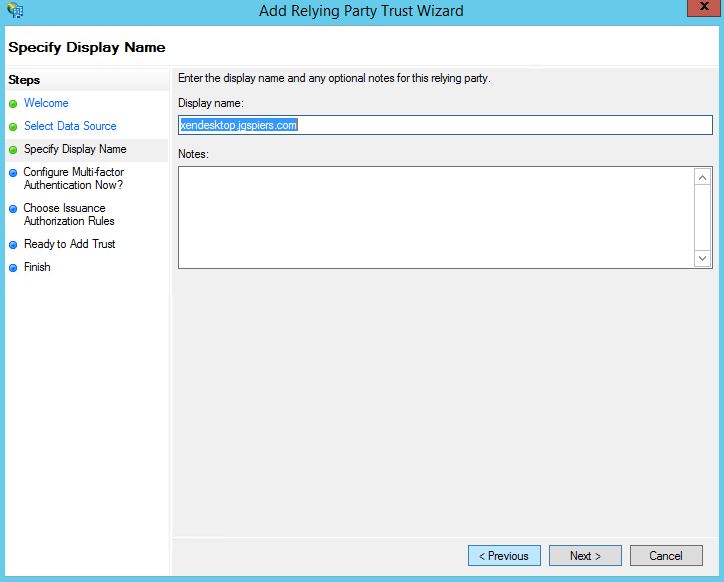
Click Next. 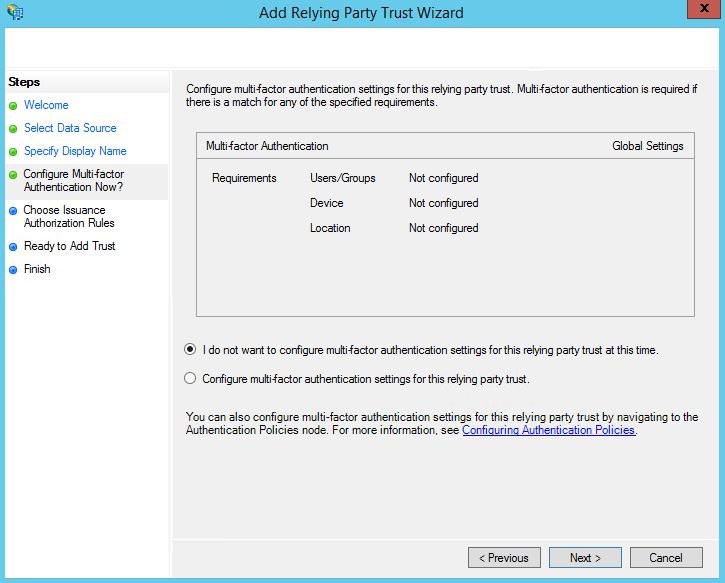
Click Next. This will permit all users. You can create specific Issuance Authorization Rules to allow users from certain Security Groups to be allowed or denied authentication to ADFS for example if you have a requirement.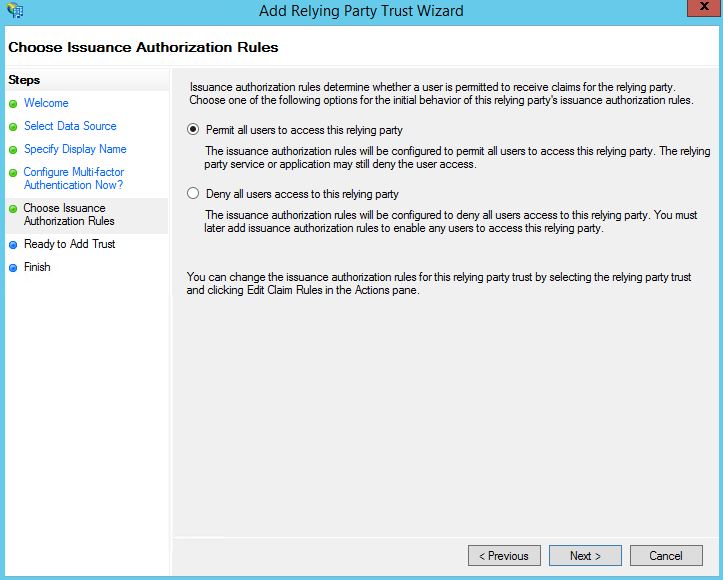
Review all imported settings and click Next. Signature and Encryption certificates will have been generated from StoreFront and imported to ADFS. 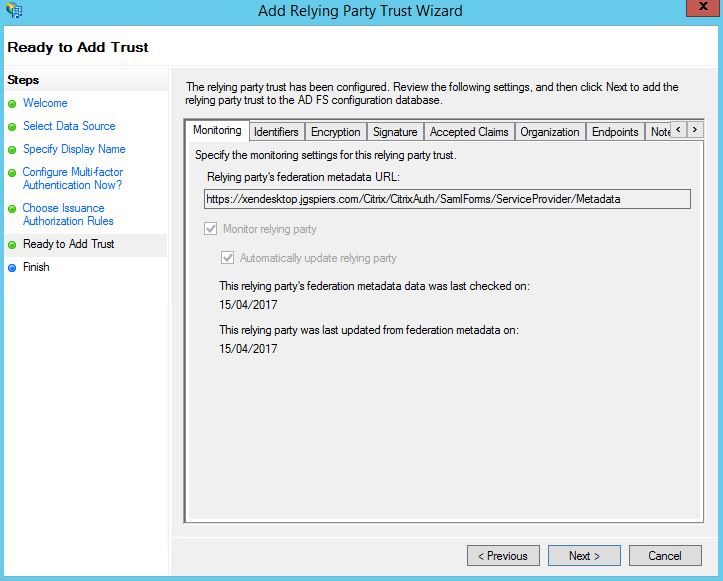
Keep the Open the Edit Claim Rules dialog box checked and click Close. 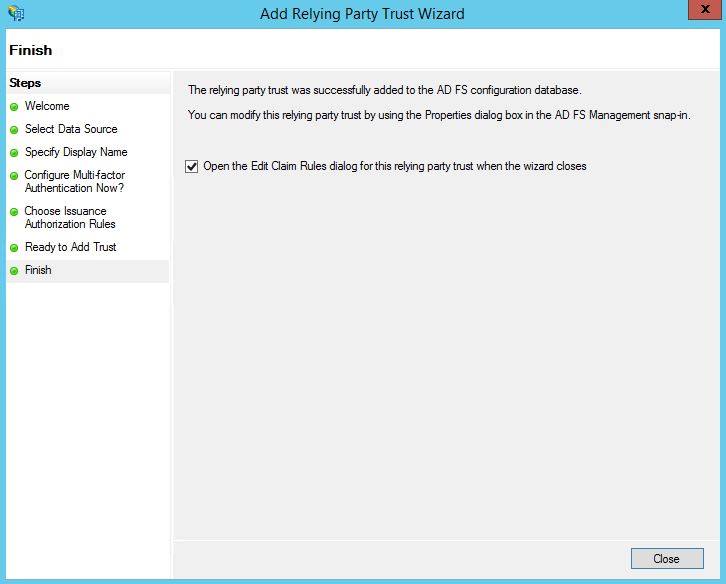
Click Add Rule. 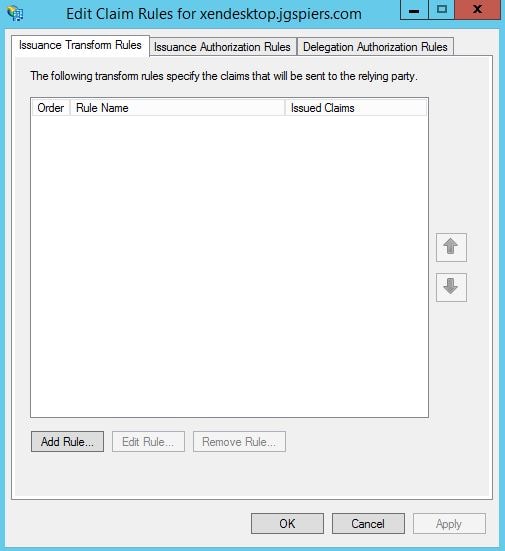
Using the Claim rule template dropdown, select Send LDAP Attributes as Claims. Click Next. 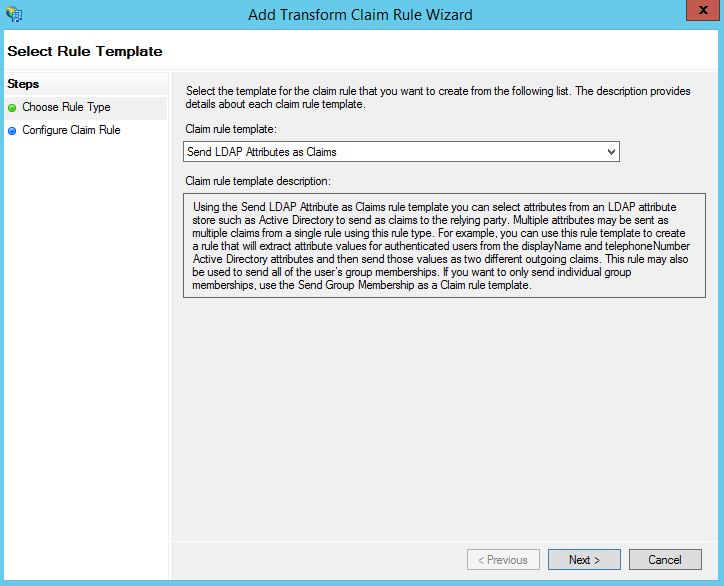
Enter a Claim rule name. Under Attribute store select Active Directory. Under LDAP Attribute enter User-Principal-Name and Name ID under Outgoing Claim Type. Click Finish. 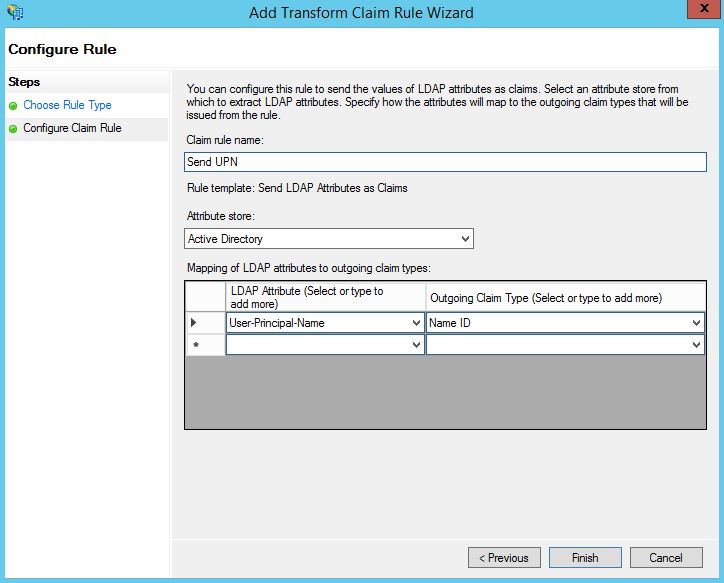
Click OK. 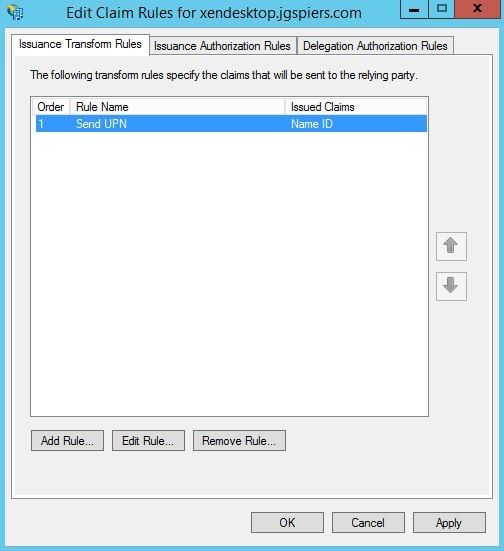
To test everything is working, enter your StoreFront URL as below. You’ll be asked for your username/password. When entered and accepted, you should be presented with the claims and assertion. 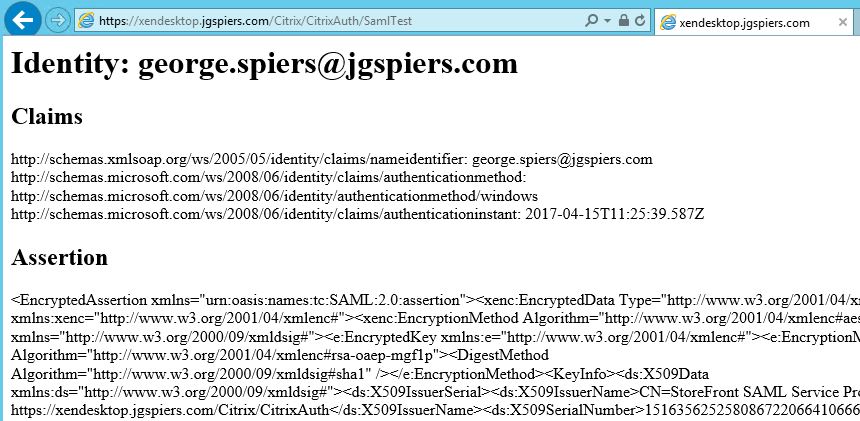
Using the StoreFront console, uncheck User name and password to use SAML only. Propagate changes to any remaining StoreFront servers.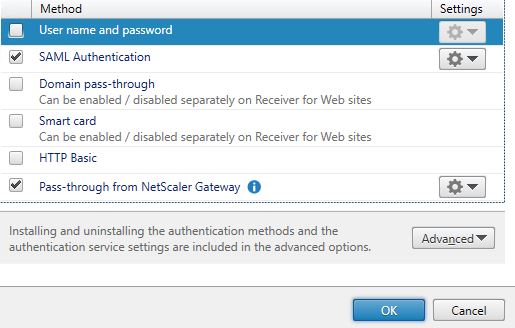
Log on to StoreFront using SAML
Now enter your StoreFront Receiver for Web address or use the Receiver for Windows client. You should be redirected to ADFS. Enter your credentials.
Note: If you are receiving a popup authentication box (WIA) you may need to edit the ADFS Global Authentication Policy to allow forms based authentication.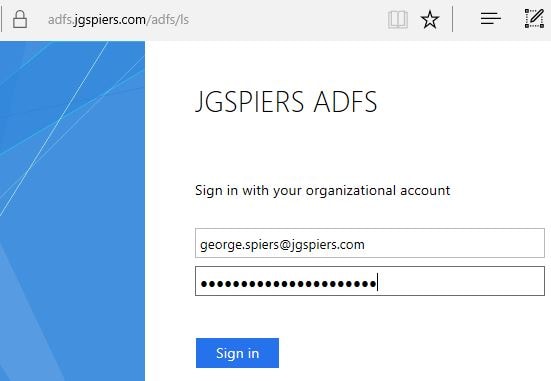
If successful you’ll be directed back to StoreFront and shown your applications and desktops. 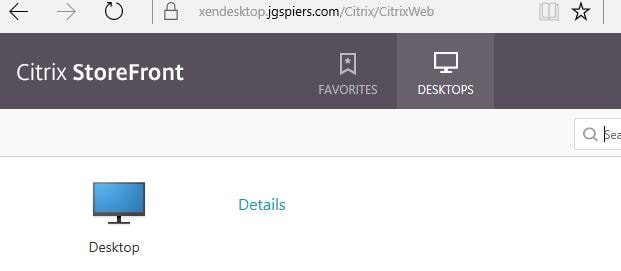
Events Logs, viewing and revoking issued Certificates from FAS
Once the user authenticates with ADFS, StoreFront issues an identity assertion to FAS for user george.spiers@jgspiers.com. 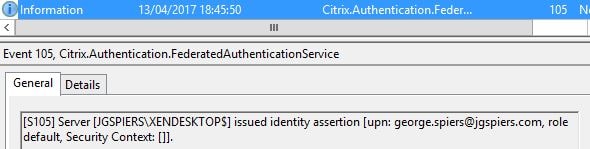
FAS then begins the issuing of a certificate to user george.spiers@jgspiers.com. 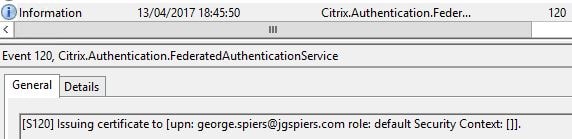
A certificate request is made to the Certificate Authority. 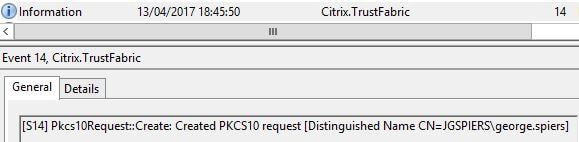
If the request is granted, FAS issues a certificate to george.spiers@jgspiers.com. 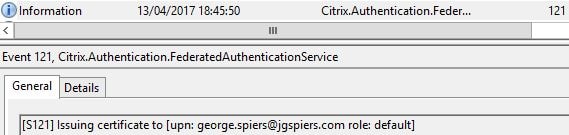
The request details are logged. 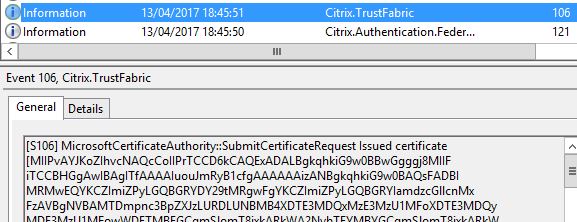
FAS keeps hold of the certificate and private key. The private key is not shared with StoreFront. 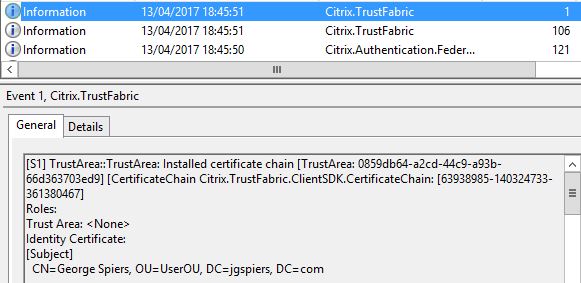
As a user connects to a VDA, the VDA reports that an Identity Assertion Logon is occuring along with details of the user logging on. 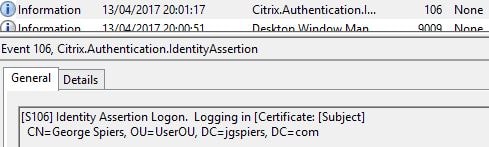
The certificate request can be seen from the Certificate Authority console. ![]()
If you double-click on the request, you can see the certificate which expires in 7 days. 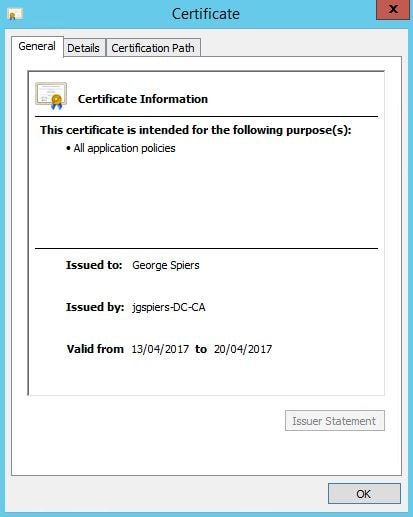
You can also view issued certificates that are cached on the FAS server. Launch PowerShell and issue command Add-PSSnapin Citrix.Authentication.FederatedAuthenticationService.V1 or asnp citrix.* and Get-FASUserCertificate -Address IDP.jgspiers.com with address being your FAS server name. These certficates will be cached by default for 7 days. 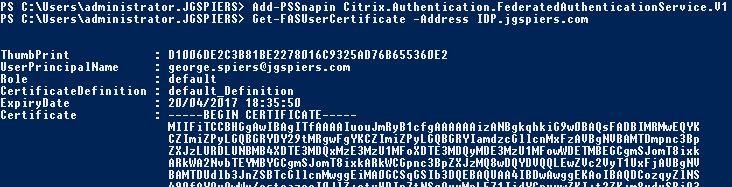
If in-session certificates are enabled, StoreFront again issues an assertion to FAS. 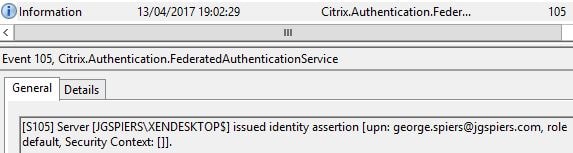
A record is then generated to say that VDA1 is accessing the issued certificate for user george.spiers@jgspiers.com. 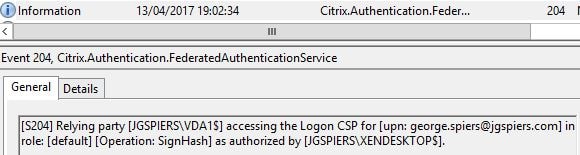
You can remove FAS issued certificates for specific users using a command such as Remove-FASUserCertificate -Address IDP.jgspiers.com -UserPrincipalName george.spiers@jgspiers.com from PowerShell on your FAS server. If you run the same command without the -UserPricipalName switch, all issued certificates will be removed from the specified FAS server. ![]()
You can also pre-generate certificates using New-FASUserCertificate. This could help in situations where you want to pre-generate certificates during non-peak hours to reduce load on FAS and ADCS servers.
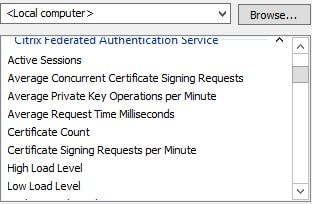
A number of performance counters come installed on the FAS server after you have installed the FAS role. These are helpful in determining how many certificates FAS has currently enrolled, how quick certificates are generated, signed and so on. Certificate generation normally takes around 1 second, the certificate is then cached for 7 days to make logons faster however assertions will still be made to FAS from StoreFront and the VDA when users are re-authenticating within the 7 days.
anaturea
December 11, 2017Since xenapp and xendesktop 7 9 and storefront 3 6 it is possible to use saml authentication with a number of external identity providers and integrate that with the.
Jerem
October 16, 2019Hello,
Thanks for this tutorial 🙂
FAS can be configured on 443 or only 80 working ?